 Well, this has been an interesting journey (a deep learning WEEK more like it) as I’ve been working on making my own widgets for Node-Red. I thought I’d share some of the things I’ve picked up. Experienced JavaScript object users please look away now. Those not interested in JavaScript look away now.
Note: The original video for this is out of date as I have learned more – the new video has some extra code, too – here it is - https://youtu.be/mTAPrvB1EeI
C Programmer: As a life-long C programmer, I came into JavaScript with some trepidation. Like alternative universes, JavaScript may look similar to C – but it is not the same – and that led to all manner of silly mistakes over time. However as I see a tiny light at the end of the tunnel, I have to say, it was worth the effort. Despite being a client-side interpreted language, it really is great fun to use.
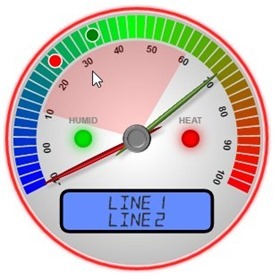
The gauge: Well, as long as you keep it simple that is. When designing my first attempt at a gauge for Node-Red, I realised that a typical gauge operation goes like this:
Some features such as the background are typically set in an init function once only (and as such it would be better if the user is not involved in this. Other features such as needle positions are set dynamically and will change during operation.
This is generally handled one of two ways – either by setting a value and then calling an update function, or by running something in the background which checks for value changes so all you have to do is change a variable. On many of the gauges you’ll see flashing lights and smooth movement of gauge needles – that implies something running constantly or at least checking for changes and running when change is needed.
Concerns: This worries me as there can be quite some overhead in updating an entire gauge, umpteen times a second. So I decided that what was needed was a layering system as you might find in Photoshop – such that I could lay down the basic design and background of a gauge once only then dynamically clear and write to a top layer whenever changes are required. Such changes might include the state of a flashing light – or a needle not being where you want it, requiring successive incremental updates until the needle or needles do get to be where you want.
I then started thinking about variables and functions (methods). Did I want to update variables such as the needle pointer directly (direct variable manipulation) – or did I want to manipulate the input value before passing it through (that needs a method/function).
That led me to create, as you will have seen earlier, a large blob of JavaScript for my gauge, including initial setup – then a timer-driven function to update the gauge regularly. That was stage one.
HTML5 Canvas: In the process I discovered (by looking at what others had done) that HTML5 Canvas (which really is easy once you get past the initial learning curve) Is a great choice. What did not come so easily was the realisation that the canvasses themselves are indeed transparent and you can layer one directly on top of another – just like Gimp or Photoshop layers. That led me to split the job into two – the overall backdrop which remains fixed throughout operation – and the top layer with my LEDs, needles and set points on it.
Adding a bunch of variables to this for setup and defaults brought me out into a sweat as I struggled to imagine how two or more gauges would interact. And THAT led me onto objects – something I’d never really touched in JavaScript before – specifically to wrap up my entire code into a definition – which meant I could then simply create instances for EACH gauge without worrying about all those variables interacting. That was the point I last few days in deep learning.
Having wrapped everything up in a bulletproof package I was then faced with the question of how to access required functions and data externally. The obvious way (and the one I’ve adopted) is a series of callable functions for example: mygauge1.needle1(50);
In the process I had to learn how to hide functions within the definition and make functions accessible externally. That was easy enough.
Here is a simple example – the assumption is that you have a jQuery link (to update a div) and a DIV called “fred”
1. function myobj(){
2. this.v1=5;
3. init=function(passThis) { setInterval(every25ms, 25,passThis); }
4. this.doubleit=function(r) { this.v1=r*2; }
5. every25ms=function (passThis) { $("#fred").html(passThis.v1); }
6. init(this);
7. }8. brian=new myobj;
9. //brian.doubleit(12);
10. //brian.v1=7;
There is a lot to this – and I’ll be using the word “this” a lot – so for clarify I’ll use italics for the special meaning of this. It may look strange at first but if you follow me it soon won’t.
Definition: So the point of this was to create a test object definition – an object that would simply put a value in a DIV (I know, slightly overkill but I was trying to prove a point). We start off with the definition in line 1.
Take a look at the code above – there is a lot in here despite their being only 9 lines. I figured any more and people might run away.
Firstly on line 1, we define a type of object. A “myobj” type. I’m not making anything here – just defining it (ends in line 7).
On line 2 – we define an externally available variable – v1. “this” makes it accessible externally (try removing “this”).
In line 3, we are defining a function called init. When the instance is created on line 8, init will be called internally (by line 6) and will start off a timer which will run every 25ms and which will call an internal function called “every25ms” (line 5), passing this to it. Do not get hung up on this yet.
Line 4 defines a function (again made available externally by “this” and called “doubleit”, will double whatever is passed to it.
The “every25ms” function on line 5 which is to be called every 25ms by init… simply prints out the local variable.
Line 6 calls init (which is NOT accessible externally) when the instance is created in line 8 - to initialise the instance and start off the timer – this saves running an init externally. From line 8 onwards, the function “every25ms” is called every 25ms to put the value of this.v1 onto the DIV.
You’ll see “5” appear in your DIV if you test this somewhere – that’s the initial value. Note "passThis" – (arbitrary name). Because the function init is private - I don't prefix it with "this" – when it sets the interval timer it has pass to the timer function the outer “this”… - so I pass "this" in the init call. This is new as a result of feedback in here suggesting a private “init” function that was no accessible externally. In the original version I used this.init() - and passing this worked. Removing that resulted in the timer callback function using the wrong "this". Trace it through and it makes sense. The callback function needs to know about the outer "this".
Line 8 is where things start to happen. At that point, the instance (brian) is created and the timer starts all on it’s own - thanks to the internal init function.
So far so good. How do I now interact with that variable v1? I wanted the choice of updating a variable or calling a function. The two commented lines are two ways to do this – their operation should be self-explanatory.
Line 9 simply won’t interact with local functions inside the definition and we don’t want them to – we want interaction with specific functions in each instance of the object – like “brian” for example. And that’s where “this” comes in. Add “this” to a variable name or a function name – and it becomes accessible to the outside world. For example you CANNOT do brian.init() or worse, brian.every25ms() and that’s a good thing!
Scope: So using this technique allowed me to keep all variables and functions private and only “expose” those I needed. LOVELY. If I only wanted to use function and not expose any variables – I would not use for example “this” as a prefix to v1.
These ideas then form the basis of my current gauge. I can built a massive machine with lots of variables and functions inside and have no worries about interactions with other gauges because I’m only “exposing” stuff I want…. and gauge1.v1 has nothing to do with gauge2.v1
Of course I’m assuming that was as clear as mud - but if you are interested, go have a play in this CodePen where I’ve left the code. See the number that comes up in the working area – try un-commenting those functions (methods) in lines 9 and 10. See what happens if you replace passThis.v1 with this.v1 or just v1. See what happens if you remove references to this altogether. CodePen is great as changes run immediately and safely.
Merely experimenting with the code in that CodePen should do what it did for me – clear a massive amount of mental fog.
Simply creating v1 – and removing this and passThis in referring to v1 – leads to disaster – v1 is accessible externally on it’s own –so kiss goodbye to multiple instances. But the same code using “var v1” leads to a save internal v1 NOT accessible as “brian.v1”. Your choice.
My new gauge object is coming along nicely – and a minimal installation involves little more than a link and a couple of lines of code – stunning how these simple ideas change the whole game.


