Quantcast
Channel: Scargill's Tech Blog
Viewing all 1391 articles
Browse latest View live

Sonoff 4CH 4 Channel Mains Control

$
0
0


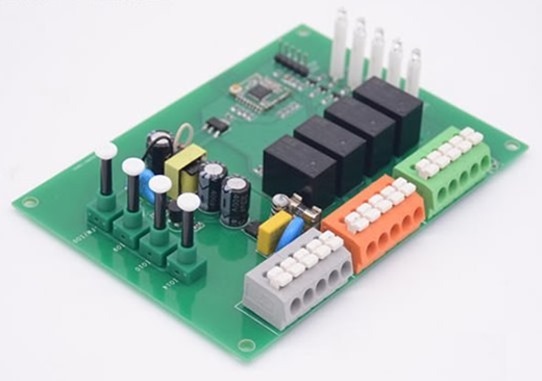
Sonoff Sonoff 4CHA parcel turned up for me today – the Sonoff 4CH. You may recall I wrote some time ago about a smaller version they put out and I was quite scathing about the wiring. I turned out as you recall that this was a third party product and they were in the process of making their own version. Well, this is it.

The unit uses an ESP8285 (like the 8266 but with built-in Flash) to make a low cost 4-way mains power switch in a very nice DIN box. The price of the unit, at around £11.53 + postage, makes it cheaper than some people charge just for the box!!!

If you read this blog regularly you’ll know I’ve no interest in running their products on their own cloud – and that despite having my own very comprehensive software, this fellow has recently IMHO taken the lead in powering Sonoff products with his code. Well, it just so happens he supports this boar,  so this morning I grabbed the latest software, put in my MQTT and WIFI credentials, made the one change to the code needed to run this board (a single define) and off I went to open the board up.

Inside is the usual handy programming connector needing 3v3 and ground as well as serial in and out from an FTDI. As usual, I broke all the rules and instead of using a proper 3v3 supply I powered the board for the purposes of programming, directly from the FTDI – remembering to set it to 3v3 and not 5v.  At first I got nowhere until I realised I still had my Arduino environment set to ESP8266 – a quick check and there is indeed a setting for the smaller board.

And that was it – nothing to report really – it works as you’d expect.  Now what I don’t understand are the little covers – which on one side of the board cover up the 4 buttons to turn the outputs on and off (one of them is also the programming button) and on the other side the LEDs.  I will be drilling 5 holes in there so I can actually see the LEDs – but that’s just me.

Itead Sonoff 4CHDIN mounting, well put-together, inexpensive 4-relay switching.  The information claims you can use a maximum of 2.5Kw and that each output is 10 amps… well, I’m not sure I’d want to put 10 amps through there especially inductive, maybe more like half of that, while obeying the total of no more than 2.5KW.  There’s a little fuse on the board on the incoming live - but to save opening it up in the event of problems and finding a tiny fuse, I’d be thinking about the lowest sensible value of fuse in your power lead. I put a 10 amp fuse in there and may yet replace it with a 5 amp (of course what this means depends on which side of the pond you are on – we Brits get a lot more power out of 10 amps than our American friends).

You may notice something odd  - or depending where you live you might not find it odd at all – the neutral block is green and the earth block is grey. You see, being a Brit – I associate earth with grass – i.e. green and our earth wire is either green or some combination of green and yellow… so I could see someone being caught out by that – you’ll notice my wiring looks off with the green earth heading into the grey box!!!   Those push connectors incidentally work a treat! With previous Sonoff products I had people asking me what to do with the Earth wire – no such problem here.

This one is going to Spain with me – we have Star wiring over there and spare room on the power DIN rail so this will fit in very nicely to control some lighting and one small heater over there. If you’re starting from scratch this could make a decent low-cost-per-relay move into home control along with whatever software you use to control things – in my case – I send commands out from Node-Red via MQTT straight to the board over WIFI.


ITead Sonoff 4CH circuit board


At least on the surface, another winner from this company. Don’t all rush as Itead are on Chinese holiday until 3rd of Feb!

Facebooktwittergoogle_pluspinterestlinkedin

A week of Learning

$
0
0

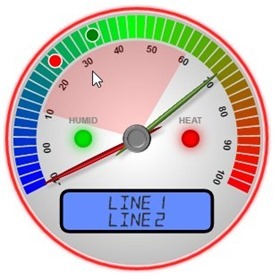
Working on the gauge in CodePenSome may be wondering if I’ve gone off on holiday, as I normally post here on an almost daily basis. Well, if you regularly read the comments sections you’ll see I’ve been heavily involved in answering questions, but more importantly I’ve taken one step back and two steps forward on this gauge thing. Read on.

But firstly – WIN SOMETHING! You’ve probably heard me talk about my pal Peter Oakes in Canada – he has an excellent YouTube Channel in which he talks about IOT – well, he’s just launched a competition and the prizes look pretty damned impressive indeed. Take a quick looks over here – you might want to participate…. https://www.hackster.io/contests/IOT2020

Thanks:  Before going any further, I’d like to take this opportunity to thank some people in there without naming names – for several donations received this week – you have no idea how this helps motivation, knowing that your work is appreciated. Thank you, guys!

The Gauge: Now - regular visitors will know I’ve been doing a lot of work on Node-Red-Dashboard-compatible widgets recently as I really do think this is the way forward for mobile access to DIY home control systems and also for desktop and wall access via touch displays -  but one thing that has bothered me up to now was the clumsiness of some of my coding – global variables all over the place, a lot of opportunity for interference from one node to another etc. Everything just works but the perfectionist in me wants to “do the job properly”.

So earlier this week I took a step back, seeing what “proper programmers” had done with turning these widgets into “objects”, with clean interfacing to the outside world. Well, trust me, it isn’t that easy. I asked around as to how I might encapsulate my Javascript into an object, exposing only those bits that needed to be exposed. No-one I know well enough to ask for help, could help in this particular instance! So, I took a step back, grabbed some coffee and thanks to my friend Google, I’m pleased to say I’m getting somewhere.

Shortly you will see my gauge once again featured in these pages but the way it is done and bits you’ll need to look at have been dramatically changed as has the chance of unwanted interaction – and the overhead has been substantially reduced due to a series of insights which have followed each other – and some of them I’m sure some others have missed. Read on.

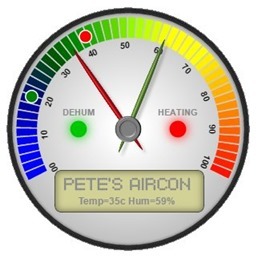
So first off, I made a gauge with pretty colours – you’ll see it elsewhere in this blog. It works – why take it any further?

Well, the gauge features nice, smoothly moving needles and other bits. What’s wrong with that?  Every time the needle is updated in the existing design, the entire gauge has to be re-drawn. This is not uncommon but just felt wrong to me. To tackle this I had to understand LAYERS. It turns out that if you make the position of CANVASSES absolute, you can put one on top of another (you also need to understand zIndex but that’s easy). If you can do that, then you can draw the gauge backdrop including the text and pretty-coloured segments once only on the bottom layer and only then clear and update the top layer, say, 50 times a second with needle updates etc. That saves some calculating.

But now I needed two CANVAS items which looks a little odd when setting up so I worked out how to create both, totally in Javascript. That led to another problem, in Node-Red you can’t just put your CANVAS elements in the top left corner of the page BODY – it won’t work. I then reasoned that both CANVASSES could sit inside a DIV on top of each others – and indeed they can. So now all that is needed in HTML is to define a DIV and the Javascript will do the rest.

That still left me with a mass of messy Javascript - and the thought of explaining what was and what was not relevant to end users in the blog here was keeping me awake. That’s when I started looking into this whole object encapsulation thing. 2 days ago that was a distant world, something for the future. Today, I wonder why I waited so long to take the effort to learn. I had to learn some new tricks in the process – however, when you eventually see the new gauge, setting it up will be as easy as this.

var gauge1= new petesGauge;

gauge1.init({
  container: "myDiv",
  });


gauge1.value1(90);

Define a gauge, point it to a DIV at which point it appears magically – and then dynamically set a value which will slowly change in front of your eyes. No other information exposed to the outside world, no need to do anything other than set up an empty DIV and add a link to the Javascript compressed library.

Part of the magic here is in the encapsulation I’ve learned to handle – but also of course there are many defaults. In the top section you’ll be able to override defaults and turns things on and off if you want – and in the bottom section there will be several settable items – the value of two gauge needles, the value of set points, visibility of LEDs etc. All easy to use options.

I’m on the right path – I understand what I’m doing but I’ve only so much time to code this up.

If anyone fancies themselves a whiz at JS Objects, I’ve fathomed out how to get and set global vars in the object with simple methods – no problem but can i hell interact externally with internal vars – happy to have a chat with anyone interested in enlightening me.

jsFiddle helped me get this far but the best tool for the job IMHO apart from lack of formatting – is CodePen – you can make code changes dynamically and see changes in real time – what a difference this makes. Oh and I realised the one thing missing from my LCD display (not shown above) is the overspill of side lighting typically seen on real LCD displays. That’s coming soon.

New Toys: I’ve also discovered (thanks to MrShark) Atom this week which promises to be a great editor both in Windows and on my little SBCs.  My MINT installation, apart from falling to bits visually after a “sleep” operation, continues to function well on the laptop and I’ve received some nice new DIN rail brackets from China which can screw onto the back of a perspex sheet for mounting boards and supplies. More on all of this later. Incidentally for those wondering, my testbed wireless Orange Pi Zero and twin NanoPi M3 units are still sitting on the bench, still working perfectly despite disconnecting the WIFI several times deliberately.

Desktop Touch Controller: And on another subject, how is my Desktop Pi Touch Controller doing? For some time Desktop Controllernow I’ve had a 5” touch screen attached to a Raspberry Pi 2, using Node-Red Dashboard as a simple controller for my office – to turn lights on and off and keep an eye on temperatures etc.  Works a treat using Chromium in “kiosk mode” – but two things have annoyed me – one being that menu from Node-Red Dashboard – the second being the ability of the browser to fail occasionally due to connection issues and put up a stupid message instead of trying to reconnect.  Well, I may have cracked both of these as for the last few days the little unit has been sitting there rock-solidly doing it’s job.

The annoying Node-Red-Dashboard unwanted menu problem (well I only have one page on this unit – why do I want a menu) was solved simply by a reader who wrote in to suggest this added to the style.

#toolbar {display:none;}

Yes, that’s it – simple as that. Gone – space retrieved.

The second came from here. http://www.labs.bristolmuseums.org.uk/running-google-chrome-in-kiosk-mode-tips-tricks-and-workarounds/

So I have a couple of templates on the page – one at the top with my CSS and some useful Javascript – the second at the bottom.

I’ve added this to the top

<body onClick=”location.reload()”>

and this to the bottom.

<script type=”text/javascript”> $(function() { setTimeout(function () { if($(“#VisitorStoriesHelpText”).length>0){ $(‘body’).attr(“onClick”,””) } }, 1 * 1 * 1000);}); </script>

And yes, I know that body code is really not appropriate in a Node-Red template – but guess what… it seems to work. I’ve not had an issue with the display for days now. May be a fluke of course – but fingers crossed.

Facebooktwittergoogle_pluspinterestlinkedin

A Deep Learning Weekend

$
0
0

Gauge by Peter ScargillWell, this has been an interesting journey as I’ve been working on making my own widgets for Node-Red. I thought I’d share some of the things I’ve picked up. There’s a short video to go with this. Experienced JavaScript object users please look away now. Those not interested in JavaScript look away now.

C Programmer: As a life-long C programmer, I came into JavaScript with some trepidation. Like alternative universes, JavaScript may look similar to C – but it is not the same – and that led to all manner of silly mistakes over time. However as I see a tiny light at the end of the tunnel, I have to say, it was worth the effort. Despite being a client-side interpreted language, it really is great fun to use.

The gauge: Well, as long as you keep it simple that is. When designing my first attempt at a gauge for Node-Red, I realised that a typical gauge operation goes like this:

Some features such as the background are typically set in an init function, once only. Other features such as needle positions are set dynamically and will change during operation.

This is generally handled one of two ways – either by setting a value and then calling an update function, or by running something in the background which checks for value changes so all you have to do is change a variable. On many of the gauges you’ll see flashing lights and smooth movement of gauge needles – that implies something running constantly or at least checking for changes and running when change is needed.

Concerns: This worries me as there can be quite some overhead in updating an entire gauge, umpteen times a second. So I decided that what was needed was a layering system as you might find in Photoshop – such that I could lay down the basic design and background of a gauge once only then dynamically clear and write to a top layer whenever changes are required. Such changes might include the state of a flashing light – or a needle not being where you want it, requiring successive incremental updates until the needle or needles do get to be where you want.

I then started thinking about variables and functions (methods). Did I want to update variables such as the needle pointer directly (direct variable manipulation) – or did I want to do a one-off correction to the input value before passing it through (that needs  a method/function).

That led me to create, as you will have seen earlier, a large blob of JavaScript for my gauge, including initial setup – then a timer-driven function to update the gauge regularly. That was stage one.

HTML5 Canvas: In the process I discovered (by looking at what others had done) that HTML5 Canvas (which really is easy once you get past the initial learning curve) Is a great choice. What did not come so easily was the realisation that the canvasses themselves are indeed transparent and you can layer one directly on top of another – just like Gimp or Photoshop layers. That led me to split the job into two – the overall backdrop which remains fixed throughout operation – and the top layer with my LEDs, needles and set points on it.

Adding a bunch of variables to this for setup and defaults brought me out into a sweat as I struggled to imagine how two or more gauges would interact. And THAT led me onto objects – something I’d never really touched in JavaScript before  – specifically to wrap up my entire code into a definition – which meant I could then simply create instances for each gauge without worrying about all those variables interacting. That was the point I lost two days in deep learning last week.

Having wrapped everything up in a bulletproof package I was then faced with the question of how to make updates outside the package. The obvious way (and the one I’ve adopted) is a series of callable functions i.e. mygauge1.needle1(50);

In the process I had to learn how to make functions accessible outside of the “object”. That was easy enough.

Here is a simple example – the assumption is that you have a jQuery link (to update a div) and a DIV called “fred”

1. function myobj(){
2. this.init=function() { this.v1=5; setInterval(test, 25,this); }
3. this.doubleit=function(r) { this.v1=r*2; }
4. test=function (localthis) { $("#fred").html(localthis.v1); }
5. }
6. brian=new myobj;
7. brian.init();
8. // brian.doubleit(12);
9. // brian.v1=7;

There is a lot to this – and I’ll be using the word “this” a lot – so for clarify I’ll use italics for the special meaning of this.  It may look strange at first but if you follow me it soon won’t.

Definition: So the point of this was to create a test object definition – an object that would simply put a value in a DIV (I know, slightly overkill but I was trying to prove a point).  We start off with the definition in line 1.

Take a look at the code above – there is a lot in here despite their being only 9 lines. I figured any more and people might run away.

First things first on line 1 – define the object.  I’m not making anything here – just defining it (ending in line 5).

Within the object I’m defining is a function called init (line 2). That does two things – it sets a local variable to 5 and starts off a timer which will run every 25ms and which will call an internal function called test, passing this to it. Stop – do not get hung up on this yet.

Line 3 defines a function that doubles that local variable.

Line 4 defines the function that will be called every 25ms.

Line 6 is where things start to happen. I’m making an instance of my object and calling it brian. At this point nothing happens.

Line 7 I call the internal init function – which does two things – it sets v1 to value 5 and starts the timer – and from there on the function “test” is called every 25ms to put the value of v1 onto the DIV. You’ll see “5” appear in your DIV if you test this somewhere.

So far so good. How do I now interact with that value. I wanted the choice of updating a variable or calling a function. The two commented lines are two ways to do this – their operation should be self-explanatory.

But here’s the think. Line 9 simply won’t interact with local variables inside the definition and we don’t want them to – we want interaction with specific instances of the object – like “brian” for example. And that’s where “this” comes in. Add that to a variable name or a function name – and it becomes accessible to the outside world. For example you CANNOT do brian.test()  and that’s a good thing!

Scope: So plastering this all over the place allowed me to keep all variables and functions private and only “expose” those I needed. LOVELY. But for one thing – it didn’t work.

I could not show the value of v1 in the div.  Had I kept it completely private by not using this, it would have worked. And then I realised WHY. this refers to the current place – i.e. inside of brian in this case. But the function “test” runs asynchronously every 25 ms. It isn’t part of this. Indeed it has it’s own this.  so inside test, this.v1 referred to something that doesn’t exist. It occurred to me that JavaScript which will basically let you pass anything in a function, would not mind if I passed this to the test function… so I did. Clearly I’d have to call it something else in the function – so I called it localthis. And guess what – it worked.

These ideas then form the basis of my current gauge. I can built a massive machine with lots of variables and functions inside and have no worries about interactions with other gauges because I’m only “exposing” stuff I want…. and gauge1.v1 has nothing to do with gauge2.v1

Of course I’m assuming that was as clear as mud-  but if you are interested, go have a play in this CodePen where I’ve left the code. See the number that comes up in the working area – try un-commenting those functions (methods) in lines 8 and 9. See what happens if you replace localthis.v1 with this.v1 or just v1.  See what happens if you remove references to this altogether. CodePen is great as changes run immediately and the

Merely experimenting with the code in that CodePen should do what it did for me – clear a massive amount of mental fog.

My new gauge object is coming along nicely – and a minimal installation involves little more than a link and a couple of lines of code – stunning how these simple ideas change the whole game.

I’ve made a short video of this for those who prefer visual - https://youtu.be/6_it9oTf580

Facebooktwittergoogle_pluspinterestlinkedin

NR Templates and the Inject Node

$
0
0

When testing Node-Red, the common INJECT node is invaluable. Indeed it is just about the only way to instantly inject information into another node. Here is a typical example.

Inject and Debug Nodes

It doesn’t get any simpler than this. Here I have merely dropped an “Inject” node onto the Node-Red working surface along with a “Debug” node. I’ve made no changes to either of them.  Note that “inject” and “debug” nodes come as standard with Node-Red.

Node-Red setup

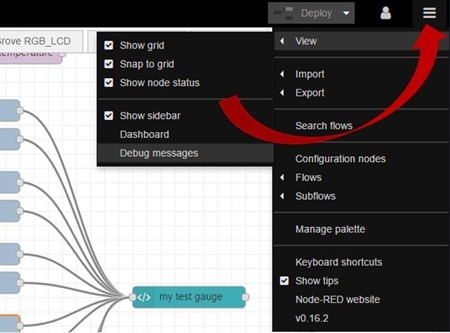
Correctly set up, on the right of the Node-Red screen, you can see (or make available via the top-right three horizontal bars – view – “debug messages”) a debug window and simply by pressing that button-like item to the left of the inject node, you can put a timestamp into the debug window as such:

Debug window

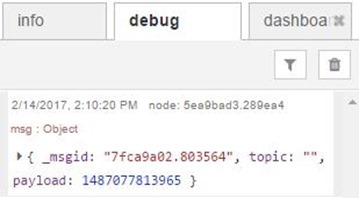
Simple enough. Note that this says (in red) “msg.payload”.  In homage I guess to MQTT, the inject node outputs a simple object which deals primarily with msg.topic and msg.payload. You can use these for whatever messages you want.  The debug node by default shows only msg.payload but you can of course change this to show the entire message object.

Full debug message

Note that here (image above) we also see a blank topic (because the unmodified inject node has that as empty – you could put “Merry Christmas” in there if you like. Also included is _msgid which is of no interest to us for now unless you have a specific need for a unit number.

In general then,  you can fire out msg.topic and msg.payload from the inject node.  Instead of putting out a timestamp,  you can put out a string (for example “Hello world”) and this is output in msg.payload.

Hello world

Output Hello World

Expanding the INJECT output

For many purposes, we are done – you know know how to output a value into msg.payload and you can easily add msg.topic to that.  An inject node then can directly output data suitable for, say an MQTT node which needs both msg.topic and msg.payload.

For some purposes however, this is not enough.

Messages

In the above image, I need to inject one of two messages into a template. Easy enough, “message 1” as string into one injector, “message 2” into another. But what if we have a string of messages for different purposes going into that template?

On way to differentiate them would be to use topic.

if (msg.topic==”needle1”)  { /*use msg.payload to influence  a gauge needle */ }
if (msg.topic==”lcd”) { /* use msg.payload to influence a display */ }

Another way to do this is by putting a function node after the inject node…

msg.needle=msg.payload;

The output of this then, is your message sitting inside msg.needle instead of msg.payload.

Do-able but two things about that. Firstly you still can only output one message at a time and now you have the extra work and additional screen real estate used up for the additional function node. Not very elegant. If that works for you – stop here.

So what if we want a simpler way that may include sending multiple messages out at once.

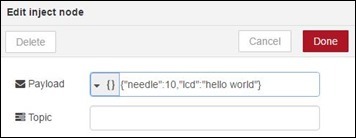
In the inject.node you can’t change the name of “msg.payload” – but you can change what it outputs – a number, a string etc.. and in this case of particular interest, JSON.

Let’s take an example. Let’s say that by pressing the test button we want to set a needle value to 10 AND we want to send the message “hello” to an LCD display in our gauge.

Sending an object

Sending several messages in a JSON string

This LOOKS like you are sending a string of text but look what comes out – when you view the debug payload:

image

Not a string, but an object  - but how do you make use of this? Simple. In your template – or function or whatever you are firing this message into:

if (msg.payload.needle!==undefined) { /*make use of msg.payload.needle */ }
if (msg.payload.lcd!==undefined) { /* make use of msg.payload.lcd  */ }

This way, directly from a single inject node you can send either one, or several messages at once. The check for undefined means you don’t always have to send all of them.

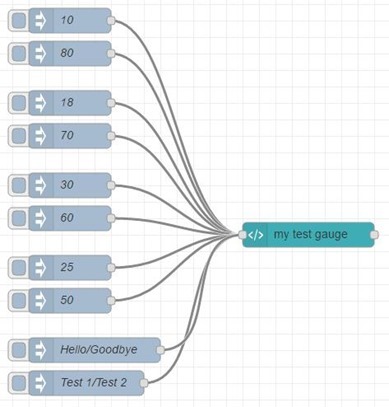
Hence, for example, in testing my gauge, I can have a number of buttons testing  different parts of the gauge and one of them sending messages to both lines of the internal LCD at once without making a big mess of the screen. In the example below, the bottom two injects each send 2 different commands to the gauge when pressed.

Testing the gauge

But what about existing objects

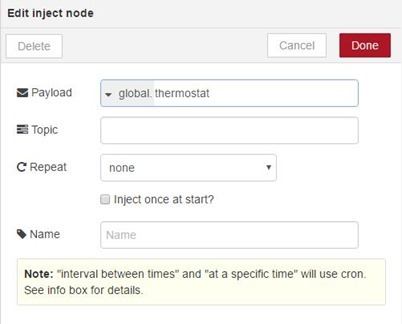
Another way to send multiple messages through the injector allows you to make use of existing global objects…

Injecting objects

In this example, I happen to have an existing object called “thermostat” – which can be referred to as “context.global.thermostat” though the more modern way to do that is by use of global.get and global.put.

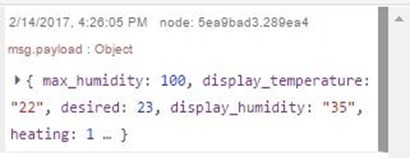
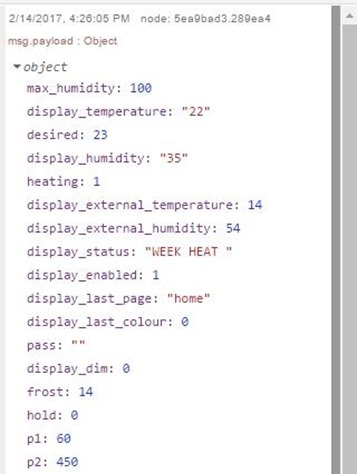
Armed with the above, which contains in this case lots of information about the state of my house… I can send that – either manually or of course in a timed fashion, to the debug node.

thermostat object

A little confusing at first until you notice the three dots at the bottom… which mean “I’m only showing you some of the result. Click on them and..

expanded object

Far too much information to display here – but I think you get the point – though msg.payload looks restrictive – in fact you can send a whole load of information thanks to the ability of the INJECT node to carry an object in msg.payload.

In this case, if you set DEBUG to look for msg.payload.desired you will indeed see a result of 23.

Can I create an object? Sure:

Test object creation

In this case – the content of the injector is irrelevant. Just drag it onto the screen.  Here we have (for the sake of it) two debug nodes – one is looking for msg.payload.actual and the other is looking for msg.payload.desired.

And here are the contents of that simple function node in the middle.

msg.payload={
desired:25,
actual:23
}
return msg;

Easy.

Facebooktwittergoogle_pluspinterestlinkedin

Odds and Ends

$
0
0

Just a few odds and ends… we’ve arrived safely in Spain and I’m not getting quite as much blogging time as I’d like as there are repair jobs to do – but I managed a little item on Node-Red earlier – I’ve had people in here asking for simple-use examples – so that’s the first.

Gauge Progress: I’ve not forgotten my HTML5 Canvas gauge – it’s coming along nicely but along the way I’m hitting minor bottlenecks on image loading – and image pre-loaders are not helping. Most but not all of this came to light when I moved thousands of miles away from home with the attendant delays! I’ll return to this one soon.

Node-Red Menus: Regular readers may recall from earlier blogs that I’ve been griping about the menu in Node-Red being there even if you have only one page. Some may have noticed that a blog reader pointed out a simple CSS solution – well, now there is better – Node-Red master as of now has an option to turn the menu off. I’d give it a day before updating to make sure the latest version had filtered through to updates.

Mint Linux: I wrote a while ago about this – so often these things fall by the wayside – well, I’m still using it – can’t find anything wrong with it on my little black laptop.  It isn’t Windows but for development work – it runs a lot faster on that old hardware than Windows 7 did and everything works right down to my Logitech Bluetooth headphones. Anyone else using this on an Intel-powered laptop?

Raspberry Pi Power backups: You’ll probably know I’ve covered this in the past – various solutions for backing up the little SBCs in the event of power failure. My best solution up to now has been RavPower battery charging units – but not all of them seem to work in the same way. I did find a little LIPO unit that works on one round 3v6 battery but it’s power output would not work for a RPI3 for example (which takes more power than the RPI2. Well, I’ve just discovered and sent off for one of these. It’ll take a few weeks but I’ll let you know how that goes. Anyone bought something similar? How did that go for you?

Facebooktwittergoogle_pluspinterestlinkedin

The LCD Object

$
0
0

lcdIt has been a very busy week for us here in Spain – what with partying and what-not, so I’ve not had as much time as I would like to develop my Javascript object skills, however, I’ve managed to get much further with a project I’ve been working on in the background – a little LCD display.

I wanted to simulate a real LCD and you’ll have seen in an earlier blog entry that I managed some Javascript code to do this.  Well, I’ve had all SORTS of unexpected issues, now resolved and I’ll detail here what I’ve done.

colour changeSo first off, I was having some interaction with other objects on the page – resolved – but an issue that came to light when I got here to Spain – with my little Raspberry Pi that is running this stuff left in England – was that of loading external items – for example, images and fonts.  Designing items for Node-Red Dashboard is slightly different to working on an empty web page as you’re basically working inside a DIV – you don’t have the luxury of ONLOAD and HEADERS etc and I found myself getting annoyed with my web seven-segment font not working when first loaded  - i.e. initial text would show up in a default font because of the time it takes to load the web font from England. I could not understand why this would always happen – surely there’s some caching going on? But if you read the comments in previous blogs – that apparently is not the case as the templates in Node-Red Desktop add a timestamp to URL calls which kills the cache. Well, not ALL of it but certainly makes life difficult when trying to load up fonts and images. 

LCD in redAnyway, the first idea that came out of various comments was to URL encode the fonts – and of course, wanting to keep with good practice I put all of that into a separate style sheet. NO! The page has to load the style sheet, so the problem doesn’t go away. The answer lay in having the font inline – now that SOUNDS messy but actually it’s not that big a deal especially if you don’t have wrapping turned on – it’s just a one liner – albeit a very long line. The breakthrough came when I read a suggested link which took me to Fontsquirrel – having initially used this 14-segment font for my LCD only to find that the capital S was a bit naff and the spacing was NOT identical on all characters, I was then quite excited when I found an excellent WOFF file called segment14 here.  Mono spaced and with a decent S.

Lovely, but of course this still had the same issue with loading – not a big issue at home but as soon as myself and the source were separated by a plane trip – the loading issue became apparent. Anyway, Joe Lippa and Antonio (Mr Shark) have been feeding me links and it turns out that Fontsquirrel can load up the font and return a CSS file with the code all inline (they don’t appear to have 7 or 14 segment fonts so it is as well you can upload fonts you have found -  and have them converted) – so no external loading.  In the data that came back was a WOFF data block and a WOFF2 data block – I ditched the former as the latter works just fine.  I’ve put links to fonts here – I’ve modified them for my own use but you should know I’m not claiming any ownership of the fonts – others have done the excellent work on designing the fonts.

Purple LCDWith the font issue resolved I set about making a basic object for a display (which will no doubt mutate – but right now can be dropped into a template in Node-Red to show lines of simulated 7-segment display in a variety of colours. Methods can be invoked to updated the two lines and to change the colours – both background and foreground. I managed my colours by trial and error but you can of course change them and add more.

Simple testing of the LCD objectThis, then, is merely the first stage – everything works – you can change colours and text… so much more can be done – choice of how many lines, how many characters, what font size etc. but all of that is easy to add once the basic idea is in place. This is going to be added to my armoury of gauges and shapes available in Node-Red Dashboard – I’m playing with the GITHUB beta right now and it is coming along VERY nicely – now that the actual template width and height can be tweaked.

Anyway, there it is… if you want to play with this – grab the code and paste into a template via the “import clipboard” option (top right – 3 bars)– yes, it’s big because of the font – but very do-able. You can replicate this and make two or more displays but more likely the object and font should be split off into another template if you plan to do that. 

Note that in my test inject nodes I am now injecting JSON, not text – just as easy but more powerful as you’ll see in the text injectors. See previous blog entries for related info on LCD simulation (alpha blending of the all-segments on character under the actual text).

If enough people are interested I can expand this to describe the workings of the code but specific questions are invited in the comments area (not 2 years later please).

Facebooktwittergoogle_pluspinterestlinkedin

Big Timer

$
0
0

tmp17DBBig Timer is probably the best timer for Node-Red, providing a general purpose timer as well as  handling summer/winter correctly as well as (importantly) lighting up time (for which it needs longitude and latitude). After all you probably don’t turn the outside lights on at 6pm!! You turn them on when it gets DARK.

Updated to v 1.5 – February 18, 2017

BigTimers

Why: Existing timers didn’t do what I wanted – also – I have a watering system – I want it to run at dusk and dawn every day – but not in December through February (ice)!  I had to have control over both days of the week and months. Existing timers didn’t do that either. Many seemed to be based on the old mechanical timers but without moving parts. That won’t do.

Firstly: the name. It’s a timer – but it’s a BIG one – so I’ve called it BigTimer. (note: the original scheduler is no longer developed – BigTimer does everything Scheduler does and much, much more).

Secondly: it has an input. You can inject various words into BigTimer – and get instant over-ride action. "1" or “on”, "0" or “off”. "auto" or  “default” etc. 

Does that need explaining? “on” for manual override to on, “off” for manual override to  off (both of which reset on the next auto state change), “default” or “auto” to return the timer to normal operation.

If you set the timer to come on, say at dusk and off at midnight, you can override the setting during the day by sending “on” to the input. This override will reset at the next auto change of state.

If you inject "manual" in conjunction with  “on” and “off”, the state will change until the set timeout (in minutes) times out - so if you turn the lights on in manual and forget you did it? The unit will return to default operation in X minutes (which you can set - defaulting to 24 hours - 1440 minutes) after any manual change you make. You can also send a "sync" command which simply outputs the current state with a side effect of decrementing the timeout counter - handy for testing.

Here is a test setup for BigTimer, just using simply injection nodes:

BigTimer test setup

And here’s what happens if you press ON (a simple inject – you can send that message in the payload by any means you like)…

Bigtimer test setup[6]

But what are those other two outputs?

Output 1: is a message – you control the topic and payload – so I use it, for example, as I do, to send a message to MQTT to control something. You can have this message go out once – or every minute. There are other components to the msg object on the first output, there for information only.

Object

In this example (version 1.5.0 of Bigtimer onwards) you see various items in the output -also note that this view is in Node-Red 0.16.2 which is different to older versions – I strongly recommend you upgrade if using an earlier version.

You can see msg.payload which is whatever you put in there to go off to, some other node to make something happen. In addition and for information only we have msg.state, msg.value, msg.AutoState, msg.manualState and others. You can ignore them but handy for checking. msg.state shows “on”, “off” or “none” and in the case of the first two (on/off) msg.time shows the time for the next change (version 1.2.86 and above)

Output 2: outputs a 1 or 0 every minute when checking (in msg.payload) – you can use that to light up something.

Output 3: puts out another text message in msg.payload which you can set – I point it to a speech synth so it might say “external lighting coming on”. There is one message for the ON state, another for the OFF state. Ignore it if you don’t have a use for it.

And to get this node?

Make sure you are in your Node-Red installation folder (for example /home/pi/.node-red) and type:

npm install node-red-contrib-bigtimer

So in my case, I keep all my nodes under /home/pi/.node-red/node-modules.  So I do the install from /home/pi/.node-red

Restart Node-red and Bob’s your uncle – it should appear on the left with the other Nodes. If you happen to have the ADMIN node in Node-red you don’t even need to do any of that – you can install node-red-contrib-bigtimer straight from the admin tab.

In addition, I have recently,  as a response to a sensible request from one of our blog readers, changed the code so that if either the ON payload or OFF payload is blank – then no message will be sent at that time – this means you can now easily OR timers together. So if you need several time intervals in a day or other complicated setup you can simply use a number of timers and feel the first output to one common destination!

Here’s an example of TWO timers simply sending stuff to a debug node for testing…

two BIGTIMERS

Backtrack for Newbies: Node-Red is a simple-to-use but very powerful visual tool for wiring the Internet of Things and a tool for connecting together hardware devices, APIs and online services in new and interesting ways. I control a range of Arduino and ESP-8266 devices using a Raspberry Pi2 (RPi3 would be even better but I’ve not yet noticed a slow down despite having many, many nodes in Node-Red) as my central controller using the Jessie operating system as of late May 2016 as it now has an excellent backup system. You can of course run Node-Red and the other tools I use on a wide range of machines – Orange Pi, Roseapple Pi, Odroid C2 etc using Debian, DietPi, Xenial etc. I even have my normal installation script running on a laptop using Mint Linux.

tmp871On this particular Pi I run MQTT (Mosquito with Websockets), SQLITE, APACHE and Node-Red. I started using Blynk as my mobile remote controller then went on to using ImperiHome but today I concentrate on using Node-Red Dashboard which has so very much potential.  I also use Nextion touch-LCD display devices for local displays. All of this can be managed within Node-Red. If you find this interesting you might like my  home control 2016 post here or the Nextion Wi-Fi Touch Display article.

Here (as requested): to the right is a screenshot of a typical setup… click on the image to enlarge.

So in total you have a timer you can set to go on and off at specific times of the day, or dusk and dawn, on certain days, certain months, you can even set it to run on specific days of the month (Christmas day?) or even certain weekdays of every month (second Tuesday).

You can tick a box to have it output on power-up or not, you can tick a box to have it auto-repeat the message every minute or not. You can add positive and negative offsets to the times (including dusk and dawn etc.), you can optionally add your OWN offset to the UTC time of the host computer and you even select a random value within the limits of the offsets (security lighting etc.) You can temporarily suspend the schedule via a tick box or a message.

And here are the words the node will accept at the input to override automatic operations. The input is not case-sensitive.

on (or 1)

off (or 0)

manual

auto (or default)

stop

sync

In the drop-down boxes for on and off times you can select times or words like dusk,dawn, sunrise, sunset, night etc. All are dependent on the longitude and latitude you put into the relevant boxes and will adjust every day as necessary.

The best way to learn is to put a debug node on the top output – and inject text payloads (using the INJECT node) to the inputs as demonstrated above.  Have fun. I could not manage without this node.

Out of the first output as well as the normal msg.payload, you can extract msg.state which might be “on”, “off”, or “auto” – and msg.value which might be 1 or 0.  This is so that if you are using say, ImperiHome and store states in global vars, if the time reverts back to auto, you can let ImperiHome know what is happening.

If you make good use of this node – please put a link to this blog entry somewhere in your writings so people will come back here. Or if proves REALLY useful you could feed my Ebay habit – there’s a link on the right of the blog.

Enjoy and please do report any issues back here.

Facebooktwittergoogle_pluspinterestlinkedin

Garden Data Collection

$
0
0

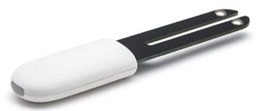
MiFloraSome time ago a pal of mine and I did some swaps of spare kit and I ended up with a Mi Flora sensor.  A rather pleasing looking device,  the MI Flora has a 3v lithium button cell and can transmit by Bluetooth LE, the light level, temperature, battery level and moisture. Battery is supposed to last for months. I’ve provided an AliExpress link above which puts the units at under £8 Inc. postage. No doubt that price will vary dramatically depending on where you chose to spend your money. Amazon charge more like £13.

So having pulled off the protective tab which meant the battery would work, I put the unit to one side as I had no idea how to read it.

A week or so later in Spain, with poor weather my pal Jay came on to ask me if I’d used it. I had not – and so we decided to give it a go. As it turned out I had some cheap Bluetooth 4 dongles I’d bought on a whim last year. I plugged one into my Raspberry Pi 2. The program “hcitool” lets you scan for Bluetooth devices and as it happens it was already installed on the Pi. From the command prompt:

sudo hcitool lescan

Instant success as the Mi Flora device with it’s MAC address was revealed. I made a note of the MAC address.

I would need Python 3 to experiment – but this was already installed on the Pi and some code to get the information from the unit. This code turned out to be ok with a little modification. I ended up creating a folder called /home/pi/myflora and dumping the lot in there.

Jay had modified the program to send MQTT. That of course needed the PAHO client. In order to do that I needed something called PIP.

sudo apt-get install python-pip

sudo pip3 install paho-client

Note NOT pip (which works for Python 2.7) but pip3.

I then added to the MI flora directory a test program which Jay sent me called bathroom.py – presumably because he’d put the sensor in his bathroom – I adjusted the output slightly as I was putting my unit in the garden

import sys
import paho.mqtt.client as mqtt

from miflora.miflora_poller import MiFloraPoller, \
MI_CONDUCTIVITY, MI_MOISTURE, MI_LIGHT, MI_TEMPERATURE, MI_BATTERY

poller = MiFloraPoller("C4:7C:8D:32:08:63")
print("Getting data from Mi Flora")
print("FW: {}".format(poller.firmware_version()))
print("Name: {}".format(poller.name()))
print("Temperature: {}".format(poller.parameter_value("temperature")))
print("Moisture: {}".format(poller.parameter_value(MI_MOISTURE)))
print("Light: {}".format(poller.parameter_value(MI_LIGHT)))
print("Conductivity: {}".format(poller.parameter_value(MI_CONDUCTIVITY)))
print("Battery: {}".format(poller.parameter_value(MI_BATTERY)))

# Publishing the results to MQTT
mqttc = mqtt.Client("miflorabathroom")
mqttc.username_pw_set("admin","xxxx")
mqttc.connect("192.168.1.19", 1883)
mqttc.publish("miflora/garden", "{ \"battery\" : " + str(poller.parameter_value(MI_BATTERY)) + ", \"version\" : \"" + str(poller.firmware_version()) + "\", \"sunlight\" : " + str(poller.parameter_value(MI_LIGHT)) + ", \"temperature\" : " + str(poller.parameter_value("temperature")) + ", \"moisture\" : " + str(poller.parameter_value(MI_MOISTURE)) + ", \"fertility\" : " + str(poller.parameter_value(MI_CONDUCTIVITY)) + " }")
mqttc.loop(2)
# End of MQTT section

So the idea was that running “python3 garden.py” would send some MQTT to my Mosquitto MQTT broker – and indeed it did (change MAC address for the MI Flora and MQTT details in the above).  Subscribing to “miflora/garden” did the trick – I could fire off the program and with in seconds I’d see the resulting JSON package coming out into my MQTT-Spy client.

Next job was to get Node-Red talking to the MI Flora – I used an INJECT node, set to retrigger every 15 minutes – firing off to an EXEC node which contained nothing more than “python3 /home/pi/miflora/bathroom.py”

That worked – so now I had a regular supply of data in the form of an easy to use JSON package.

I split the package up – and fed it into a Node-Red Dashboard graph – and that was my first disappointment. If you fire more than 4 items into those graphs – the popup fails to show all of them – and the graphs are not very good anyway. I think a lot more work needs to go into that.

I do use GROVESTREAMS on-line (which is REALLY flexible) to store data remotely but there’s a limit as to how far back you can read for free – that was not the case when I first started using them and wrote the Node-Red-Contrib-Grove node to make it all easy.

So now I was on a search for a decent graphics package that would run on the Raspberry Pi (or similar). NOT as easy as it sound,  unless you’re very easily pleased when it comes to graphics.

After a lot of experimenting I decided to give Grafana a shot. I thought it would be nice to put the data into a SQLITE 3 database – and fire into Grafana. Erm, no. Despite (wait for it) using SQLITE internally to store users and dashboards, the package does not actually support SQLITE for data – how daft is that.  I said that now to save you some confusion later. When I did the install it kept referring to SQLITE and could I HELL figure out how to set up a database for my data – that’s why.

As a Pi user (that means SD use so I’m not keen on MySQL as SD has limited WRITE capability and I can’t help thinking it will shorten the life of the SD) the options for data sources did not look appealing to me at all, the least offensive being INFLUX and that is the one I settled on – partly as there is a node for it available for Node-Red.  Despite the pretty website this is still very preliminary at version 1.02. Influx doesn’t use terms like tables and fields which kept me going for a couple of hours – but it is good at storing time-stamped data – indeed you don’t even do the time-stamping. You create an empty database and start firing data at the DB in pairs – stream name – and data value – it really is very simple once you get started. I guess you could think of it as a single table with pairs of data-name and data-value.  I went down a few dead ends and discovered if you got your stream names wrong – good luck renaming them as INFLUX does not support renaming!

Anyway, it ‘s all very easy once you get started. I did things backwards and installed Grafana first. Here’s what I did – no guarantee it will work for you.

sudo dpkg -i grafana_4.1.2-1487023783_armhf.deb
sudo /bin/systemctl daemon-reload
sudo /bin/systemctl enable grafana-server

That was Grafana up and running on port 3000 – user name admin, password admin to actually DO anything – and quickly change that password!!! I did that, went into the ini file and disabled user registration as the admin can do that and opened up port 3000 redirect in my router so I could access this from the outside world. That all worked well.

wget http://ftp.us.debian.org/debian/pool/main/i/influxdb/influxdb_1.0.2+dfsg1-1_armhf.deb

sudo dpkg -i influxdb_1.0.2+dfsg1-1_armhf.deb

That set up influx and that ran without further ado at port 8083. I did NOT open that up to the outside world. In there I created a new empty database called “logger”

logger

In Grafana – which supports influx without any changes, I followed Engineer John’s instructions to set up the data-source and a new Dashboard.

So the next thing – would be to get some data.  I played with this for some time – should I keep incoming data source names simple – as you can’t rename them? Then Jay pointed out that in Grafana you can ALIAS names. That did it. So in influxDB node for Node-Red, you fire in a payload – and depending where you want to put your data – you use msg.measurement.. Yes, exactly, what’s wrong with msg.topic you might ask. So here is my little MI Flora MQTT node firing values into InfluxDB

MiFlora[6]

And that yellow function block…

node.status({fill:"blue",shape:"dot",text: msg.payload});

tmp=JSON.parse(msg.payload);

msg.measurement="battery"; msg.payload=tmp.battery; node.send(msg);
msg.measurement="sunlight"; msg.payload=tmp.sunlight; node.send(msg);
msg.measurement="temperature"; msg.payload=tmp.temperature; node.send(msg);
msg.measurement="moisture"; msg.payload=tmp.moisture; node.send(msg);
msg.measurement="fertility"; msg.payload=tmp.fertility; node.send(msg);

Yes, I know – far better ways to do this – but it was my first stab at it and it worked. For general use however I added an incoming function that merely copies msg.topic into msg.measurement and that means any single data-source coming in via MQTT can be blasted straight into InFluxDB.

Yes, that’s write – you don’t create tables or fields – you just send in field names and data and that’s it!

I also fed in some data from my general sensors – with horrible topics like pergola/lighting but of course thanks to the Grafana alias ability – names like that would not show up in Dashboards.

Having stored up some data it was time to get it into graphs – I took the VERY simplest approach of showing lines as I have at this point no idea what some of the Grafana functions do – I DO know that smoothing the data might be fun as Grafana relies on the data-source to do that and Influx doesn’t do that.  What IS nice is that you don’t have to worry about things like “I want the last 5 minute’s worth” or “show me the last month’s worth” as Grafana does all of that for you – from here  it gets easy.

New dashboard and under metrics ADD ROW – takes an hour or so to get to grips with this..

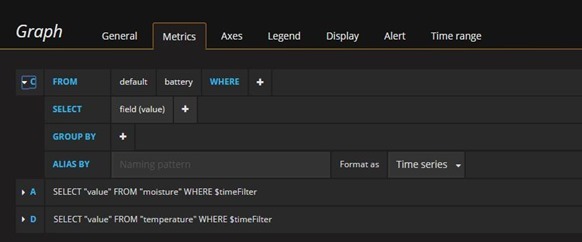
Grafana setup

I’ve expanded the top one here – I have 3 lines in that one graph – see the blank ALIAS BY  - if you want to change the source name (in this case battery) put something in there.

And that  is how I got to this point…

Graphing

So top left you see battery, moisture and temperature from the MI Flora unit. I chose to separate off light level as the range of values is WAY higher… and on the right I’ve started with another unrelated sensor incoming from MQTT and as you see using the ALIAS I’ve renamed the stream (topic) to “Kitchen OS Temperature” – yes, it really IS that cold inland Spain right now.

But this is merely the beginning – now I will put all my other data from the UK and Spain into here – lots of it and some day I might even manage to extract individual graphs back into Node-Red Dashboard, but right now, I’m happy with these pages. Looking good.

There’s a lot to take in – and I am as you can see NOT an expert at this yet so before firing questions back – you might want to spend some time looking at the links on this blog entry and using Google. If you think another database is better by all means write in to say why – and if you think there’s a better easy-to-fit-in-Pi graphing system, preferable one that works with SQLITE – again do let us know. I started all of this with zero information late afternoon yesterday and had it all working by the end of last night – so it’s not THAT big a deal even if my clumsy writing makes it look that way.

Not entirely sure what’s going on the this battery level on my first day – but it did occur to me that the unit is intended for putting into plant-pots – not sitting outside in the sopping rain so I’m off to dry it out and cover it in cling-film!! That’ll mess up today’s readings but I do need to get it right as we’re off back to the UK for a few weeks later this week and I don’t want to come back to a rusted heap.

MiFlora[8]

Facebooktwittergoogle_pluspinterestlinkedin

Node Red and HighCharts

$
0
0

HiChart Charts in Node-RedFirst things first – HighCharts are not free for commercial use. Indeed they are IMHO very expensive. However, for your own website, a school site of a non-profit organisation they are free to use. You are also ok to make modifications. So – that’s the “cover my back” bit out of the way – now how to use them in Node-Red.

I’ve looked at this before, because their charts are very, very nice.  As some of you know, I’m now sold on Grafana but I also really like the idea of using charts with my favourite database – SQLITE and this is not supported as far as I can see with Grafana. Indeed I’m glad there is a Node-Red Node for InfluxDB as I had trouble getting my head around inputting data otherwise (the node makes it REALLY easy).

And so it was that I cam back to looking at HighCharts. Now one of the demos of theirs I really like involves plotting variable numbers of time-based lines in a graph (temperature, humidity etc)– with potentially missing values. I found when using other chart systems that if you had the odd missing value due to power failure etc, you had to fix that – with the HighCharts demo it just draws a smooth curve between the two.

Another of their demos features zooming and it is only in the last couple of days when taking another look – that I realised you could combine the two – zoomable multi-line graphs.

What you see on the right is little more than their basic demo – with a few bits taken out to make the whole thing work in the limited space we typically have in Node-Red Desktop – and zooming built in.

I tested everything in JSFiddle and then tried dumping it into Node-Red – nothing – zilch. I found that using the libraries remotely just would not work. Out of desperation I grabbed the libraries, one of which is big and put them into one of my usual “myjs” directories on the Raspberry Pi and lo and behold, it all worked.

Sample data into HiCharts

Here you see above my test – now bear in mind this is very preliminary. In the brown FUNCTION nodes I have 2 different sets of data just to test things… and these feed an object in msg.payload through to the Dashboard UI. I’ve made two of these – using two different DIVs. One is called “mine1” and the other is called “mine2” – they fill DIV ids “container1” and “container2" respectively. Everything else is the same.

So – starting off with their demo here http://www.highcharts.com/demo/spline-irregular-time

I took that demo and wrapped the lot in a function (object) – so as to hide everything from the outside world in case I wanted two or more of these on a page. I then wrapped the code inside a local, externally accessible function. This could be way more efficient – but I wanted something up and running and as you will see I have two completely independent graphs here.

Here is the code inside the blue template. The only thing that changes is the reference to the DIV (container1/container2) and the references to the new object (mine1/mine2) – and of course near the end I’ve fed unique titles and subtitles when creating the object but the latter do not have to be unique.

<script src="/myjs/highcharts.js"></script>
<script src="/myjs/exporting.js"></script>
<div id="container1" style="min-width: 300px; height: 300px; margin: 0 auto"></div>

<script>
   (function(scope){
        scope.$watch('msg', function(msg) {
          mine1.graph(msg.payload);
        });
    })(scope);


var sample_data1=[{
        name: 'Winter 2012-2013',
        // Define the data points. All series have a dummy year
        // of 1970/71 in order to be compared on the same x axis. Note
        // that in JavaScript, months start at 0 for January, 1 for February etc.
        data: [
            [Date.UTC(1970, 9, 21), 0],
            [Date.UTC(1970, 10, 4), 0.28],
            [Date.UTC(1970, 10, 9), 0.25],
            [Date.UTC(1970, 10, 27), 0.2],
            [Date.UTC(1970, 11, 2), 0.28],
            [Date.UTC(1970, 11, 26), 0.28],
            [Date.UTC(1970, 11, 29), 0.47],
            [Date.UTC(1971, 0, 11), 0.79],
            [Date.UTC(1971, 0, 26), 0.72],
            [Date.UTC(1971, 1, 3), 1.02],
            [Date.UTC(1971, 1, 11), 1.12],
            [Date.UTC(1971, 1, 25), 1.2],
            [Date.UTC(1971, 2, 11), 1.18],
            [Date.UTC(1971, 3, 11), 1.19],
            [Date.UTC(1971, 4, 1), 1.85],
            [Date.UTC(1971, 4, 5), 2.22],
            [Date.UTC(1971, 4, 19), 1.15],
            [Date.UTC(1971, 5, 3), 0]
        ]
    }, {
        name: 'Winter 2013-2014',
        data: [
            [Date.UTC(1970, 9, 29), 0],
            [Date.UTC(1970, 10, 9), 0.4],
            [Date.UTC(1970, 11, 1), 0.25],
            [Date.UTC(1971, 0, 1), 1.66],
            [Date.UTC(1971, 0, 10), 1.8],
            [Date.UTC(1971, 1, 19), 1.76],
            [Date.UTC(1971, 2, 25), 2.62],
            [Date.UTC(1971, 3, 19), 2.41],
            [Date.UTC(1971, 3, 30), 2.05],
            [Date.UTC(1971, 4, 14), 1.7],
            [Date.UTC(1971, 4, 24), 1.1],
            [Date.UTC(1971, 5, 10), 0]
        ]
    }, {
        name: 'Winter 2014-2015',
        data: [
            [Date.UTC(1970, 10, 25), 0],
            [Date.UTC(1970, 11, 6), 0.25],
            [Date.UTC(1970, 11, 20), 1.41],
            [Date.UTC(1970, 11, 25), 1.64],
            [Date.UTC(1971, 0, 4), 1.6],
            [Date.UTC(1971, 0, 17), 2.55],
            [Date.UTC(1971, 0, 24), 2.62],
            [Date.UTC(1971, 1, 4), 2.5],
            [Date.UTC(1971, 1, 14), 2.42],
            [Date.UTC(1971, 2, 6), 2.74],
            [Date.UTC(1971, 2, 14), 2.62],
            [Date.UTC(1971, 2, 24), 2.6],
            [Date.UTC(1971, 3, 2), 2.81],
            [Date.UTC(1971, 3, 12), 2.63],
            [Date.UTC(1971, 3, 28), 2.77],
            [Date.UTC(1971, 4, 5), 2.68],
            [Date.UTC(1971, 4, 10), 2.56],
            [Date.UTC(1971, 4, 15), 2.39],
            [Date.UTC(1971, 4, 20), 2.3],
            [Date.UTC(1971, 5, 5), 2],
            [Date.UTC(1971, 5, 10), 1.85],
            [Date.UTC(1971, 5, 15), 1.49],
            [Date.UTC(1971, 5, 23), 1.08]
        ]
    }];
    
function doit(theContainer,title,subtitle)
{
this.graph=function(xx)
{
Highcharts.chart(theContainer, {
    chart: {
        zoomType: 'x',
        type: 'spline'
    },
    title: {
        text: title
    },
    subtitle: {
        text: subtitle
    },
    credits: { enabled: false },
    xAxis: {
        type: 'datetime',
        dateTimeLabelFormats: { // don't display the dummy year
            month: '%e. %b',
            year: '%b'
        },
        title: {
            text: 'Date'
        }
    },
    
    exporting: {
            buttons: {
                contextButton: {
                    enabled: false
                } } },

    yAxis: {
        title: {
            text: 'Snow depth (m)'
        },
        min: 0
    },
    tooltip: {
       headerFormat: '<b>{series.name}</b><br>',
       pointFormat: '{point.x:%e. %b}: {point.y:.2f} m'
    },

    plotOptions: {
        spline: {
            marker: {
                enabled: false
            }
        }
    },

    series: xx
});

}

}
mine1=new doit("container1","title1","Subtitle1");
mine1.graph(sample_data1);
</script>


and here is the code inside one of those orange functions – the only thing that changes is the data.

msg.payload=[{
        name: 'Win 2012-2013',
        // Define the data points. All series have a dummy year
        // of 1970/71 in order to be compared on the same x axis. Note
        // that in JavaScript, months start at 0 for January, 1 for February etc.
        data: [
            [Date.UTC(1970, 9, 21), 0],
            [Date.UTC(1970, 10, 4), 0.28],
            [Date.UTC(1970, 10, 9), 0.25],
            [Date.UTC(1970, 10, 27), 0.2],
            [Date.UTC(1970, 11, 2), 0.28],
            [Date.UTC(1970, 11, 26), 0.28],
            [Date.UTC(1970, 11, 29), 0.47],
            [Date.UTC(1971, 0, 11), 0.79],
            [Date.UTC(1971, 0, 26), 0.72],
            [Date.UTC(1971, 1, 3), 1.02],
            [Date.UTC(1971, 1, 11), 1.12],
            [Date.UTC(1971, 1, 25), 1.2],
            [Date.UTC(1971, 2, 11), 1.18],
            [Date.UTC(1971, 3, 11), 1.19],
            [Date.UTC(1971, 4, 1), 1.85],
            [Date.UTC(1971, 4, 5), 2.22],
            [Date.UTC(1971, 4, 19), 1.15],
            [Date.UTC(1971, 5, 3), 0]
        ]
    }, {
        name: 'Win 2013-2014',
        data: [
            [Date.UTC(1970, 9, 29), 0],
            [Date.UTC(1970, 10, 9), 0.4],
            [Date.UTC(1970, 11, 1), 0.25],
            [Date.UTC(1971, 0, 1), 1.66],
            [Date.UTC(1971, 0, 10), 1.8],
            [Date.UTC(1971, 1, 19), 1.76],
            [Date.UTC(1971, 2, 25), 2.62],
            [Date.UTC(1971, 3, 19), 2.41],
            [Date.UTC(1971, 3, 30), 2.05],
            [Date.UTC(1971, 4, 14), 1.7],
            [Date.UTC(1971, 4, 24), 1.1],
            [Date.UTC(1971, 5, 10), 0]
        ]
    }, {
        name: 'Win 2014-2015',
        data: [
            [Date.UTC(1970, 10, 25), 0],
            [Date.UTC(1970, 11, 6), 0.25],
            [Date.UTC(1970, 11, 20), 1.41],
            [Date.UTC(1970, 11, 25), 1.64],
            [Date.UTC(1971, 0, 4), 1.6],
            [Date.UTC(1971, 0, 17), 2.55],
            [Date.UTC(1971, 0, 24), 2.62],
            [Date.UTC(1971, 1, 4), 2.5],
            [Date.UTC(1971, 1, 14), 2.42],
            [Date.UTC(1971, 2, 6), 2.74],
            [Date.UTC(1971, 2, 14), 2.62],
            [Date.UTC(1971, 2, 24), 2.6],
            [Date.UTC(1971, 3, 2), 2.81],
            [Date.UTC(1971, 3, 12), 2.63],
            [Date.UTC(1971, 3, 28), 2.77],
            [Date.UTC(1971, 4, 5), 2.68],
            [Date.UTC(1971, 4, 10), 2.56],
            [Date.UTC(1971, 4, 15), 2.39],
            [Date.UTC(1971, 4, 20), 2.3],
            [Date.UTC(1971, 5, 5), 2],
            [Date.UTC(1971, 5, 10), 1.85],
            [Date.UTC(1971, 5, 15), 1.49],
            [Date.UTC(1971, 5, 23), 1.08]
        ]
    }];
    
return msg;

With more work, this could be really useful – and don’t forget to check the BIG range of graphs and other widgets in the HiCharts demos – there is some wonderful stuff in there.

Back to databases - as you can see it would not be hard at all to pull data like this out of just about any database! That's my next job after I tidy this up a bit.

Facebooktwittergoogle_pluspinterestlinkedin

AlexaPi and a Warning

$
0
0

Amazon DOTIt’s been a busy week already – I’ve been saving up a load of “Can we write articles for your blog?” emails and this morning I decided to take a look. The sample articles were ATTROCIOUS and now I know why so many articles are bad out there – they are written to order by people who just write stuff. Well, no thanks. I’ve asked the lot of them to remove me from their databases.

In the course of the post coming in I noted a Github notice of a new version of ALEXAPI – now for those of you who don’t live in the USA or America, Amazon Alexa is a box that you can talk to and control your home, play music (theirs, not yours) and generally buy Amazon products without needing to be able to read and write. It’s a wonderful thing. ALEXAPI claims to do the same on a Raspberry Pi or similar.

I have two of the Amazon DOT devices (which are very reasonably priced at £49 as against the full on unit which IMHO is, like the Google unit and others, way OVER priced). Very happy with them. Well, I’d be happier if they had an RJ45 connection instead of just WIFI – but that’s ok.

So what do we do with these? Well, we have shopping lists, we listen to music (on Maureen’s account as she has Prime, I don’t) and we control house heating, lighting etc. All in all they’re part of the family – and the BIRDSONG skill drives our cats NUTS which is a lot of fun.

And so it was that I found this link interesting in the email this morning. With this software, a usb mic and speaker of some kind, not only can you emulate an Alexa on a Raspberry Pi but on all manner of other devices.

Now, I long ago gave up on using a Pi, £32 for the Pi, plus powered speaker, plus decent mic plus case plus power supply comes to WAY over the cost of a ready-built Echo complete with REALLY pretty lights and a microphone array.

But this morning for a moment I was distracted – one could use an Orange Pi Zero which is only a few quid!!!  And off I went and followed the instructions. So – before I start, if you want to play with this – you CAN install this on an Orange Pi Zero (Armbian is good), it DOES work and you CAN completely uninstall if. Been there, done that.

I stuck in my USB audio adaptor, powered speaker, 3.5mm stereo microphone and installed the software. I filled in the details on Amazon which gave me the necessary keys to update the config on the AlexaPi.  I rebooted the Orange Pi Zero and…

Nothing.  As usual, audio settings. I talked to some VERY helpful people on their forums who guided me through changing the settings to the USB audio device. I tested it – audio output – perfect. Audio input – perfect. I thanked them,  rebooted and…

“Hello”…

Well, I nearly fell off my seat. “Alexa, what time is it?” – after quite some delay (this is NOTHING like a DOT which responds almost instantly) the unit came back with the time.  I tried a radio station and LO, it played the radio station. By now I was getting excited… I could put up with the delay.

Sadly, and this is no reflection on the obviously hard work done by the designers, things went downhill from there.

“change accounts” I said, wanting to switch to my wife’s account as she has Amazon music. No other people in the account setup. That could have been just a technicality so I ignored that. remember I know exactly how to use these things as I have two DOTS.

“Set a timer” – turns out the unit does not do lists – most likely API-related.

“Find my devices” – this was the killer. It took some hunting down but it was actually in the UNINSTALL instructions that I found … “AVS API doesn't have a way to connect the devices to Amazon.”

That last one was the killer. That and the mic – the problem is – Amazon put a lot of work into the mics – and they handle speech over background music reasonably well. I can blast my music and shout over the couch “ALEXA – SHUT UP” – and it promptly obeys. Not so the AlexaPi – while playing the radio could I HELL get it to take any notice of me until I turned the music down – and I was only sitting 2ft away.

I uninstalled the lot – and my Orange Pi Zero seems to be as good as new. So if you want something new to play with – or if you have a very limited set of needs – have a play. For me – I’d rather fork out £49 at this point.

It was suggested that one thing this software could to that the real thing can’t – is respond asynchronously – i.e. use it to output speech without a command – that is an annoying omission on the Amazon system – though if you write a special skill you can have it say what you want in reply – but then you have to call the skill and have a secure connection etc. 

But then it occurred to me – I have a Raspberry Pi running the house and HABRIDGE – and it has Node-Red and I already have IVONA speech on it – all I need is a speaker and when the DOT talks to HABRIDGE to fire an MQTT control message to my lighting and heating – it can also send off some speech itself. Don’t know why I didn’t think of that before.

So there it is.

Facebooktwittergoogle_pluspinterestlinkedin

The post AlexaPi and a Warning appeared first on Scargill's Tech Blog.

Editors

$
0
0

Programming editors, like music, are a matter of personal taste and I don’t hope to convert anyone here today. I would however like to bring something to your attention which I discovered at the weekend.

I’m a “Notepad++” man. I don’t particularly like the look of NotePad++ but it is fast and flexible and has colour-coding. It’s a Windows only program but has lots of plug-ins. It is my favourite editor. Well, it was.

I’ve recently been toying with other editors such as Atom but invariably I last a matter of hours with new things before finding bugs – which I am very good at, unfortunately. I think the first issue I had with Atom was Javascript refactoring but there were other issues which, all in sent me scampering back to NotePad++

There is of course Visual Studio – and that’s very nice for Windows users if you can handle it being slow as molasses – I can’t. Life is way too short to sit and wait for it to start up.

Then there is Sublime Text 3. I started warming up to that too – but again little niggles I didn’t like.

Until recently I figured I may as well stick with NotePad++ but for a chance trip to see my friend Jonathan. As always when we meet up he has stuff I’m not up to speed with and vice-versa and so it was that in the course of conversation he asked me if I was using Visual Studio Code?

My immediate reaction wasn’t totally positive – thinking it would have something to do with Visual Studio and hence “tarred with the same brush”. Anyway, being Jonathan I could not dismiss this out of hand so I asked him to show me what he was on about.

Well, things have certainly changed at Microsoft, haven’t they! Presumably partly due to Steve Ballmer disappearing off the scene?

Visual Studio Code is an editor – simple as that – a code editor. I’ve been playing with it for hours now and done some major upgrades to one of my nodes with it.  This fast, free (and importantly advert-free) clean multi-panel editor appears to have everything that Notepad++ has – and VERY much more. The first thing I noticed on pulling in my JavaScript Visual Studio Codecode was the really nice colour coding and the dark theme. The second thing – and in all honesty one of the main reasons I’m attracted to this – is the really good Intellisense.  Was it that or the document formatting, turning my spiders web of a program into a very neat job at a button-press.

Or was it the gob-smacking list of extensions? Or the GIT integration, file compare… whatever, I’m a convert.

There are some features you might not believe if you’ve not kept up with Microsoft… extensions for debugging via Chrome (yes, that’s the competitor’s program) or the (untested by me) stunning fact that this editor is also available for the MAC and LINUX !!! What!!???! In my case I’m happy to stick with editing in Windows.

So – free, better than what I’m using now, fast, flexible and supported by Microsoft Why wouldn’t I be impressed. If you give the editor a go (which takes no time at all in Windows), you might be too. Integrates no problem as the primary editor for WinSCP.

Lovely.

Facebooktwittergoogle_pluspinterestlinkedin

The post Editors appeared first on Scargill's Tech Blog.

Node-RED Global Flow and Context

$
0
0

There’s a mouthful. This short article is about the various kinds of variables used in Node-Red and more importantly how to initialise them and how to view them.

So in Node-Red when you want to use variables – there are three basic types as well as local variables.

So for example – you’ve opened up a FUNCTION block and you want to use some variables. VAR is always a good start.

var fred=1;

A way to get a variable to PERSIST behind that simply function invocation to the next time around, use this;

context.set(“fred”,1);

If you’d like that var to be available to any other function in that flow (page)- use:

flow.set(“fred”,1);

And if you need a global variable that can be accessed anywhere within Node-Red including other flows  – I use them all the time for things like thermostat objects etc… use global.

global.set(“fred”,1);

and of course you get them back as global.get(“fred”); etc.

This is not meant as a course on programming – you can read all about this on the Node-Red site – just look up variables.

So three useful types of variable.

But there’s a problem. Node-Red runs asynchronously and in my first efforts I would have an INIT tab and initialise my global variables there. Once in a blue moon I would see a non-destructive failure with the logs showing that I’d tried to use a variable before it had been initialised (created, even).  So in a platform where everything is running asynchronously how do you ensure (without checking every single time you use it) that a variable has been initialised…. especially important for globals.

One way which I don’t really like is to ensure that the variable is initialised in the left most tab. as that runs first… ok… kind of….

Well it turns out “there’s a node for that”.  Node-Red-Contrib-Config does that – you can set up a variable – which could be a whole object – an no matter where you put this node – it will run BEFORE the main flows start up – I tested it, it works. My only niggle might be that the VALUE field needs to be expandable – a single line is not much use for large objects.

npm install node-red-contrib-config

So that’s one side of it.

The other side is – would it not be nice if you could have a tab to show you the current status, names and values of all of your global variables – and more. Well, now you can.

This needs a SLIGHT mod to Node-Red so if you’re new you might want to back stuff up.

In the directory you normally (hopefully locally) npm install stuff –

https://www.npmjs.com/package/node-red-contrib-contextbrowser

So the install is:

npm install node-red-contrib-contextbrowser

Stop Node-Red and in (in my case) and make a slight edit

nano /usr/lib/node_modules/node-red/red/runtime/nodes/context.js

This is the function you need to alter - very carefully add one line as I have in bold. That’s it – don’t make any other changes.….and this IS case-sensitive.

function createContext(id,seed) {
   var data = seed || {};
   var obj = seed || {};
   obj.get = function get(key) {
       return util.getMessageProperty(data,key);
   };
   obj.set = function set(key, value) {
       util.setMessageProperty(data,key,value);
   }
   obj.getKeys = function() { return Object.getOwnPropertyNames(data); }
   return obj;
}

(NODE RED GUYS – any chance of making the above standard???)

Start up Node-Red (this works even if you use HTTPS and have password on Node-Red)

And lo – you should have a new tab on the right… click in the editor on a node or function you know has variables initialised…

and then use the refresh in that new tab..

My test..

tmp6E51

The contents of that orange function

tmpD029


And..

tmp65A3

As you can see, you must select the particular node or function with the mouse first – then hit the little refresh in the contextbrowser tab - you then see above freddy and the value in the tab – along with any others you’ve defined in that node or function. Ok it’s not quite debugging but better than nothing.

Now moving to the Global tab is another matter as I have several globals including some big objects – if they are very big – you might have to hit the little … indicator to expand them.

tmp3C87

So for me this is marvellous – I can now set up global vars with the confidence that they will be initialised properly at the start – and I can also get a nice overall view of the globals I’ve used – something I could not easily do before.

Facebooktwittergoogle_pluspinterestlinkedin

The post Node-RED Global Flow and Context appeared first on Scargill's Tech Blog.

Raspberry Pi Zero WiFi

$
0
0

Raspberry Pi Zero WiFiI should have just entitled this “Raspberry Pi” as it keeps expanding (now covering the rest of the Pi boards – but keep reading).. as you will see, the title is a little restrictive given what we’ve done over the last few days. Friend Antonio over Italy and I (still stuck here in the frozen wastes of the Northeast of England) have been working quietly in the background on making the script compatible with the new Raspberry Pi Zero WiFi (RPiZW) having already managed to get it working on a range of boards and operating systems including RPi2, RPi3, Debian, Xenial, various Orange Pi boards, various FriendlyArm boards, the Odroid C2 and more.

At under a tenner, no-one can claim this tiny WIFI enabled RPiWZ is going to break any records. It is slow. very slow compared to a Raspberry Pi 2 or perhaps an Orange Pi Zero... and at first attempt I nearly gave up after waiting a whole day for my script to run (and fail) - something that can take maybe an hour on more powerful single board computers such as the RPi3 or the Odroid C2 etc.

However, having failed to get the script to run on the official Raspbian distribution for this board, for a variety of reasons, we next tackled DIETPI. Here, this slimmed down operating system comes into it's own and the PI Zero WiFi runs a lot more swiftly than it does with stock Raspbian. Still, by lunchtime yesterday I'd stopped the script due to various errors. By late last night however, with a little manual injection I had everything running on this tiny board - Apache, PHP, Node-Red with all my usual Nodes, MQTT, Sqlite, PhpLiteAdmin, Ha-Bridge, MC and much more, all with no manual intervention (just as well, given the time it takes).

This weekend while I was out shopping for a new milk-frother, our friend Antonio over in Italy was busy working on some last minute amendments to the script which, you'll recall now runs on a range of devices and systems including Xenial and Debian. We’ve now completed the  updates to the script, including the ability to run on the RPiZW.  The sheer size of the RPiZW (or rather lack of it, being exceedingly thin) means you could fit this board, able to control a house, on the back of an LCD display and have the whole thing mounted in a reasonably slim wall-mounting box. The Orange Pi Zero on the other hand has that large Ethernet connector which means a slim case is out of the question.

There is of course competition for this board, the Nanopi Neo Air is actually smaller (different format of course, being square) - and no doubt a lot faster - but like the RPiZW it has no Ethernet. One issue I've had with many boards is that of WIFI reliability. Up to now, the WIFI on the RPiZW is rock-solid - just as well, as it doesn't have hardwired Ethernet capability (well, not without some soldering or a compact-size-defeating USB dongle). The NanoPi on the other hand works well and is way better technically but I'm not 100% happy about the WIFI on the latter. All of this could change of course with future software updates.

Raspberry Pi Zero WiFi: Here’s what I did (total time 4 hours -  VERY little of which I was actually doing anything – well, watching YouTube videos actually):

  • I grabbed the file DietPi_v145_RPi-armv6-(Jessie).img
  • I used SD Formatter to format a 16GB card then Win32 Disk Imager to blow the image onto the SD card.
  • I plugged the card into the RPiZW and powered the board up, plugged into a screen – and with keyboard and mouse connected via a USB hub.
  • I started up the Pi – that takes a little while and it eventually wants you to login as root (initial password dietpi).
  • As per initial dialogs in DietPi-Config, I set up the WIFI.
  • The board went off to do some downloading and came back to the DietPi-Software - I swapped from DropBear to OpenSSH Server and lighttpd to Apache2 - but didn’t install anything else.
  • At the end of that I could get into the board remotely using WINSCP and no longer needed the keyboard and mouse.
  • I copied the script across to the root directory – ensuring it was in Linux format (Line feeds only) and that it had execute permission.
  • It went off and automatically set up a PI user with password “password”. I logged into the board (using WinSCP) as user  pi. I copied the script across again and once again made sure it had execute permissions. I ran the script.
  • Several items were downloaded. I waited patiently until the main menu came up. I accepted all defaults but added HA-Bridge.
  • I was asked for a user name (user) and password – and an admin name (admin) and password… (you can opt out of that now and leave defaults if you like) and at that point the script – as you’d expect – went off for 4 hours (using a half-decent microSD from Samsung) doing it’s own thing. And yes, watching the WEBMIN setup DOES feel like watching paint dry.
  • At the end of all of this – I rebooted the board – and that was the end of that – a perfectly working RPiZW.

Something that has come out of this – is the importance of SD speed… I’ve always known this but NEVER has it been as obvious as it is here with this slower board. 4 hours – recall I mentioned an earlier attempt which failed but also took longer. Well, now I’m using a decent Samsung microSD.

Raspberry Pi Original: Which brings me to the Raspberry Pi – not the 2 or 3 but one of the originals. The script appears to be working perfectly now even on pre-Pi2 boards with full size SD card (Raspberry Pi © 2011.12). Sadly when I was using those I was not aware of the need for the best SD and THIS install took 7.25 hours – if you plan to try one of these – get a decent SD! Still – all working so an otherwise useless Pi is now up and running.

Raspberry Pi Zero: On a whim, I took a copy of the microSD I used on the RPiZW and dropped it into the lowly, cheap and cheerful Raspberry Pi Zero (the one with nothing) – I then took a USB adaptor and plugged it in, with one of those really cheap unbranded WiFi USB blocks at the other end.  I plugged in power, waited, checked for new IP addresses and LO AND BEHOLD that was online too!

Raspberry Pi 2:  I tested the modified script on the Pi2 and as well as being a darn sight faster to install than the units above – it does work well.  I did however notice that the yellow Node-Red GPIO node does not work – possibly something missing in DietPi. However – there’s a great utility called GPIO which gives you full command line access and I’ve now added that as an option to the script. I’ve tried GPIO access including PWM and it all works a treat as Pi user.

cd
git clone git://git.drogon.net/wiringPi
cd ~/wiringPi
./build

The above it what I added… then use GPIO – now, with the –g option, the pins correspond to the actual connector which is nice – so for a nice dim LED on GPIO13

gpio –g mode 13 pwm
gpio –g pwm 13 20

Not tried that on the Zero but I assume it will work as well. If anyone knows why that yellow GPIO node sits at “connecting” do let me know. Remember in all of this we’re using the DIETPI image – NOT original Raspbian – which IMHO is a little heavy handed if you don’t want a graphical interface.

Coming up soon: Android Phone.  Currently the script works – but services (SYSTEMD) don’t so I had to manually run Node-Red while the NODES were installing – to ensure settings.js was present. Also there’s an issue with locales.. but it all WORKS – much more later – I have to go to a party and I think Antonio is looking at the services issue. This could be REALLY good!!! I really must re-do the title of this blog entry…

Things are looking up.

Raspberry Pi backupAnd now for something completely different: Meanwhile I thought you might like to see this Raspberry Pi battery backup  (not for good reasons) -   I bought this a couple of weeks ago and it turned up today. 4 brass spacers and it fits onto my Raspberry Pi 3 a treat.

But – pull the power out – and the Pi reboots – who on EARTH dreamed this up!!! They claim 9 hours of backup but no good if power loss causes a reset… worse -  I bought it from Europe at £9.49 and I COULD have bought it from where they probably got it from in the first place at £8.73 and no postage. Oh well. I’m assuming I got a bad one – surely they could not have designed it this way. Anyway, it has a 3800maH battery and it all fits perfectly on the back of a Pi.  On the FRONT of my Pi I have an LCD display and the whole thing was intended to form the backbone of my updated home control in Spain when we go back there in April. A clue to the problem may be that there is a small yellow power indicator on the Pi, suggesting the pack might just be putting out insufficient voltage for the Pi + LCD. So – I tried it with a Raspberry Pi 2 on it’s own – same result. Just thought you’d like to know in case you were thinking of buying one of these. THIS looks GOOD (Thanks Antonio) – any experience of this??  I have some goodies from another company coming in the next couple of weeks which look promising as uninterruptable supplies– more on this soon.

Facebooktwittergoogle_pluspinterestlinkedin

The post Raspberry Pi Zero WiFi appeared first on Scargill's Tech Blog.

Android Phone as Server

$
0
0

Why am I showing you a picture of a cracked-screen phone?

Linux on Android PhoneWell because this particular phone is a bust Oukitel K10000, the phone with the world’s longest-lasting battery and an excellent workhorse. My friend Aidan gave me this (rather than chucking it away) some time ago and it has been sitting doing nothing. All that is wrong with it is a cracked (and exceedingly dangerous on the fingers) screen. I’ll bet I’m not the only one with such a phone lying around wasting space.

Well, as of yesterday, it is a Debian server with all my usual stuff going on quietly in the background – with the screen normally off – running freezing cold and hopefully being super reliable.

This is an experiment only – beware – if your phone dies it is your problem….  oh and your Android phone needs to be ROOTED. 

Imagine turning your old, dust-covered phone into a sleek, battery backed-up server with unfeasibly long backup time, immunity to any mains spikes, a silent, fast Debian base for all the stuff in my script – which includes Node-Red, Apache/PHP, SQLITE (+ PHPLiteAdmin), MQTT, MC, Ha-Bridge and more!  If you’ve been following this blog you’ll know about the script.

So this article applies to ROOTED Android phones and we’ve only tested around Android 5.0 onwards.  In my case I rooted the phone with KingRoot (note, NOT the one in the PlayStore which is a con – avoid it - but the one at kingroot.net ) – please note that rooting phones is beyond the scope of this article and if you are not confortable with this you should not do it. There are a lot of links out there on the subject and many of them are fraudulent.

tmpCD52There is an APP in the Play Store called Linux Deploy. It is also on GitHub. Beware that this is essentially undocumented unless you are Russian – so please don’t ask how you can use your phone’s GPS or Sound from Debian – not a clue!

You should have a modern-ish WiFi enabled (or hardwired if you like) Android phone or tablet with at least 16GB of internal FLASH (which should give you 10GB working space).   If you only have 8GB that will leave you only 2GB which - really – isn’t enough.

Getting Debian 8 on the phone:  After ensuring your phone/tablet is rooted, Install the App.

Linux on Android PhoneIn the app, on the top LEFT menu – find  REPOSITORIES and select Debian 8 for ARM.

On the bottom right is a drop down – you should go in there and select INSTALLATION TYPE – directory (OR FILE with a reasonable file size limit – say 5GB – the 2GB default will NOT work). Change the user to “pi” with suitable password in the same menu. TICK for allowing initialisation – and use of SSH server. Also where you see INIT SYSTEM change that to sysv. 

Then TOP RIGHT menu  - INSTALL – that might take some time – top right again CONFIGURE – then bottom menu START – and you should have a working Linux you can get into with for example WINSCP for that “pi” user. The IP address is clearly shown in the App.

I suggest not going further until you are comfortable with the above – took me several attempts because I didn’t follow the above exactly (well, and Antonio and I were learning at the same time).

Running the script: Via WinSCP or similar, put the script into the pi directory – changing permissions as normal - run the script – and ensure PHONE is selected – it isn’t by default. Come back after lunch. The script will no doubt suggest a reboot. Instead, hit the STOP button on the bottom of the phone screen – wait for it complete, hit the START button – wait – and you should now have everything in the script running!

Now – I’m using this to run my script – but I’m thinking you COULD use it to serve files etc. – I’ve not tried this but I’m guessing it would be easy to access an SD card…. and make that a folder…. hmmm.

Anyway, it is now the day after I installed all this – the phone is sitting there “off” and unlike my FriendlyArm board with it’s whirling fan, is sitting silently and freezing cold yet ran the script much faster than any of my SBCs – around 40 minutes.

K10000 running Debian 8No guarantees as there just isn’t enough info about Linux Deploy out there (unless you find/translate some) – but it does seem to work well now that we’ve made sufficient alterations to the script to take this particular setup into account. A fun project, to be sure. Now, I know this is a not a fair comparison and tomorrow we might come back and say … no good (for whatever reason).. but at £107 for that particular phone… compare – how much would it costs for a Raspberry Pi 3, uninterruptable power supply able to keep the phone going for something like a couple of days with no power, a high-def touch screen, a solid case for the whole thing.. indeed ,it might be possible to use a cheap tablet…  I was looking on Ebay – 16GB Android tablet – perfectly working except for missing buttons and cracked digitiser – around £10

One thing to note – I’ve turned rsyslog messages off – it was spitting out all sorts of unwanted helpful messages when you changed brilliance on the phone or disconnected the USB etc –REALLY annoying.. If you feel you need logging on -

sudo service rsyslog start

That will stay on until the next stop-start…

Node-Red running on a K10000 phoneSuch a shame it isn’t clear how to access some of the peripherals like audio. But who knows – someone reading this article may already have solved such challenges.

Please note: the pretty colours on the right do not come as standard. Click images to see larger versions.

This is really starting to look GOOD!!!!

Revelation: I’ve now taken on-board ideas from others and thanks for that – both people in here and on Google+ – most of the other solutions are longwinded and need other packaged  so up to now Linux Deploy – I’m now installing on my old Nexus 7 2012 using Linux Deploy (which is completely self-contained and offers full root access – is looking the best). The ONLY thing you can’t do is use the Android peripherals – because of lack of UK info but this morning I figured it all out. 

Ok, bear with me – you have Node-Red on Linux – and MQTT. So, you run Tasker on the phone (in the Android section) with MQTT – and now you have access to and control of all of the Android facilities that TASKER can handle (i.e. just about the lot) from within the Debian environment. Doddle.. now all I need is some time!!

Out-takes: Lovely in theory, I had my already-rooted K10000 up and running in no time with Linux – then up popped a message to say I needed a WIFI upgrade. Well, wasn’t I daft enough to install this rather than leaving well enough alone. One dead phone with the little green Android man and red triangle. I went off to get a factory image and installed Android 6 on the phone – only to then realise that KingRoot won’t root that.. so – back to the web for Android 5.01 – which then worked. 3 hours lost. Life is not without challenges.

Facebooktwittergoogle_pluspinterestlinkedin

The post Android Phone as Server appeared first on Scargill's Tech Blog.

Android Phone as Resource

$
0
0

This  is the following up the previous Android Phone as Server article. Last update 20/03/2017.

Servers: So having now tried various phones and tablets, it does look like the Linux Deploy App on a rooted Android phone makes for a good Debian installation in order to run software like Apache, SQLITE, MQTT and Node-Red – in some cases surpassing the capabilities of the likes of Raspberrry Pi by some way. When I say it looks that way, it is to early to comment on reliability – though my little K10000 monster phone has now been sitting on the bench for several days running this stuff without a hitch.

Resource: The next step then is to add value to this – modern Android phones are awash with features, none of which are currently being used in this setup. With MQTT communication, it seems natural to take all of those sensors and outputs and use them, firing info back and forth in MQTT or similar between Debian (Node-Red for example) and the Android phone (or tablet).

Some time ago when messing with the infamous TASKER  on Android – which can access most phone/tablet features, I noted the Tasker/MQTT plug-in – which means that Tasker can communicate via MQTT. The only problem with this – is that the MQTT app has not been updated since 2015, recent reviews suggest that it packs in after a while and the author does not at first glance appear to be responsive. I’ve written to him and not yet had any answer. This makes me extremely reticent to go down this route. I’m wondering if there are other ways to use Tasker to do the same thing. Remember that for this to be useful, this has to be something that will start up automatically when the phone is on – and also something that will run in the background when the phone is on standby.

So recently, friend Antonio sent me a link to another option – Sensor Node – the link here is to the free version and I splashed out and bought the full one. This seems ideal, instant access to at least sensors (though not controls) via MQTT at a user-selectable rate. Well, it didn’t quite work out that way when I tested it – firstly some of the touted sensor readings for some inexplicable reason are not included in the options for MQTT output -  like battery power and percentage charge – which would be really very good for sensing if the power has been lost and doing something about it – (like backing up any RAM cache to disk).  I’ve written to the author and asked about this – but when I started testing this it got worse, the software would not store my MQTT readings properly and there is no facility that I can see to run this in the background or ensure that readings commence when the phone starts up.

Anyway it turned out that Sensor Node was CRAP – even the paid version-and it turns out that there is an updated MQTT Client add-in for Tasker so I gave THAT a go.

Verdict:  It is looking like TASKER and the MQTT Client plug-in are winners. It did not take long to have Tasker sending BATTERY STATUS back to Debian every time the percentage changed – and in the process I found this link detailing a LOAD of variables you can use. The next thing was to get a Tasker task taking in an MQTT message and SPEAKING it out – that works a treat.  If I could just figure out how to get it to take in serial (see the article on the RFLINK gadget) – I could take in my doorbell presses and have them play bells!!!

Facebooktwittergoogle_pluspinterestlinkedin

The post Android Phone as Resource appeared first on Scargill's Tech Blog.


RFLink and Node-Red

$
0
0

RFLink Board and MegaA couple of weeks ago I went to stay with my pal Jonathan and he had some Byron doorbell pushes to play with. He showed me a universal RF 433Mhz receiver board he purchased which could look at the signals from the various kids of 433Mhz standard transmitting units. This was interesting as I have an Acurite weather station with the most appalling interface which requires a PC to be on constantly in order to remotely access the information. I don’t know what planet the designers were on – but it was a gift from my wife, solar powered and including rain level, wind speed and direction etc.. a nice job other than the software. It has been sitting outside the wall on my office for months doing nothing.  I thought it might be interesting to get that going.

RFLink

The unit my friend was using was rather expensive but he suggested I try the RFLink software along with a DIY unit comprising an Arduino Mega2560, a little board called an RFLink V1.1.4 and an antenna – you see the lot here.

tmpC75DThe kit arrived days ago and I put it together with a soldering iron easily enough but had to wait for a Mega board to arrive which it did this week. I downloaded the software – very simply install program for the PC – couple of button presses really – and that was that. I plugged the little RF board into the MEGA, plugged the Mega into my PC and… out of the blue, information from my Acurite board appeared out of no-where, as did  more one-liners from my Byron button presses and even our doorbell. It took no time at all with help from a fellow enthusiast who’s used this stuff before to figure out how to send a signal back to the doorbell to make it work.

All very nice but I needed this into Node-Red.

I took my latest Raspberry Pi using DietPi and after adjusting comms permissions, simply plugged the USB device into the Pi and set up a serial node for both transmit and receive.

From there on it was easy. Far from complete - but thought you might be interested – the combination of the two boards and that software seems to work really well up to now for receiving from 433Mhz sensors and for sending out commands to 433Mhz boards. I have a slight concern about how long you have to leave the Byron SX35 pushbuttons before pressing again (3 seconds). No idea what that delay is necessary but I have mentioned this to the author.

Valid input instructions from the various sensors is in this link along with the Arduino software download….

http://www.nemcon.nl/blog2/protref

I bought a bog-standard Arduino 2560 (cheap Chinese version)

I bought this board… the RFLink 433 kit – requires a little soldering…

https://www.nodo-shop.nl/en/21-rflink-gateway

10 minute soldering (take note of version numbers – important), 10 minutes max to blow the software. Test the board (56k baud) to ensure when nearby sensors are sending results – they are coming in and then I wrote this test… it isn’t very elegant yet.

RF433

// So firstly a generic means of getting incoming items into an object

var the433 = {};

node.warn(msg.payload.substring(1));
var parts433 = msg.payload.substring(1).split(";");

the433.p1 = parts433[0];
the433.p2 = parts433[1];
the433.name = parts433[2];

var a = 3;
while (a < parts433.length) {
    var bits433 = parts433[a].split("=");
    switch (bits433[0]) {
        case "ID": the433.id = bits433[1]; break;
        case "SWITCH": the433.switch = bits433[1]; break;
        case "CMD": the433.cmd = bits433[1]; break;
        case "SET_LEVEL": the433.set_level = parseInt(bits433[1], 10); break;
        case "TEMP": the433.temp = parseInt(bits433[1], 16) / 10; break;
        case "HUM": the433.hum = parseInt(bits433[1], 10); break;
        case "BARO": the433.baro = parseInt(bits433[1], 16); break;
        case "HSTATUS": the433.hstatus = parseInt(bits433[1], 10); break;
        case "BFORECAST": the433.bforecast = parseInt(bits433[1], 10); break;
        case "UV": the433.uv = parseInt(bits433[1], 16); break;
        case "LUX": the433.lux = parseInt(bits433[1], 16); break;
        case "BAT": the433.bat = bits433[1]; break;
        case "RAIN": the433.rain = parseInt(bits433[1], 16) / 10; break;
        case "RAIN": the433.rainrate = parseInt(bits433[1], 16) / 10; break;
        case "WINSP": the433.winsp = parseInt(bits433[1], 16) / 10; break;
        case "AWINSP": the433.awinsp = parseInt(bits433[1], 16) / 10; break;
        case "WINGS": the433.wings = parseInt(bits433[1], 16); break;
        case "WINDIR": the433.windir = parseInt(bits433[1], 10); break;
        case "WINCHL": the433.winchl = parseInt(bits433[1], 16); break;
        case "WINTMP": the433.wintmp = parseInt(bits433[1], 16); break;
        case "CHIME": the433.chime = parseInt(bits433[1], 10); break;
        case "SMOKEALERT": the433.smokealert = bits433[1]; break;
        case "PIR": the433.pir = bits433[1]; break;
        case "CO2": the433.co2 = parseInt(bits433[1], 10); break;
        case "SOUND": the433.sound = parseInt(bits433[1], 10); break;
        case "KWATT": the433.kwatt = parseInt(bits433[1], 16); break;
        case "WATT": the433.watt = parseInt(bits433[1], 16); break;
        case "CURRENT": the433.current = parseInt(bits433[1], 10); break;
        case "CURRENT2": the433.current2 = parseInt(bits433[1], 10); break;
        case "CURRENT3": the433.current3 = parseInt(bits433[1], 10); break;
        case "DIST": the433.dist = parseInt(bits433[1], 10); break;
        case "METER": the433.meter = parseInt(bits433[1], 10); break;
        case "VOLT": the433.volt = parseInt(bits433[1], 10); break;
        case "RGBW": the433.rgbc = parseInt(bits433[1].substring(0, 2), 16);
            the433.rgbw = parseInt(bits433[1].substring(2, 4), 16); break;
    }
    a++;
}

// SO - the above is general... here is my specific setup for temporarily displaying
// the Acurite info
if ((the433.p1 == "20") && (the433.name == "Acurite") && (the433.id == "c826")) {
    if (typeof the433.temp !== 'undefined') temp = the433.temp;
    if (typeof the433.hum !== 'undefined') hum = the433.hum;
    if (typeof the433.bat !== 'undefined') bat = the433.bat;
    if (typeof the433.rain !== 'undefined') rain = the433.rain;
    if (typeof the433.winsp !== 'undefined') winsp = the433.winsp;
    if (typeof the433.windir !== 'undefined') windir = the433.windir;

    node.warn("Temperature: " + temp + "c");
    node.warn("Humidity: " + hum + "%");
    node.warn("Battery: " + bat);
    node.warn("Rain: " + rain + "mm");
    node.warn("Wind Speed: " + winsp + "km/h");
    node.warn("Wind Dir: " + (windir * 22.5) + " degrees");
}

Put that in a Node-Red template – attach a Node-Red serial Node set to take serial input from USB0 at 56k – character /r as a separator and deliver ascii strings…and that – is just the beginning…


If you like this post – please share a link to it by social media, by email with friends or on your website.
More readers means more feedback means more answers for all of us. Thank you!

Facebooktwittergoogle_pluspinterestlinkedin

The post RFLink and Node-Red appeared first on Scargill's Tech Blog.

The Mint Experiment

$
0
0

Anyone who’s known me for years knows I’m a died in the wool Windows man.  Over many years from Windows 3.1 onwards, I’ve done down that road until ultimately all my machines are now Windows 10 – and I have to say that, while it could be argued before Windows 7 that it was not the most reliable operating system in the world, from that point on pretty much all of that changed. I regularly leave Windows 10 machines running for weeks on end and I’m sure they’d keep going for many months if it were not for the only remaining issue- that of pesky updates which Microsoft are determined we have whether we like it or not.

Now to be fair there was a time when Adobe – a company I cannot stand, used to issue updates for Acrobat almost on a daily basis and at least that no longer happens. I can usually tell when Windows wants me to update because Skype conversations become almost unusable and other strange things happen – at that point I reboot the machine and lo and behold – a Windows update is in progress – don’t turn off your machine. Thanks – I’m in a hurry for  train…

In my previous role as IT Director of the FSB, I would take it upon myself, being a hands-on type, from time to time, to try the latest Linux on one of our PCs, only to end up with utter disappointment as it would fail to connect to a WIFI access point or the video would hang over the end or some such issue – there was always SOMETHING – and so I would scrap that idea for a several months before trying again. At one point I used to get hate mail from  members who were clearly selling Linux machines -  for supporting Microsoft! Serious hate mail.  So over the years I kept trying again and always ending up with disappointment. (I’ve never used Linux on my personal machines because yes, I do like the latest state of the art, graphically intensive games and yes I do use lots of proprietary packages such as Magix and others which are simply not available on Linux.

In recent times as regular readers know, I’ve been forced into taking an interest in Linux because Debian (a Linux variation) runs on the Raspberry Pi. 2 years ago I bought a Raspberry Pi 2 (having played with the original Pi, loaded up the graphical operating system and immediately put it on Ebay in disgust at the speed). On the Pi2, I was pleasantly surprised to see that Raspbian ran at a reasonable speed and since then I’ve done many different board reviews and installed Raspbian and Debian on lots of boards, leaning on experts along the way as my knowledge started to build.

A while back I took the plunge and installed Ubuntu onto one of these boards and with help from others soon came to realise that there were not THAT many differences between Debian and Ubuntu and one of the things that has struck me in all this time is how reliable the operating system can be – I’ve a Pi that’s been sitting controlling stuff for well over a year now without as much as a sneeze despite me poking live updated and tweaks into it without rebooting.

Linux Mint on an old Dell laptop

And so with that in mind, last week I took an old DELL E4300 I had lying around which had simply refused to update to Windows 10 from Windows 7 (no matter how many ways I came at it) and which was so old it was really not worth opening up – and grabbed myself a USB stick with Ubuntu on it, ready after maybe 3 years of abstinence and armed with much better knowledge than previously, to try again.

Well, what a disappointment that was. Ubuntu loaded up no problem, with it’s rather dated looking purple interface – and asked me for my WIFI password – I promptly gave it this – and before long I had a working laptop. Or so I thought. The WIFI icon looked broken – yet I could pull up a browser and go on the web  - no problems. I was impressed by the ability to watch video on the BBC website, something that in the past on Linux was just not on.

tmp95E7That enthusiasm lasted maybe an hour. The App store decided not to work – coming up blank. But hey, that was just one program. I noted a nice graphical email client complete with calendar. I set it up and within minutes I had my Google calendar up and running. But as soon as I tried putting in email  - “Cannot get email as there is no Internet connection”. I opened a browser and sure enough the Internet was fine – but still that broken WIFI indicator. From there, things went downhill – it could not store draft emails due to a permissions issue and – nope – sorry life is TOO SHORT FOR THIS – I was reminded of the frustration of previous years… what HAVE these Linux guys being doing all this time, I thought.

I was in the process of giving up when I read something about Linux MINT. I liked the interface. In the instructions for installation I had to go get PendriveLinux so I could install the image on a USB stick. You should be seeing links here as appropriate. I went off to the official download page and picked the 64 bit version using the Xfce graphical interface as it had been suggested that while simple out of the box, this version had lots of options. I put the Mint Linux onto the USB stick and put it into the laptop. I must admit I found a certain satisfaction in wiping Ubuntu. The installation went well and WIFI came up but this time, no broken WIFI indicator. The taskbar seemed to be missing a battery indicator but It didn’t take me long to figure out how to add all sorts of widgets to the taskbar to make me feel at home (including a battery indicator).

I noted that Thunderbird email was installed and I set that up with my two email accounts – no problem whatsoever… but no calendar. Of course, that’s a plug in and it needs another plug-in to get Google calendar functionality – but all of that took mere moments to organise and now I have fully fledged email and calendar. Granted it is a little slow at pulling in the 35,000 emails in my main in-box – but it’ll get there I’m sure.

I hit a few obstacles on the way - my by now standard VNC server would not have it until Mr Shark suggested I try  x11VNC – that worked a treat.  Then I had it asking pesky password questions every time I tried to breath – that was easy to fix  - then I noted on power up that the KEYRING wanted another password – you’d think I was operating a bank. That went quickly – and from there everything went smoothly.  But this was Linux MINT – about which I know nothing at all. The funny thing was, doing an APT-GET UPDATE showed that in fact this is Ubuntu Xenial… now I’d already, with lots of help from MrShark, modified my all-singing install script for Ubuntu. I didn’t really expect it to work on this machine but having written down the steps to put everything together I thought “what the hell” and ran the script – it failed of course as it looks for UBUNU, DEBIAN, RASPBIAN or DIETPI – and this was LINUXMINT. I added a check for the latter THOROUGHLY expecting a host of horrific error and compatibility errors.

I was with some delight that I returned 15 minutes later to find that not only had the script worked – but without a single error – adding NodeJS, Node-Red, Apache, PHP 7, Mosquitto, SQLITE, MC and several other programs to my installation.  I rebooted to ensure I wasn’t dreaming – sure enough – everything worked.

The laptop has no Bluetooth interface so I plugged in one of those cheap Chinese Bluetooth USB units… and went off to the Bluetooth controls – without ANY hassle my Bluetooth mouse connected!!! I plugged in my Bluetooth headset – it got that – I went off to the BBC website and…news.bbc.co.uk – the Bluetooth headset didn’t connect automatically – so I went to the volume control – it was in the options – sure enough – perfectly synced Bluetooth.

Now if SKYPE video will just work….

Up to now, hours later, I have a nicely usable laptop with all my development toys (well maybe not NotePad++ but there are a couple of decent Linux editors,  my email and calendar, Chrome browser and a full office suite – making an otherwise pretty hopeless old laptop into a useable tool!

Issues: This morning I ran out of battery. A sign came up to say the battery is low – save your work – but that that point the mouse and keyboard stopped working – hence saving work was impossible. A moment later, the laptop shut down. I charged it and it came straight back up with the same message – I had no option but to shut it down (sluggish mouse response as an aside). After rebooting all was well.   Also Skype does not appear to survive power cycling and has to be loaded again.

Facebooktwittergoogle_pluspinterestlinkedin

Sonoff 4CH 4 Channel Mains Control

$
0
0


Sonoff Sonoff 4CHA parcel turned up for me today – the Sonoff 4CH. You may recall I wrote some time ago about a smaller version they put out and I was quite scathing about the wiring. I turned out as you recall that this was a third party product and they were in the process of making their own version. Well, this is it.

The unit uses an ESP8285 (like the 8266 but with built-in Flash) to make a low cost 4-way mains power switch in a very nice DIN box. The price of the unit, at around £11.53 + postage, makes it cheaper than some people charge just for the box!!!

If you read this blog regularly you’ll know I’ve no interest in running their products on their own cloud – and that despite having my own very comprehensive software, this fellow has recently IMHO taken the lead in powering Sonoff products with his code. Well, it just so happens he supports this boar,  so this morning I grabbed the latest software, put in my MQTT and WIFI credentials, made the one change to the code needed to run this board (a single define) and off I went to open the board up.

Inside is the usual handy programming connector needing 3v3 and ground as well as serial in and out from an FTDI. As usual, I broke all the rules and instead of using a proper 3v3 supply I powered the board for the purposes of programming, directly from the FTDI – remembering to set it to 3v3 and not 5v.  At first I got nowhere until I realised I still had my Arduino environment set to ESP8266 – a quick check and there is indeed a setting for the smaller board.

And that was it – nothing to report really – it works as you’d expect.  Now what I don’t understand are the little covers – which on one side of the board cover up the 4 buttons to turn the outputs on and off (one of them is also the programming button) and on the other side the LEDs.  I will be drilling 5 holes in there so I can actually see the LEDs – but that’s just me.

Itead Sonoff 4CHDIN mounting, well put-together, inexpensive 4-relay switching.  The information claims you can use a maximum of 2.5Kw and that each output is 10 amps… well, I’m not sure I’d want to put 10 amps through there especially inductive, maybe more like half of that, while obeying the total of no more than 2.5KW.  There’s a little fuse on the board on the incoming live - but to save opening it up in the event of problems and finding a tiny fuse, I’d be thinking about the lowest sensible value of fuse in your power lead. I put a 10 amp fuse in there and may yet replace it with a 5 amp (of course what this means depends on which side of the pond you are on – we Brits get a lot more power out of 10 amps than our American friends).

You may notice something odd  - or depending where you live you might not find it odd at all – the neutral block is green and the earth block is grey. You see, being a Brit – I associate earth with grass – i.e. green and our earth wire is either green or some combination of green and yellow… so I could see someone being caught out by that – you’ll notice my wiring looks off with the green earth heading into the grey box!!!   Those push connectors incidentally work a treat! With previous Sonoff products I had people asking me what to do with the Earth wire – no such problem here.

This one is going to Spain with me – we have Star wiring over there and spare room on the power DIN rail so this will fit in very nicely to control some lighting and one small heater over there. If you’re starting from scratch this could make a decent low-cost-per-relay move into home control along with whatever software you use to control things – in my case – I send commands out from Node-Red via MQTT straight to the board over WIFI.


ITead Sonoff 4CH circuit board


At least on the surface, another winner from this company. Don’t all rush as Itead are on Chinese holiday until 3rd of Feb!

Facebooktwittergoogle_pluspinterestlinkedin

What, ANOTHER Gauge?

$
0
0

Now, before you say anything – this gauge is different to the rest.. It is all mine and it EVOLVING (last update Feb 03) if you’ve seen this blog entry before today…

Gauges: Peter Scargill's GaugeI’ve spent a lot of time ploughing through code, some of it years old (SteelSeries) and though many of these designs are beautiful, most are not that well supported if at all and some comprise libraries that are kitchen sink jobs that take some learning, so much so that recently, in a fit of peak, after failing to figure out how to add a simple second dial or eliminate the wasted space of that metal outer ring in SteelSeries (it is easy to make it disappear but not the space it occupies) that I decided to “give it a go” myself.

What you see here is not finished but it works (and is a lot prettier when you see it running).  It scales without internal adjustments other than the gauge size as I need something that will easily adapt to differing Node-Red template blocks.

Images: There are several images on my site – don’t use them permanently please – grab them for yourself – they likely will change anyway.

As the dials move below the (circular) set-points the LEDS will go on and off – one triggers BELOW the set-point (heat), the other ABOVE (dehumidifier).

In the process of making this I’ve made a number of dials and centres – all in PowerPoint – very simple.

Centre 1 by Peter ScargillCentre 2 by Peter ScargillCentre 2 by Peter Scargill

I call these three metalCarvedCentre.png, greenCarveCentre.png and greyCentre.png respectively. I don’t plan to make a lot as there must be millions of needles and centres out there already.

tmpFF04Glowing rings are easy to add… and I’m working on an LCD display background image that’s hopefully a little more convincing than the canvas-manufactured version I’m using right now.

Glowing rings by Peter Scargill - in PowerPoint

If you poke the test values, you should see the gauge needles move smoothly to their destination. So I’m really happy about (and this happens a LOT it seems) having to update the whole thing every 20ms for animation when all I want is to update the dials (and an LCD panel eventually) – but I can’t find LAYERS anywhere.

What I HAVE done elsewhere is use Z-laying with multiple canvases to achieve layering as you will see in the link below. Originally I had 3 layers – the background, the bits that change and the knob over the needle – all of which SHOULD have worked perfectly – but for reasons beyond me the knob didn’t always show. I moved it in with the dial and all is well – so only two identical canvas units are needed. This seems like a good general way forward. I will change my main dial code to follow this pattern eventually when I've pondered what effect this will have on interfacing.  Anyway, I put this together from scratch and it seems to work ok, Take a look at this.. https://jsfiddle.net/scargill/r4qstas2/6/

tmp42D9

A timer runs constantly but does nothing unless a change is made  and the values are then incremented or decremented until they  match the required values.

I think this will make a fine addition to the visual tools we have but still needs much tidying up so no comments about code quality please.

Fonts: Fonts are always a thing – and the normal web ones are today considered to be utterly pants. So – TTF fonts are good but also large – so I found this online convertor. You simply drag a TTF file of your choosing (clearly if for commercial purposes, you need to make sure it is free) and you get the option to download from a link – it works. So I wanted a nice dot matrix font for the little display here – and I found “Dots all for Now JL” which is pretty but also 44K. I ran it through the convertor and in less than a minute I was up and running with a font that is only 7k.

To use the font, I did this..

<style type="text/css">
@font-face {
font-family: "DOTMAT";
src: url("/myfonts/dotsalfn.woff") format('woff');
}
</style>

and then just referred to DOTMAT as you would any font. Now there are all sorts of warnings on the web about ensuring fonts are loaded first and working with CANVAS etc. – but somehow, in Node-Red, it all just works… which is nice and keeps the code simple.

And that’s it for now. I’m working on improving the code.

[{"id":"22bad52a.82347a","type":"ui_template","z":"c552e8d2.712b48","group":"40cf30b4.d9549","name":"MyGauge","order":0,"width":"6","height":"6","format":"<style>\n  @font-face {\n    font-family: \"DOTMAT\";\n    src: url(\"/myfonts/dotsalfn.woff\") format('woff');\n  } \n</style>\n\n<script>\n  var showNeedle2 = true;\nvar showLED1 = true;\nvar showLED2 = true;\nvar needleWidth1 = 1;\nvar needleWidth2 = 1;\n\nvar set1 = 0;\nvar set2 = 0;\nvar value1 = 0;\nvar value2 = 0;\n\nvar setpoint1 = -1;\nvar setpoint2 = -1;\nvar degrees = -1;\nvar degrees2 = -1;\n\nvar title = \"Pete's Aircon\";\nvar subTitle = \"Hmm1\";\nvar ledTitle1 = \"DEHUM\";\nvar ledTitle2 = \"HEATING\";\n\nvar needle1 = new Image();\nvar needle2 = new Image();\nvar centre = new Image();\n\n\n\nvar direction1 = 1;\nvar direction2 = 1;\n\n(function(scope) {\n  scope.$watch('msg', function(msg) {\n    if (typeof(msg.value1) != \"undefined\") value1 = msg.value1;\n    if (typeof(msg.value2) != \"undefined\") value2 = msg.value2;\n    if (typeof(msg.set1) != \"undefined\") set1 = msg.set1;\n    if (typeof(msg.set2) != \"undefined\") set2 = msg.set2;\n  });\n})(scope);\n\n\n\n\nfunction n(n) {\n  return n > 9 ? \"\" + n : \"0\" + n;\n}\n\n\nfunction init() {\n  needle1.src = \"http://www.scargill.net/things/needles/redCurvedNeedle.png\";\n  needle2.src = \"http://www.scargill.net/things/needles/greenCurvedNeedle.png\";\n  centre.src = \"http://www.scargill.net/things/needles/greyCarvedCentre.png\";\n  canvas = document.getElementById(\"fred\");\n  ctx = canvas.getContext(\"2d\");\n  cX = Math.floor(canvas.width / 2);\n  cY = Math.floor(canvas.height / 2);\n  dX = cX / 175; // divisor for centrepiece sizing\n  dY = cY / 175;\n\n  setInterval(draw, 50);\n\n}\n\n// draw a wedge\nfunction drawWedge(percent, color, count) {\n  var arcRadians = ((percent / 100) * 360) * (Math.PI / 180),\n    startAngle = totalArc,\n    endAngle = totalArc - arcRadians;\n  ctx.save();\n  ctx.beginPath();\n  ctx.moveTo(cX, cY);\n  ctx.arc(cX, cY, radius_outer, startAngle, endAngle, true);\n  /** cut out the inner section by going in the opposite direction **/\n  ctx.fillStyle = color;\n  ctx.arc(cX, cY, radius_inner, endAngle, startAngle, false);\n  ctx.closePath();\n  ctx.fill()\n  ctx.restore();\n  totalArc -= arcRadians;\n}\n\nfunction drawbit(i, colr) {\n  if (i & 1) drawWedge(1.1, colr, i);\n  else drawWedge(0.2, \"#cccccc\", i);\n}\n\n// draw the donut one wedge at a time\nfunction drawDonut() {\n  var r, g, b;\n  b = 0;\n  g = 0;\n  r = 255;\n  for (var i = 0; i < 100; i++) {\n    var r, g, b;\n    if (i < 40) {\n      g += 8;\n    }\n    if ((i > 40) && (i < 70)) {\n      g -= 8;\n      r -= 12;\n    }\n    if (i > 70) {\n      g -= 8;\n      b += 12;\n    }\n    drawbit(i, \"rgba(\" + r + \",\" + g + \",\" + b + \",1)\");\n  }\n}\n\nfunction roundRect(ctx, x, y, width, height, radius, fill, stroke) {\n  if (typeof stroke == 'undefined') {\n    stroke = true;\n  }\n  if (typeof radius === 'undefined') {\n    radius = 5;\n  }\n  if (typeof radius === 'number') {\n    radius = {\n      tl: radius,\n      tr: radius,\n      br: radius,\n      bl: radius\n    };\n  } else {\n    var defaultRadius = {\n      tl: 0,\n      tr: 0,\n      br: 0,\n      bl: 0\n    };\n    for (var side in defaultRadius) {\n      radius[side] = radius[side] || defaultRadius[side];\n    }\n  }\n  ctx.beginPath();\n  ctx.moveTo(x + radius.tl, y);\n  ctx.lineTo(x + width - radius.tr, y);\n  ctx.quadraticCurveTo(x + width, y, x + width, y + radius.tr);\n  ctx.lineTo(x + width, y + height - radius.br);\n  ctx.quadraticCurveTo(x + width, y + height, x + width - radius.br, y + height);\n  ctx.lineTo(x + radius.bl, y + height);\n  ctx.quadraticCurveTo(x, y + height, x, y + height - radius.bl);\n  ctx.lineTo(x, y + radius.tl);\n  ctx.quadraticCurveTo(x, y, x + radius.tl, y);\n  ctx.closePath();\n  if (fill) {\n    ctx.fill();\n  }\n  if (stroke) {\n    ctx.stroke();\n  }\n}\n\nfunction drawCircle() {\n  ctx.save();\n  /** outer ring **/\n  ctx.beginPath();\n  ctx.moveTo(cX, cY);\n  ctx.shadowBlur = 5 * dX;\n  ctx.shadowColor = \"rgba(40,40,40,1)\";\n  ctx.arc(cX, cY, radius + (8 * dX), 0, 2 * Math.PI, false);\n  ctx.arc(cX, cY, radius + (6 * dX), 0, 2 * Math.PI, true);\n  ctx.closePath();\n  ctx.fillStyle = \"rgba(40,40,40,1)\";\n  ctx.fill();\n  ctx.restore();\n  \n  \n  // do an arc of numbers...\n   ctx.save();\n    ctx.translate(canvas.width / 2, canvas.height / 2);\n    ctx.rotate(-140 * (Math.PI / 180));\n    ctx.font = \"bold \" + String(Math.floor(cX / 13)) + \"px Helvetica\";\n    ctx.textAlign = 'center';\n    ctx.fillStyle = '#000000';\n    for (var a=0;a<=100; a+=10)\n    {\n    ctx.rotate(23 * (Math.PI / 180));\n    ctx.fillText(n(a), 0, -(cY*0.65)); \n    }\n    ctx.restore();\n  \n\n  ctx.save();\n\n  if (showLED1 == true) {\n    /** Sub label 1 **/\n    ctx.font = \"bold \" + String(Math.floor(cX / 14)) + \"px Helvetica\";\n\n    // ctx.font = \"bold \" + String(Math.floor(cX / 14)) + \"px Helvetica\";\n    ctx.textAlign = 'center';\n    ctx.fillStyle = '#8A8A8A';\n    ctx.fillText(ledTitle2, cX + (cX / 2.5), cY - (cY / 9), (cX / 1));\n    if (degrees < setpoint2) {\n      ctx.beginPath(); // red led - size and scale need to be related to canvas - currently fixed\n      ctx.arc(cX + (cX / 2.5), cY, (cX / 15), 0, 2 * Math.PI, false);\n      ctx.closePath();\n      ctx.shadowBlur = 20;\n      ctx.shadowColor = \"rgba(255,0,0,1)\";\n      ctx.fillStyle = \"rgba(255,0,0,1)\";\n      ctx.fill();\n      ctx.restore();\n    } else {\n      ctx.beginPath(); // red led - size and scale need to be related to canvas - currently fixed\n      ctx.arc(cX + (cX / 2.5), cY, (cX / 15), 0, 2 * Math.PI, false);\n      ctx.closePath();\n      ctx.fillStyle = \"rgba(140,40,40,1)\";\n      ctx.fill();\n      ctx.lineWidth = 2 * dX;\n      ctx.strokeStyle = 'rgba(40,0,0,0.6)';\n      ctx.stroke();\n      ctx.restore();\n    }\n  }\n  if (showLED2 == true) {\n    /** Sub label 1 **/\n    ctx.font = \"bold \" + String(Math.floor(cX / 14)) + \"px Helvetica\";\n    ctx.textAlign = 'center';\n    ctx.fillStyle = '#8A8A8A';\n    ctx.fillText(ledTitle1, cX - (cX / 2.5), cY - (cY / 9), (cX / 1));\n\n    if (degrees2 > setpoint1) {\n      ctx.save(); // green led - size and scale need to be related to canvas - currently fixed\n      ctx.beginPath();\n      ctx.arc(cX - (cX / 2.5), cY, (cX / 15), 0, 2 * Math.PI, false);\n      ctx.closePath();\n      ctx.shadowBlur = 20;\n      ctx.shadowColor = \"rgba(0,200,0,1)\";\n      ctx.fillStyle = \"rgba(0,200,0,1)\";\n      ctx.fill();\n      ctx.restore();\n    } else {\n      ctx.save(); // green led - size and scale need to be related to canvas - currently fixed\n      ctx.beginPath();\n      ctx.arc(cX - (cX / 2.5), cY, (cX / 15), 0, 2 * Math.PI, false);\n      ctx.closePath();\n      ctx.fillStyle = \"rgba(40,110,40,1)\";\n      ctx.fill();\n      ctx.lineWidth = 2 * dX;\n      ctx.strokeStyle = 'rgba(0,40,0,0.6)';\n      ctx.stroke();\n      ctx.restore();\n    }\n  }\n\n  /** Main label **/\n  ctx.save();\n\n  ctx.beginPath;\n  roundRect(ctx, cX - (cX / 1.7), cY + (cY / 3), cX + (cX / 5.1), cY - (cY / 1.5), dX * 10, true);\n  ctx.clip()\n\n  ctx.beginPath;\n  ctx.strokeStyle = 'black';\n  ctx.lineWidth = 5;\n  ctx.shadowBlur = 15;\n  ctx.shadowColor = 'black';\n  ctx.shadowOffsetX = 0;\n  ctx.shadowOffsetY = 0;\n  ctx.fillStyle = \"rgba(255, 255, 180, .8)\";\n  roundRect(ctx, cX - (cX / 1.7) - 4, cY + (cY / 3) - 4, cX + (cX / 5.1) + 8, cY - (cY / 1.5) + 8, dX * 10, true);\n\n  ctx.restore();\n  ctx.save();\n\n  ctx.font = \"bold \" + String(Math.floor(cX / 8)) + \"px DOTMAT\";\n  ctx.textAlign = 'center';\n  ctx.fillStyle = '#8A8A8A';\n  ctx.fillText(title, cX, cY + (cY / 2.05));\n\n  /** Sub label **/\n  ctx.font = \"bold \" + String(Math.floor(cX / 12)) + \"px Helvetica\";\n  ctx.textAlign = 'center';\n  ctx.fillStyle = '#8A8A8A';\n  ctx.fillText(subTitle, cX, cY + (cY / 1.65));\n  ctx.restore();\n}\n\nfunction draw() {\n\n  if ((set1 == setpoint1) && (set2 == setpoint2) && (value1 == degrees) && (value2 == degrees2)) return;\n\n  if (set1 > setpoint1) setpoint1++;\n  else if (set1 < setpoint1) setpoint1--;\n  if (set2 > setpoint2) setpoint2++;\n  else if (set2 < setpoint2) setpoint2--;\n\n  if (value1 > degrees) degrees++;\n  else if (value1 < degrees) degrees--;\n  if (value2 > degrees2) degrees2++;\n  else if (value2 < degrees2) degrees2--;\n\n\n  width = 18 * dX,\n    radius = cX * .9,\n    radius_outer = cX * .9,\n    radius_inner = (radius - width) - (11 * dX),\n    kerning = 0.04,\n    color_alpha = 0.3;\n  totalArc = .47; // starting point for the arc\n\n  ctx.save();\n  // Radii of the white glow.\n  innerRadius = 20 * dX;\n  outerRadius = canvas.height / 2;\n  gradient = ctx.createRadialGradient(canvas.width / 2, canvas.height / 2, innerRadius, canvas.width / 2, canvas.height / 2, outerRadius);\n  gradient.addColorStop(0, 'white');\n  gradient.addColorStop(1, '#bbbbbb');\n  ctx.arc(canvas.width / 2, canvas.height / 2, canvas.height / 2 - (10 * dX), 0, 2 * Math.PI);\n  ctx.fillStyle = gradient;\n  ctx.fill();\n  ctx.restore();\n\n  drawCircle();\n  drawDonut();\n  \n  // Humid Circle\n  ctx.save();\n  ctx.beginPath();\n  ctx.translate(canvas.width / 2, canvas.height / 2);\n  tdegrees = -204 + (degrees2 * 227 / 100)\n    ctx.rotate((233 / 100 * setpoint1 - 118) * (Math.PI / 180));\n    ctx.beginPath();\n    ctx.arc(0, -(cY*0.82),cY*0.05, 0, 2 * Math.PI, false);\n    ctx.fillStyle = 'green';\n    ctx.fill();\n    ctx.lineWidth = 1.5;\n    ctx.strokeStyle = '#ffffff';\n    ctx.stroke();\n  ctx.restore();\n\n  // Temperature Circle\n  ctx.save(); \n  ctx.beginPath();\n  ctx.translate(canvas.width / 2, canvas.height / 2);\n  tdegrees = -204 + (degrees2 * 227 / 100)\n  ctx.rotate((233 / 100 * setpoint2 - 118) * (Math.PI / 180));\n  //ctx.beginPath();\n    ctx.arc(0, -(cY*0.82),cY*0.05, 0, 2 * Math.PI, false);\n    ctx.fillStyle = 'red';\n    ctx.fill();\n    ctx.lineWidth = 1.5;\n    ctx.strokeStyle = '#ffffff';\n    ctx.stroke();\n  ctx.restore();\n\n  // Save the current drawing state\n  ctx.save();\n  ctx.beginPath();\n  ctx.translate(canvas.width / 2, canvas.height / 2);\n  tdegrees = -204 + (degrees * 227 / 100)\n  ctx.rotate(tdegrees * (Math.PI / 180));\n\n  // shadow on lines??\n  ctx.shadowBlur = 4;\n  ctx.shadowColor = \"rgba(0,0,0,0.2)\";\n  ctx.shadowOffsetX = 5 * dX;\n  ctx.shadowOffsetY = 5 * dX;\n\n\n  ctx.drawImage(needle1, (canvas.width / 7) - (canvas.width / 4), -(canvas.height * needleWidth1 / 80), (canvas.height / 2), (canvas.width * needleWidth1 / 40));\n  // Restore the previous drawing state\n  ctx.restore();\n\n  if (showNeedle2 == true) {\n    // Save the current drawing state\n    ctx.save();\n    ctx.beginPath();\n    ctx.translate(canvas.width / 2, canvas.height / 2);\n    tdegrees = -204 + (degrees2 * 227 / 100)\n    ctx.rotate(tdegrees * (Math.PI / 180));\n    // shadow on lines??\n    ctx.shadowBlur = 4;\n    ctx.shadowColor = \"rgba(0,0,0,0.2)\";\n    ctx.shadowOffsetX = 5 * dX;\n    ctx.shadowOffsetY = 5 * dX;\n    ctx.drawImage(needle2, (canvas.width / 7) - (canvas.width / 4), -(canvas.height * needleWidth2 / 80), (canvas.height / 2), (canvas.width * needleWidth2 / 40));\n    ctx.restore();\n  }\n  ctx.save();\n  ctx.beginPath();\n  ctx.translate(canvas.width / 2, canvas.height / 2);\n  // draw the centre bit then restore the previous drawing state\n  ctx.drawImage(centre, (0 - (centre.height / 4)) * dX, (0 - (centre.width / 4)) * dY, (centre.height / 2) * dX, (centre.width / 2) * dY);\n  ctx.restore();\n  subTitle = \"Temp=\" + n(Math.floor(degrees)) + \"c \" + \"Hum=\" + n(Math.floor(degrees2)) + \"% \";\n}\n\ninit();\n\n</script>\n\n<canvas id = \"fred\"\nwidth = 310 height = 310 > </canvas>","storeOutMessages":true,"fwdInMessages":true,"x":980,"y":2480,"wires":[[]]},{"id":"fbecd5a1.989ac8","type":"inject","z":"c552e8d2.712b48","name":"","topic":"","payload":"22","payloadType":"str","repeat":"","crontab":"","once":false,"x":630,"y":2340,"wires":[["9f9e89fe.db3518"]]},{"id":"6e98eeac.504cf","type":"inject","z":"c552e8d2.712b48","name":"","topic":"","payload":"35","payloadType":"str","repeat":"","crontab":"","once":false,"x":630,"y":2380,"wires":[["9f9e89fe.db3518"]]},{"id":"9f9e89fe.db3518","type":"function","z":"c552e8d2.712b48","name":"msg.value1","func":"msg.value1=msg.payload;\nreturn msg;","outputs":1,"noerr":0,"x":790,"y":2360,"wires":[["22bad52a.82347a"]]},{"id":"10d0f056.a552e","type":"inject","z":"c552e8d2.712b48","name":"","topic":"","payload":"11","payloadType":"str","repeat":"","crontab":"","once":false,"x":630,"y":2420,"wires":[["9eb8ebf8.be3108"]]},{"id":"ae37427b.2f8b3","type":"inject","z":"c552e8d2.712b48","name":"","topic":"","payload":"60","payloadType":"str","repeat":"","crontab":"","once":false,"x":630,"y":2460,"wires":[["9eb8ebf8.be3108"]]},{"id":"9eb8ebf8.be3108","type":"function","z":"c552e8d2.712b48","name":"msg.value2","func":"msg.value2=msg.payload;\nreturn msg;","outputs":1,"noerr":0,"x":790,"y":2440,"wires":[["22bad52a.82347a"]]},{"id":"2251f312.3a575c","type":"inject","z":"c552e8d2.712b48","name":"","topic":"","payload":"10","payloadType":"str","repeat":"","crontab":"","once":false,"x":630,"y":2500,"wires":[["7c5ad2de.3c767c"]]},{"id":"ae3f6f46.2aed8","type":"inject","z":"c552e8d2.712b48","name":"","topic":"","payload":"20","payloadType":"str","repeat":"","crontab":"","once":false,"x":630,"y":2540,"wires":[["7c5ad2de.3c767c"]]},{"id":"7c5ad2de.3c767c","type":"function","z":"c552e8d2.712b48","name":"msg.set1","func":"msg.set1=msg.payload;\nreturn msg;","outputs":1,"noerr":0,"x":780,"y":2520,"wires":[["22bad52a.82347a"]]},{"id":"4a2ac4f5.5906dc","type":"inject","z":"c552e8d2.712b48","name":"","topic":"","payload":"30","payloadType":"str","repeat":"","crontab":"","once":false,"x":630,"y":2580,"wires":[["f6ffef5f.562ca"]]},{"id":"8f5b3775.03c018","type":"inject","z":"c552e8d2.712b48","name":"","topic":"","payload":"40","payloadType":"str","repeat":"","crontab":"","once":false,"x":630,"y":2620,"wires":[["f6ffef5f.562ca"]]},{"id":"f6ffef5f.562ca","type":"function","z":"c552e8d2.712b48","name":"msg.set2","func":"msg.set2=msg.payload;\nreturn msg;","outputs":1,"noerr":0,"x":780,"y":2600,"wires":[["22bad52a.82347a"]]},{"id":"40cf30b4.d9549","type":"ui_group","z":"","name":"testa","tab":"66a97521.af8dac","disp":true,"width":"6"},{"id":"66a97521.af8dac","type":"ui_tab","z":"","name":"testa","icon":"dashboard"}]
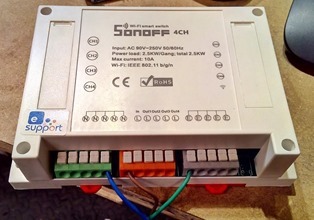
Facebooktwittergoogle_pluspinterestlinkedin

A week of Learning

$
0
0

Working on the gauge in CodePenSome may be wondering if I’ve gone off on holiday, as I normally post here on an almost daily basis. Well, if you regularly read the comments sections you’ll see I’ve been heavily involved in answering questions, but more importantly I’ve taken one step back and two steps forward on this gauge thing. Read on.

But firstly – WIN SOMETHING! You’ve probably heard me talk about my pal Peter Oakes in Canada – he has an excellent YouTube Channel in which he talks about IOT – well, he’s just launched a competition and the prizes look pretty damned impressive indeed. Take a quick looks over here – you might want to participate…. https://www.hackster.io/contests/IOT2020

Thanks:  Before going any further, I’d like to take this opportunity to thank some people in there without naming names – for several donations received this week – you have no idea how this helps motivation, knowing that your work is appreciated. Thank you, guys!

The Gauge: Now - regular visitors will know I’ve been doing a lot of work on Node-Red-Dashboard-compatible widgets recently as I really do think this is the way forward for mobile access to DIY home control systems and also for desktop and wall access via touch displays -  but one thing that has bothered me up to now was the clumsiness of some of my coding – global variables all over the place, a lot of opportunity for interference from one node to another etc. Everything just works but the perfectionist in me wants to “do the job properly”.

So earlier this week I took a step back, seeing what “proper programmers” had done with turning these widgets into “objects”, with clean interfacing to the outside world. Well, trust me, it isn’t that easy. I asked around as to how I might encapsulate my Javascript into an object, exposing only those bits that needed to be exposed. No-one I know well enough to ask for help, could help in this particular instance! So, I took a step back, grabbed some coffee and thanks to my friend Google, I’m pleased to say I’m getting somewhere.

Shortly you will see my gauge once again featured in these pages but the way it is done and bits you’ll need to look at have been dramatically changed as has the chance of unwanted interaction – and the overhead has been substantially reduced due to a series of insights which have followed each other – and some of them I’m sure some others have missed. Read on.

So first off, I made a gauge with pretty colours – you’ll see it elsewhere in this blog. It works – why take it any further?

Well, the gauge features nice, smoothly moving needles and other bits. What’s wrong with that?  Every time the needle is updated in the existing design, the entire gauge has to be re-drawn. This is not uncommon but just felt wrong to me. To tackle this I had to understand LAYERS. It turns out that if you make the position of CANVASSES absolute, you can put one on top of another (you also need to understand zIndex but that’s easy). If you can do that, then you can draw the gauge backdrop including the text and pretty-coloured segments once only on the bottom layer and only then clear and update the top layer, say, 50 times a second with needle updates etc. That saves some calculating.

But now I needed two CANVAS items which looks a little odd when setting up so I worked out how to create both, totally in Javascript. That led to another problem, in Node-Red you can’t just put your CANVAS elements in the top left corner of the page BODY – it won’t work. I then reasoned that both CANVASSES could sit inside a DIV on top of each others – and indeed they can. So now all that is needed in HTML is to define a DIV and the Javascript will do the rest.

That still left me with a mass of messy Javascript - and the thought of explaining what was and what was not relevant to end users in the blog here was keeping me awake. That’s when I started looking into this whole object encapsulation thing. 2 days ago that was a distant world, something for the future. Today, I wonder why I waited so long to take the effort to learn. I had to learn some new tricks in the process – however, when you eventually see the new gauge, setting it up will be as easy as this.

var gauge1= new petesGauge;

gauge1.init({
  container: "myDiv",
  });


gauge1.value1(90);

Define a gauge, point it to a DIV at which point it appears magically – and then dynamically set a value which will slowly change in front of your eyes. No other information exposed to the outside world, no need to do anything other than set up an empty DIV and add a link to the Javascript compressed library.

Part of the magic here is in the encapsulation I’ve learned to handle – but also of course there are many defaults. In the top section you’ll be able to override defaults and turns things on and off if you want – and in the bottom section there will be several settable items – the value of two gauge needles, the value of set points, visibility of LEDs etc. All easy to use options.

I’m on the right path – I understand what I’m doing but I’ve only so much time to code this up.

If anyone fancies themselves a whiz at JS Objects, I’ve fathomed out how to get and set global vars in the object with simple methods – no problem but can i hell interact externally with internal vars – happy to have a chat with anyone interested in enlightening me.

jsFiddle helped me get this far but the best tool for the job IMHO apart from lack of formatting – is CodePen – you can make code changes dynamically and see changes in real time – what a difference this makes. Oh and I realised the one thing missing from my LCD display (not shown above) is the overspill of side lighting typically seen on real LCD displays. That’s coming soon.

New Toys: I’ve also discovered (thanks to MrShark) Atom this week which promises to be a great editor both in Windows and on my little SBCs.  My MINT installation, apart from falling to bits visually after a “sleep” operation, continues to function well on the laptop and I’ve received some nice new DIN rail brackets from China which can screw onto the back of a perspex sheet for mounting boards and supplies. More on all of this later. Incidentally for those wondering, my testbed wireless Orange Pi Zero and twin NanoPi M3 units are still sitting on the bench, still working perfectly despite disconnecting the WIFI several times deliberately.

Desktop Touch Controller: And on another subject, how is my Desktop Pi Touch Controller doing? For some time Desktop Controllernow I’ve had a 5” touch screen attached to a Raspberry Pi 2, using Node-Red Dashboard as a simple controller for my office – to turn lights on and off and keep an eye on temperatures etc.  Works a treat using Chromium in “kiosk mode” – but two things have annoyed me – one being that menu from Node-Red Dashboard – the second being the ability of the browser to fail occasionally due to connection issues and put up a stupid message instead of trying to reconnect.  Well, I may have cracked both of these as for the last few days the little unit has been sitting there rock-solidly doing it’s job.

The annoying Node-Red-Dashboard unwanted menu problem (well I only have one page on this unit – why do I want a menu) was solved simply by a reader who wrote in to suggest this added to the style.

#toolbar {display:none;}

Yes, that’s it – simple as that. Gone – space retrieved.

The second came from here. http://www.labs.bristolmuseums.org.uk/running-google-chrome-in-kiosk-mode-tips-tricks-and-workarounds/

So I have a couple of templates on the page – one at the top with my CSS and some useful Javascript – the second at the bottom.

I’ve added this to the top

<body onClick=”location.reload()”>

and this to the bottom.

<script type=”text/javascript”> $(function() { setTimeout(function () { if($(“#VisitorStoriesHelpText”).length>0){ $(‘body’).attr(“onClick”,””) } }, 1 * 1 * 1000);}); </script>

And yes, I know that body code is really not appropriate in a Node-Red template – but guess what… it seems to work. I’ve not had an issue with the display for days now. May be a fluke of course – but fingers crossed.

Facebooktwittergoogle_pluspinterestlinkedin
Viewing all 1391 articles
Browse latest View live