Quantcast
Channel: Scargill's Tech Blog
Viewing all 1400 articles
Browse latest View live

ESPURNA and SONOFFS

$
0
0

The reason for the title is simple – I’ve just had my first (favourable, exciting, even) experience with Xose Perez’s multi-purpose Espurna IOT firmware on some of my Sonoff power controllers.

SonoffRegular readers will know that I developed ESP-GO and usually flash either ESP-GO or Theo Arends’s Tasmota firmware onto my Itead Sonoff boards. Because of the FLASH size limitations on these Sonoffs and many similar units I’ve been gravitating towards Tasmota recently and generally it works well, controlling relays and handling MQTT communication with my Node-Red/MQTT based Raspberry Pi home control systems. I’ve been using release 6.6.0 of Tasmota since it first appeared but here we go – time for change?

I have however had some niggling issues with Tasmota. I started using it as back in my UK installation and being written in C++ and Arduino software-based, it handled hostnames on these devices no problem, something ESP-GO would not (being written in C, Espressif SDK-based). Recently in my installation in Spain, using Sonoff TH16, TH10 and DUAL devices, I could NOT get hostname resolution using Tasmota (maybe some recent changes) and also on those devices, though the latest Tasmota works including with Alexa, I’m not entirely happy about occasional temporary lock ups and minor issues talking to Alexa (certain friendly names don’t work too well)..

Only yesterday I had something of a game-changing day. I put the latest nightly build of Espurna (having heard there was an Alexa issue on earlier versions of this firmware) onto all three Sonoff devices.

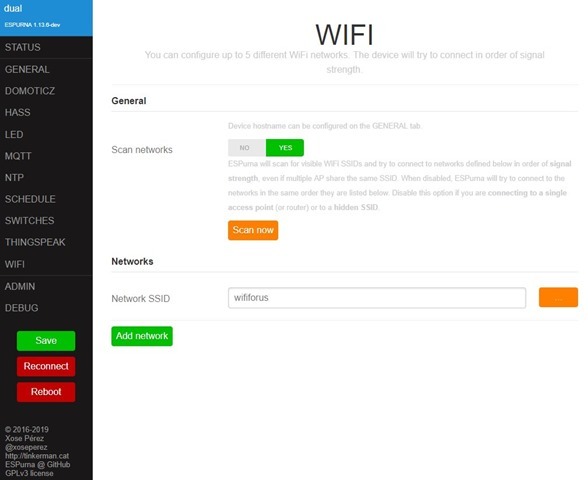
I have to say, in all cases the Espurna software works exceedingly reliably, the hostname lookup works a treat (so no more hunting around with “Advanced IP Scanner” on my PC looking for new devices recently added (never a lot of fun). I am controlling outputs, reading inputs and monitoring status on these devices easily. Installation was a breeze (trust me, I was ill last year and now have a memory like a sieve and less concentration than my cats), installation and use of Espurna has up to now been a sheer delight. I particularly like being able to add up to 5 WiFi access points based on best signal strength. My thanks to Mr Shark (Antonio) for pointing me in this direction.

What you see below is one of several web-based setup screens. They are all well done.

tmp8E51

I will no doubt write a LOT more on this subject soon – but first I need to get Espurna installed on more devices including Shelly and others. Being the end of the “far too hot” season in Southern Spain we’re planning some trips to the coast so I may be less active than usual for a short time. I do however have a BOATLOAD of new gadgets arriving soon to write about.

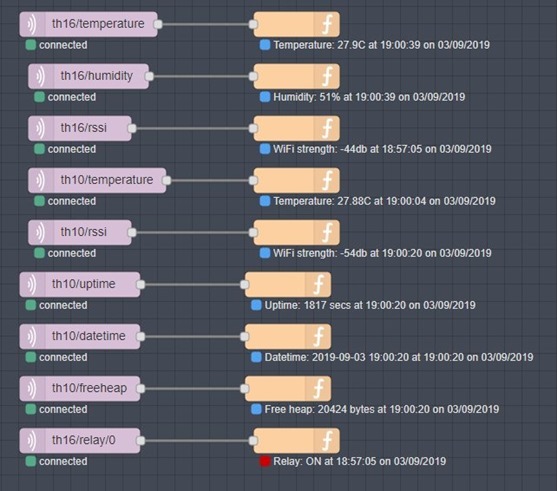
I’ve been having a play…

flow

That last function node uses one of my Node-Red global variables for time/date…

if (msg.payload==1) thecol=”red”; else thecol=”black”;
node.status({fill:thecol,shape:”dot”,text:  “Relay: ” + ((msg.payload==1) ? “ON” : “OFF”) + global.get(“handyDate”)});

Facebooktwitterpinterestlinkedin

The post ESPURNA and SONOFFS appeared first on Scargill's Tech Blog.


Node-Red Persistence Revelations

$
0
0

How could I POSSIBLY be so SLOW? For many months, after originally coming up with my own mechanism for making Node-Red variables persistent across power cycling – and then promptly forgetting about it, I’ve been conveniently ignoring the relatively new official way to do this…

This morning, just out of boredom I thought I’d have a read up… and…

Making this SIMPLE change to the Node-Red settings.js file inside the module exports section somewhere (in my case in /home/pi/.node-red folder) does it ALL.

contextStorage: {
      default    : { module: “localfilesystem”}
  },

That’s IT. So now, for any global for example, I just do this (below) in the first tab (at the top) of my Node-Red installation using an INJECT node to work once only on initialise. Unlike before, that init will only happen in the unlikely event that my settings file has been corrupted, normally no change will be made on boot as the variable will exist already.

global.set(“sidewallRGB”,global.get(“sidewallRGB”) || “255,255,255”);

Now, clearly the variables are automatically written to a file. to minimise SD wear this apparently is cached for 30 seconds so worse case if you lose power, you could lose the last 30 seconds of change… but that’s FAR better than losing all your values every time you reboot the Pi (or whatever).

I found THIS helpful discussion:

https://discourse.nodered.org/t/a-guide-to-understanding-persistent-context/4115

Facebooktwitterpinterestlinkedin

The post Node-Red Persistence Revelations appeared first on Scargill's Tech Blog.

Node-Red 1.0 b3 Woes

$
0
0

This one is only for Raspberry Pi / Node-Red fans. SORTED – so this is here to help others and maybe to encourage a better setup for I2C, serial and SQLITE3?

Until today I thought I was fully up to date with NodeJS and npm. I just happened to be looking at NotEnoughTech videos…

npm –v  produced npm 6.11.3
nodejs produced nodejs 10.16.3

i.e. pretty much up to date or so I thought.

I am of course using Node-Red 0.20.8 – the latest OFFICIAL release… and very happy with it… but…

So…

sudo apt-get update
sudo apt-get upgrade

So I followed the instructions at NotEnoughTech…

curl -sL https://deb.nodesource.com/setup_12.x | sudo bash –

At the end of that are instructions for installing the YARN package manager – so I duly followed instructions.

    curl -sL https://dl.yarnpkg.com/debian/pubkey.gpg | sudo apt-key add –
    echo “deb https://dl.yarnpkg.com/debian/ stable main” | sudo tee /etc/apt/sources.list.d/yarn.list
    deb https://dl.yarnpkg.com/debian/ stable main
    sudo apt-get update && sudo apt-get install yarn
    sudo apt-get install -y nodejs

    sudo npm install -g npm@next

    sudo npm install -g –unsafe-perm node-red@next
   

At this point I sensibly stopped Node-Red and started again – no way was it going to work. Setting.js was having none of it – something about i2c… so I tried…

    npm rebuild

After a lot of warnings (and I mean a LOT) from the sqlite3 install  –

I tried:

    sudo npm install -g –unsafe-perm node-red@next

Nope…

    npm install

No good- so I moved into the .node-red directory

npm install

More gripes about vulnerabilities….. and ultimately failure

I made sure node-red-was stopped…  and in the .node-red directory

    npm rebuild sqlite3

That took SEVERAL minutes to complete. I started node-red and…

SQLITE3 install FAILED “probably due to a problem with npm

Again in the .node-red directory

    npm install serialport
    npm install node-red-node-pi-gpio

At this point I was left merely with sqlitedb and sqlite failing
In .node-red/node_modules I wiped sqlite folders (rm -r sqlite  then rm -r sqlite3)

    npm rebuild sqlite3

NO problem this time.

Serialport seemed missing but it wasn’t stopping anything. Indeed the only thing not fixable seemed to be the dark theme. I commented that section in settings.js

I removed the serialport directory (same technique) from my .node-red/node_modules folder

This time  I tried in the PI folder.

    npm rebuild sqlite3

    npm install serialport

And everything WORKED – just i2c to go and that dark theme…

Hurray… a check of Node-Red and the dashboard showed all was well.

But no, although everything SEEMED to work and this was an almost up to date installation anyway (a 2 day old clone). I stopped NR and replaced the flow file in Node-Red with the one out of my current working installation. Everything seemed FINE.

See my desk light setup,  it’s a bodge right now as I’m working on replacing one light with another and hence running both..

msg.topic=”newred/toesp”;
var tmp=msg.payload;
if (msg.payload==”0″) msg.payload=”{rgbperm:0,0,0,0,128}”;
else msg.payload=”{rgbperm:0,”+ global.get(“deskRed”) + “,” + global.get(“deskGreen”) + “,” + global.get(“deskBlue”) + “,120}”;
node.send(msg);

msg.payload=tmp;
msg.topic=”relay_board/toesp”;
if (msg.payload==”0″) msg.payload=”{rgbperm:15,0,0,0,128}”;
else msg.payload=”{rgbperm:15,”+ global.get(“deskRed”) + “,” + global.get(“deskGreen”) + “,” + global.get(“deskBlue”) + “,60}”;
node.send(msg);

That first FUNCTION turns 2 boards and hence LED strips on and off – newred and relay_board.

This second function controls the colours…

global.set(“deskRed”,parseInt(msg.payload.substring(1,3),16));
global.set(“deskGreen”,parseInt(msg.payload.substring(3,5),16));
global.set(“deskBlue”,parseInt(msg.payload.substring(5,7),16));

msg.topic=”relay_board/toesp”;
msg.payload=”{rgbperm:15,”+ global.get(“deskRed”) + “,” + global.get(“deskGreen”) + “,” + global.get(“deskBlue”) + “,60}”;
node.send(msg);
msg.topic=”newred/toesp”;
msg.payload=”{rgbperm:0,”+ global.get(“deskRed”) + “,” + global.get(“deskGreen”) + “,” + global.get(“deskBlue”) + “,120}”;
node.send(msg);

They BOTH feed out to MQTT nodes – and on test I ALSO fed them out to DEBUG nodes.

These work a TREAT and thanks to NR persistence even survive power cycling….

Note that in one function the order as to which board gets  processed FIRST is opposite to that of the other function – not for any good reason.

A strange thing happened.. in Node-Red 1.0b3, both functions worked, both put out 2 results to the debug node….. but in BOTH cases ONLY the SECOND result was processed by the MQTT node even though both results sent out to the DEBUG node. As identical info went to the debug node and MQTT node, I can only surmise for now that somehow Node-Red 1.0s  handling of the MQTT node has changed – I’ve  no idea how this has changed but have reverted back to 0.20.8 for now.

Note that in the upgrade, at no time did any issues appear with the MQTT node…  this is a worry.

AND it gets easier to see the problem – but no easier to fix. Check out my Alexa handling..

tmp8E05

and the code..

global.set(“deskRed”,msg.rgb[0]);
global.set(“deskGreen”,msg.rgb[1]);
global.set(“deskBlue”,msg.rgb[2]);

var tmp=msg.payload;

msg.topic=”newred/toesp”;
if (msg.payload==”off”) msg.payload=”{rgbperm:0,0,0,0,128}”;
else msg.payload=”{rgbperm:0,”+ global.get(“deskRed”) + “,” + global.get(“deskGreen”) + “,” + global.get(“deskBlue”) + “,120}”;
node.send(msg);

msg.payload=tmp;
msg.topic=”relay_board/toesp”;
if (msg.payload==”off”) msg.payload=”{rgbperm:15,0,0,0,128}”;
else msg.payload=”{rgbperm:15,”+ global.get(“deskRed”) + “,” + global.get(“deskGreen”) + “,” + global.get(“deskBlue”) + “,120}”;
node.send(msg);

Turn on/off or change colour- only the second board is working….  but debug indicates both should work…

image

But only relay_board is working… so I’ll swap them around…

image

Colour change or on-off – makes no difference, though both sets of commands are appearing in the debug node, only the second set are being acted upon my MQTT.

And I just tested, splitting the function into two functions, both identical but for which board they are talking to – WORKS.

SO it is the twin node.sends that is the problem – but only for MQTT – not for DEBUG…

I even tried adding THIS to the settings.js file at the start – probably the wrong place…

runtimeSyncDelivery: true;

No effect. It is possible I put this in the wrong place…. someone tell me if I did.

It is now clear thanks to Nick at IBM – that the new async nature of NR 1.0 means that the first message could be reused BEFORE the MQTT node can handle the first one (debug will be a lot faster) – so the answer is to use a new message for the second SEND.

Facebooktwitterpinterestlinkedin

The post Node-Red 1.0 b3 Woes appeared first on Scargill's Tech Blog.

Node Red Alexa Remote2

$
0
0

To give this set of nodes their full title, the offering is known as node-red-contrib-alexa-remote2 and has VERY recently been updated.  For those of us who’ve been struggling controlling our home devices with various custom packages recently, the best option over the past few weeks seems to be node-red-contrib-amazon-echo – it works – I’ve blogged about it and so have others, but it could be better.

Then along comes THIS – read the link I just gave you. I’m still struggling figuring out what exactly to do with is – here’s where I’m up to – everything seems to work – as in – I’m not getting errors. Read this blog to avoid the timewasting I did this morning. If you;’re ahead of me, please DO comment or email and let’s make this blog entry an informative took instead of a puzzle.

Ok, so, prerequisites, you should have a device/gadget running a recent Node-Red, let’s say a Raspberry Pi 2 or 3 or 4. You should have an Amazon Alexa device – I have a DOT version 3.

You might want to turn things on and off as a starter… I do that all the time but I’ve not gotten that far with node-red-contrib-amazon-remote2.

Using the Node-Red”Manage Palette” command (top right) install node-red-contrib-alexa-remote2.

Done. Now you have to configure it. That info is here: https://flows.nodered.org/node/node-red-contrib-alexa-remote2.

As the gave me trouble for a few minutes – I’ll give you an EXACT example. Drag an “Alexa Routine” onto a nice new test flow (page) in Node-Red. In the right side of the “Alexa Routine” node’s “account” field, create a new account…  that is a brand new setup, the only thing that will be real here is your Amazon account – more on that soon. I’m assuming you have an Amazon account for your Echo and have already played with devices. maybe real ones?

tmpB3AFSo, in this “account” dialog box, is a field for an optional name – I didn’t give it a name. Next is a dropdown box called “Account”. I created a new “account” called “test2”. In there is an “auth method” and I left that at the default “proxy”. Then there is a field for “This IP”. It defaults to localhost which would be fine if your PI had a browser, mine doesn’t. I changed that to “192.168.1.19” – the local address of my PI. Next is “Port” – which defaults to port 3456. I chose (at random) 3457. I left the “file path” blank as it is optional. “Auto init” and “Events” I left alone.

“Service host” I set to the UK-recommendation “alexa.amazon.co.uk” and “Page” to the UK recommendation “amazon.co.uk”. I set the “language” field to the UK-recommendation “en-UK”. I left the optional “User agent” blank.

imageI closed that lot and I noted something about putting the IP number and port into a browser – it didn’t say WHERE (i.e. on the Pi or a PC etc) so this is where I save you time maybe? My PI has no screen attached. Above, I put in the internal IP address of the PI was working on… so now, in my PC, in my CHROME Browser I could enter “192.168.1.19:3457” – Bingo.

On my PC in the browser, using  the above link, I entered my real Amazon account and password and this dialog closed leaving a page in the browser saying this:

image

I went back to Node-Red and back in “Edit Alexa Routine Node” dialog with my “test2” account, I entered the recommended text “Hello world”… and in devices, I  selected my existing real DOT called “office dot”.

image

And that is where I am up to – totally LOST. No errors – the nodes say “ready” as you can see.

image

I picked the “echo forward node for no good reason – as I was looking for a “devices” node to create a new dummy device who’s output I could connect to a REAL device to turn it on – i.e. one of my ESP8266 boards I control by MQTT protocol. No such luck.

I was expecting some kind of node so  I could create a “virtual” device called, say “fred” and turn it on and off, the output of which I could feed via, say, MQTT to some real device. I’m sure you must be able to do this – but I’m not at that point yet. Over to readers. I’m sure it is obvious?

Facebooktwitterpinterestlinkedin

The post Node Red Alexa Remote2 appeared first on Scargill's Tech Blog.

Feeltech 6900 Signal Generator

$
0
0

You may have seen a recent comment from Peter Tennenbaum in my FY6800 review from last year.  His success at obtaining English documentation prompted me to get in touch with the company, the upshot being that the new FY6900 model is on it’s way. More on that subject in the coming weeks. Meanwhile a slight lull as I begin my travels to the UK.

FY6900

Facebooktwitterpinterestlinkedin

The post Feeltech 6900 Signal Generator appeared first on Scargill's Tech Blog.

DIRT Cheap Sonoffs

$
0
0

If you are into home control, then unless you’ve been hiding under a rock, you;ve almost certainly heard of Sonoff – Sonoff BASIC is their cheap power controller… recently upgraded to R3. Well, until September 30, Banggood have a VERY special price on the R2. I’ve been using these for ages and I’m out of them now… would you believe (shipped from China) £3.88 in pounds sterling or equivalent and FREE POST.

I only wish I’d spotted this earlier. I’m starting travel right now but I thought I’d better post this so someone else can benefit (remember September 30 is last day – I’ll be on the road and may not be able to kill this blog entry) and no I’ve not spoken to Banggood about this nor do I get commission. Here’s the link.

Facebooktwitterpinterestlinkedin

The post DIRT Cheap Sonoffs appeared first on Scargill's Tech Blog.

Rechargeable Desk Cooling Fan with Light

$
0
0

To give this lovely fan its proper title…  Wireless 3000mAh 2 In 1 Mini Cooling Fan 

Or: I love it: “Little Sunny Baldness Fan”.
Little Sunny Baldness Fan

And here’s the fan itself… Smashing job, 3 speeds and a white light inside. Lowest speed almost silent, overall quiet and it has no blades, just like an obscenely expensive Dyson.

3 Speed USB Fan with Light - RechargeableThe device is rechargeable and comes complete with USB lead and I’ve been running it all night, complete with light, without the lead.

My office tends to get stuffy especially when the soldering iron has been on – and this is just the ticket for freshening up the place. The unit is white. Note the two buttons, one to turn the light on and off, the other to control the 3-speed fan.

System alert: Over the next few days it may look like I’m on gadget overload,  in reality, I’ve just returned from Spain to a backlog of post so I’m doing my best to catch up, alongside replacing “everlasting” LED lighting around the house, weed-killing, entertaining and all the other things you do after 6 months AWOL. I have some really exciting gadget info to share.Facebooktwitterpinterestlinkedin

The post Rechargeable Desk Cooling Fan with Light appeared first on Scargill's Tech Blog.

Node Red 1.01 is OUT

$
0
0

Not only is there a new release of Node-Red i.e. 1.01 – I also noted there is some new video material to go with it. Congratulations to Nick O’Leary, Dave Conway Jones and others. If you’re interested, I suggest a look here… Much more later when I figure out how to enable photo transfer on my British Windows 10 PC. I could have sworn it did this without issue 6 months ago.

Facebooktwitterpinterestlinkedin

The post Node Red 1.01 is OUT appeared first on Scargill's Tech Blog.


A95X Android 9 TV Box

$
0
0

Ok, that’s done. I am more grateful than you might imagine for a speedy delivery from China – Banggood sent me the latest A95X TV box which is around £37 inc post right now. But perhaps the main reason I’m grateful is we just arrived back in the UK from our summer in Spain, minus either of our TV boxes. Had it not been for Banggood delivering the A95X earlier than expected, we’d have no TV right now as we abandoned aerials maybe 3 years ago and have been happily managing on Netflix and Amazon Prime (with subscriptions) and of course BBC iPlayer and a couple of other apps to fill in the blanks not covered by the above. Some readers might be interested in the likes of Showbox and similar.

Let’s get the links out of the way – you’ll find all the specs you could want in them and it saves me some typing…
A95X R3 RK3318 4GB RAM 64GB ROM 5G TV Box
More TV Boxes

To keep this in perspective, I’m no stranger to this kind of TV box as I already have the A5X and H96MAX boxes (neither of which support 4K) but this one is more up to date and I think the interface is cleaner – also it is cheap. I’ve had several in the past including terrible “Android TV” boxes (this one and my others have normal Android with a skin to make them easy to use for non-techies ( while retaining the full Android Playstore – important unless you’re happy simply with Netflix – that is no-where near good enough for me though I do use it and pay for it as they have some good content)

A95X

If this unit had been a duffer I’d be in REAL trouble with the wife, in fact, it offers a very clean interface not a million miles from the normal Android 9 experience (on which it is based – very much up to date at the time of writing) but simplified for TV use.

I won’t go into the 5G WIFI as I would not dream of connecting a TV box by WIFI – I’d rather use power-line Ethernet or “proper” Ethernet – I hear all sorts of stories about “lag” with other setups and systems – and I get none of it, here in the UK or over in Spain as I’m using the best connection I can manage – and bearing in mind that one of my connections drops to 5Mbps at times yet I’m still getting HD with that – and this box is working with and supporting my 4K TV here in the UK.

The link I gave you has all sorts of specifications in English so I’m largely avoiding re-inventing the wheel here. Note the built in media Player as well as the standard Android apps and there is enough storage and RAM to just keep on going.

Specs
This slim box has everything I need – see picture, pretty and Android 9, plenty of memory

If anyone wants to hear my gripes about (and final working solution for) geographical TV material restrictions – well that’s another conversation.

As for remotes, I find the likes of this cheap Ebay MX3 remote do the job well. As is often the case, the remote that came with the unit was a bit basic (no rear keyboard to ease password entry for accounts) whereas this unit has a full keyboard on the back.. I’ve had several of them from various suppliers over time. Here is a Banggood equivalent though I’m not sure I’ve bought one from them. Regardless they work a treat.. avoid the white back-lit versions which are similar but don’t work as well.

Media Remote from Banggood

Facebooktwitterpinterestlinkedin

The post A95X Android 9 TV Box appeared first on Scargill's Tech Blog.

Bakeey Glass for Pocophone F1

$
0
0

IMHO the most important thing next to having a sparkly SmartPhone is to have sparkly screen protectors to keep the phone looking new. If you follow the blog you’ll know I’m particularly proud of my Pocophone F1 and want to keep it in the best possible condition.

To that end I bought an all-around back cover to ensure that corners and edges were well protected. You would THINK that any old screen protector would do the job, but with such a back, what ACTUALLY happens with some of the screen covers I’ve used which offer edge to edge protection (bear in mind that like many other modern phones, the absolute edges of the screen are bevelled).

Bakeey Glass Screen Protector - Banggood

Well, the result of all of that is that up to now, my screen covers have ended up lifting at the edges over time. Not any more. I just received a couple of Bakeey™ 9H Anti-explosion Tempered Glass Screen Protectors (for Xiaomi Pocophone F1) – there will be similar models for other phones. These work a treat and they are inexpensive (depending on where you live, VERY inexpensive). See link above.

These protectors came complete with wipes, well packaged and have a single wide slot at the top. A perfect fit for my Pocophone. The ones I refer to above were slightly cheaper but these WORK.

Facebooktwitterpinterestlinkedin

The post Bakeey Glass for Pocophone F1 appeared first on Scargill's Tech Blog.

Blitzwolf BW-PF2 Type C Power Bank

$
0
0

And what is this you might ask? Well, I’m a great believer that you can’t have too many QC3.0 power banks (i.e. FAST charging). I use them all the time for our various Smartphones and also my Raspberry Pi units in the UK and in Spain.

This model is the “BlitzWolf® BW-P9 10000mAh 18W QC3.0 PD3.0 Type-c + USB Ports Power Bank” and it has a single type C input/output connector as well as a normal fast charge (QC3.0) USB output and comes complete with a short USB (one end) to type C (other end) lead.

Check out the stock photo and specs in the link above. I have nice things to say about Blitzwolf kits unlike some of the Ebay rubbishy power banks I’ve bought in the past.

Blitzwolf Power Bank

Here’s my own photo. The unit is neat, has rounded edges, satin black metal quality finish and has 10,000maH capacity (apparently – it may be while before I can prove that but in the past, Blitzwolf have not disappointed) and comes complete with manual. It also supports Apple 2.4A fast charge. Though not obvious in my photo there are 4 neat LED indicators.

The manual is in decent English, German, Spanish and Japanese and properly describes operation of the product. The LED area is also a POWER BUTTON. The unit is on charge but actually arrived almost fully charged which is nice.

Facebooktwitterpinterestlinkedin

The post Blitzwolf BW-PF2 Type C Power Bank appeared first on Scargill's Tech Blog.

Solar Wireless Car TPMS Monitor

$
0
0

This device – advertised as a Car Solar Wireless TPMS Tyre Tyre Pressure Monitor has turned out to be wonderful. See the photo of the device sitting on my car dash (2 brackets and an adhesive pad supplied – I used the latter) which also comes complete with manual and 4 tire sensors with a claimed battery life of 5 years. Note the lack of wires.

Here is one of the sensors which replace normal tyre caps, attached to our Honda, where they will stay for the next few months here in the UK, before being transferred to our little Spanish car in the spring.

Tire cap

So, what is special about this unit? Well, it charges from USB OR from the sun, so no wires needed. Indeed while working on another article and forgetting that I didn’t have a photo of the unit, I left it mounted on my dash as you see, collecting energy from the “sun” – I say that laughingly as I don’t think the Northeast of England has seen any sun this month – certainly not since I opened this unit – and yet, there it is after sitting in the car all morning, fully charged.

So, the wireless sensors outside on the wheels take seconds to mount – and I’ve done NO setup. I believe from the manual I can do lots and I will when time permits – but here’s the thing – when I got back to the UK last week, I came back with a dodgy rear right wheel which lost a lot of pressure (from 33psi to 22psi or thereabouts) in a matter of days – twice while over in Spain. The thing is, I didn’t trust the air supply gauges in the rural villages over there, I suspect some of them were last calibrated just after WW2.

I knew we had a problem with at least one tyre but I was not exactly sure of the scale. When we came back to the UK I went to a modern garage on the way up North, filled the tyre and measured all of them. Three were as they were supposed to be and then this TPMS monitor arrived from Banggood. It worked first time and this morning I tested the wheels (now fitted with the sensors) and as a result, we took the car to Quick-Fit who confirmed that just the one tyre was shot – a screw apparently – and sadly also confirmed that the tyre is not fixable.

The upshot of that was the purchase of two new rear tyres, arriving in a couple of days. In the future (we do a lot of travelling) I will be happily using this gauge to keep an eye on tyre pressures at temperatures and no longer worry about the accuracy or otherwise of rural petrol station gauges. Good gadget. One less thing to worry about. And no wires – that keeps Maureen happy.

Facebooktwitterpinterestlinkedin

The post Solar Wireless Car TPMS Monitor appeared first on Scargill's Tech Blog.

Cheap Water/flood Sensor

$
0
0

Most DIY type will at one time or another have pondered water sensing – I wasted lots of time with cheap resistive garden sensors a few years go before realising that galvanic current would eventually kill them, then I hit on the capacitive sensors – and even one controlled by Bluetooth – but that’s a different story. If you are interested in that – check out this link and this one and this one and… the list goes on. But I digress…

Water Sensor

Isn’t this PRETTY? Just as I was packing up to leave sunny Spain at the end of the summer, we had a very rare and serious flood in our village over there and I started to think about (more prevalent) floods back in the UK – between that affecting our (raised farmer’s field adjacent) rear garden and also my memory when it comes to filling the bath, I wondered if there was a NEAT, cheap and reliable solution for THESE potential issues. Just at that time I was looking on YouTube at Andreas Spiess (“the guy with the Swiss accent” who calls us all “YouTubers”) at a sensor he’d been playing with which is suitable for BOTH flood detection AND bath overflow (and most likely MUCH more) while being cheap, optical, waterproof and hopefully reliable.

I wrote off in a rush to Banggood and others in the hope that someone would come up with a sample for me to play with. As it happens the result was overwhelming.

EPT technology sent samples and some info on the FS-IR82B and you know that saying about a picture being worth 1000 words – well, here it is, below. Did you by any chance do refraction at school/University? If so then this should be obvious. If not, LEDs inside the unit bounce light around the surfaces back to simple sensors… all of this works when there is air on 4 sides but water is another matter.

Banggood came back quickly with this – 15mA 5V Optical Infrared Water Liquid Level Sensor.

This sensor is made out of sturdy-looking plastic. in my case with a short (0.5m) lead and 4-way connector. Andreas (above) tells you how to (simply) wire it up. In the case of the bath, easy – push through, using the silicon seal on the front and the plastic nut on the back – come up with an alarm mechanism…. in the case of a thick stone wall not so easy – but I’ll find a way. (‘m thinking of a plastic tube and silicon sealant right now. I’m sure I’ll find a way to get a signal back to Node-Red so my phone can alert me to floods when I’m not at home or stop the bath overflowing when I AM (but blogging when I should be paying attention to the bathwater) – others may pick a much simpler route.

Oh and Ralph S Bacon did a good video about basic use of this sensor.

To refer back to Andreas, according to Steve Lenehan, Andreas is using the low-cost tyre pressure sensor system I recently blogged, to monitor his beer brewing process – how about that for a spot of lateral thinking. I just took a quick look at his video.

So, now we have a solution… what’s your problem? Actually the more I think about this, why just water? Any liquid that does not damage the plastic? But again I digress.

Facebooktwitterpinterestlinkedin

The post Cheap Water/flood Sensor appeared first on Scargill's Tech Blog.

Sonoff Mini versus the competition

$
0
0

You can’t get away from it, the iTead products are cheap – and sometimes that is very important. But are they the best solution for Home Control? Well, that depends. Sonoff products have always been inexpensive. But bear with me.

At one time the company had a seemingly unbeatable grip on the DIY end of home control – their products which are based on the likes of the ESP8266 include Sonoff BASIC and variations. Not much use for more complex control but for basic on-off control, less than £5 sterling gets you a simple WIFI controller. Today there is some competition depending on your wallet and how much you want to spend on controlling a light.

Of course many of us are averse to using even more Chinese “cloud” or even more APPS – not in my case for political reasons but because I am a happy Raspberry Pi/Node-Red user – and I want to keep my home control working as much as possible even if the WIFI goes off – you can mitigate power issues by using battery backup, generators and other solutions but if your entire control system is cloud based, what do you do if the Internet service provider screws up?

Every IOT company seems to think you should use THEIR APP… I already have lots of different apps for my various watches – I don’t want any more for my home control thank you. Which brings us back on topic – Sonoffs. Sonoffs were the smallest and lightest cheap control box until along came Shelly. But on cost, Sonoff still have the edge – and on size, well, the new Sonoff Mini competes there as well.

Sonoff Mini

Shelly made some smart moves however – MQTT support and a nice user interface. Sonoff Mini has DIY mode and as I just found out that kind of works – though it needs fixing up. Cutting to the chase, this page has good info on using Sonoff Mini in DIY mode and within that is the Windows tool you need to set these units up in DI mode. The tool however seems like an unfinished demo.

So, grab a Sonoff Mini (not as cheap as Sonoff Basic but smaller. Last night after wasting hours following the WRONG info I got hold of the links above. The initial issue I had was this – often this kind of board has a user interface i.e. built in with a web server for initial setup – Sonoff Mini doesn’t.

Instead, they expect you to set up a router (or your mobile phone hotspot) with a specific SSID and password. That floored me initially as I was expecting to find that hotspot within the device itself. I took the approach of temporarily renaming one of my WIFI access points.

WiFi SSID: sonoffDiy
WiFi password: 20170618sn

So firstly I did the above, then turned on the un-altered Sonoff Mini – and used the EWELINK App on my phone to set the Mini to work with that access point. I then set the Mini to work with my normal access point. Easy up to now. Using the APP I upgraded the firmware of the Mini to v3.30 – you HAVE to do this as the stock software that came with the unit (v3.0.0) doesn’t support the DIY mode.

Next I turned off the device, opened it up (no screwdriver needed) and fitted the supplied “DIY” link to the two OTA pins inside – clearly marked. I put the top back on.

The instructions refer to a single flashing LED meaning you do NOT have a WIFI connection – a double flashing LED means you DO. I turned on the Mini and sure enough, I DIDN’T. WHY? Well, despite the really poor translations I eventually twigged that when you change modes to and from DIY mode and normal CLOUD mode, you lose any custom WIFI settings. Right, back to the special access point.

NOW I was COOKING. I grabbed the EXE program in the link above but frankly it is just not very good. Glaring problems (renaming the device doesn’t work, the popup dialog is faulty, changing access point options don’t show you the EXISTING access point etc. I changed the name of the Mini from the utterly useless default to myfirstmini. I also set up my normal WiFi access point.

Sonoff Mini DIY does not support MQTT natively, but it DOES have an API on port 8081 and if you get stuck into THIS page, you can supposedly easily make use of it. I had no joy. Strangely as a devout MQTT user I just recently spoke to my SHELLY 1 using ITS API – if you are a Node-Red user, that’s a lot easier than it seems. Essentially using the HTTP REQUEST node is a doodle.

HTTP Request

Thats the yellow one above. I’m controlling a relay on my heating system with simple on off commands and THIS is the setup inside of that node.

HTTP Shelly

In the Shelly I simply fire into that node a payload of “turn=on” or “turn=off”. Easy once you know how. I can also read the output of that node to see what came back… String(msg.payload.ison)

Bu that’s Shelly .

Thankfully what the otherwise poor Sonoff tool DOES manage is to let you flash the likes of Tasmota and Esurna – I’ve used both and I have to say, at least for the Sonoffs – for me, Espurna wins. As soon as I flashed the latest nightly build of Espurna onto the Mini – I lost all the settings as you would expect – I had to do the Espurna setup using (on my mobile) the access point now built into the Mini with Espurna to then set up my access point, ID, MQTT access and Alexa name – all of that is described elsewhere and is, compared to what I’ve just been through with DIY mode, a doddle.

More on working Sonoff Minis and Espurna soon. For now I’m happy I have a solution – and Alexa has a new toy to connect to. MQTT of course was simple but I decided to try the API out – so in the Espurna web interface I turned OFF the restful API and ON the http API. I used a Node-Red http request node, this time very slightly different format, in the URL I put:

http://espurna-mini/api/relay/0?apikey=xxxxxxxxxxx

(my default API key for that board) and in a pair of inject nodes – json payloads

{“value”:1}

and

{“value”:0}

respectively. Done, dusted – the request node can return the value only as a string – or lots more info as “parsed json” – and you don’t have to lift a finger for that.

Facebooktwitterpinterestlinkedin

The post Sonoff Mini versus the competition appeared first on Scargill's Tech Blog.

Uninterruptible Power Field Day

$
0
0

I’ve been messing with uninterruptible power supply issues for years and with Raspberry Pi and similar needing (only at leak of course) 3A 5v power, I’ve looked at various alternatives. Here’s a thought for motorists who are IOT enthusiasts as well..

I just solved the issue of the Raspberry Pi – purely by accident. We have a Honda that needs an EFB ( Enhanced Flooded Battery ) battery as it has auto start stop. The manufacturer fitted one of these (more expensive than run of the mill batteries). It got flattened and they don’t recover well from that – so in replacing it we fitted an AGM ( Absorbent Glass Material ) battery – better but more expensive – in our case we got a bargain – the price difference was only a tenner.

EFB
Typical EFB battery?

That leaves a free (and generally OK except in the cold) EFB battery (the garage was ready to bin it but I said no, it got us all the way from Spain to the UK but experience says it will fail in the cold when you least need a problem) – it simply goes a little low voltage when really cold and the car fails… but it will never get really cold in my office – other than that it is fine.

SO I bought a modern, efficient(ish) yet cheap 8A PWM charger that (apparently) can be left running permanently – £15 from Ebay – and a boxed down-converter to 5v at 5a also from Ebay and that SHOULD be the end of my Raspberry Pi worries (and while I’m on – the router – if it will handle a range of voltages around 12-14v).

Charger

Time will tell, my floor is full, but there is plenty of space 18″ down under my office desk – I’ve been wondering how to make use of the space and now I have an answer.

DC-DC converter
Facebooktwitterpinterestlinkedin

The post Uninterruptible Power Field Day appeared first on Scargill's Tech Blog.


The life of a solar panel

$
0
0

Here’s something you don’t see in the garden solar light adverts.. what you’re seeing in the frosty photo below is not untypical weather for the Northeast of England from November through February. When I  originally wrote this blog entry I’d had it up to here with cheap garden lights and was starting to move upmarket.

Last year we had several nights like the one in the photo below (rock solid ice in the morning) and the solar lights I blogged about last Christmas were and still are working a treat (more than can be said for most Poundland specials) and light up the garden only when movement is detected, running at a dim level at other times (and of course only when it is dark).

solar panels

As you’ll see elsewhere I’ve left  such lights (and much prettier ones) running in Spain for the winter and I have two of this model here in the UK Northeast about to enter their second winter.

But there is knowledge here to be gained if you have a minute. Check out the photo at the TOP of this blog entry. The cheap lights I’d always bought from Poundland in the past after realising that B&Q were a little over the top on price – but then in Spain I discovered that we don’t do too badly here in the UK, they are WAY more expensive in Spain as my neighbours and I over there recently discovered.

There are many designs at £1 sterling to £1.50 sterling per lamp – most are complete rubbish – plastic on plastic. We bought some sets for Spain with a frosty white  plastic finish – the plastic deformed in the Spanish heat. Avoid.

Tobago lights from Ebay

Meanwhile back in the UK, I found rock-bottom cheap solar lights such as the “Tobago” lights shown here. Typical B&Q price in sterling £1.20+ each light,  Poundland I think went bust…. Spanish price is typically similar to B&Q or worse.

I’ve had many of this (Tobago and similar, usually unbranded) design over the years (see top photo of a single light). From eBay I just bought 20 (2 sets of 10 lights) at 72 pence per light – had I bought 30 they would have been 68 pence each including free postage – unbelievably cheap.

Of course none of the cheap lights I  mention here last more than a couploe of years but here are some tips: Get lights with stainless bodies and clear lenses, glass if you can but they are usually plastic – which will not last anywhere near as long as glass.

Before I tackle problems, here’s a thought about operation. Small solar lights are basically designed to a price so there are limits.. especially in the UK where sunshine is at a premium. Try to give them as much sunlight as possible – and later in the day is better than earlier in the day even if that means less than ideal positioning. Usually these lights turn on BEFORE you really need them on, so if they’ve had no decent light since lunchtime they don’t last long before fading. Don’t believe the bull about not needing direct sunlight, they WILL give some output in cloud or shade but MUCH, MUCH less than when fully covered in direct sunlight.

Here’s a list of things which will go wrong in order of likelihood:

Firstly (before considering opening up) it is always worth cleaning the solar cell area and giving the lamp 5 minutes in the sun before digging deeper.

Battery connectors corrode (the lamp will not charge if this is the case, so clean the connectors THEN expose to the sun or a bright light for a few minutes BEFORE expecting to see output. Often this will FIX the light. After putting the battery back in place, consider WD40 on EVERYTHING.

The switch if fitted may have rusted connections. If so, and after checking the battery connection and refitting the battery, consider WD40 on everything.

Check that the battery wiring and solar panel wiring has not dropped off, resolder and cover everything in WD40.

The battery COULD (unlikely) be permanently dead but for the cost of these, is that worth progressing?

If the LED is badly corroded or the circuit is badly corroded you are likely to have a permanently useless lamp.

Some advise plastic sealant – this will fail just as the plastic did and is likely to make more mess than it is worth. I tried nail varnish on the corners of the solar cells. Ultimately failed every time – bright sun eventually kills most materials.

Facebooktwitterpinterestlinkedin

The post The life of a solar panel appeared first on Scargill's Tech Blog.

A Blitzwolf Weekend

$
0
0

Not a company I’ve ever associated with home control, Blitzwolf do some decent battery packs – but now they have a neat little IOT mains relay controller of their own.

So, first off the bat, another of their battery packs – the BW-P9 – this one has type C and microUSB inputs, Type C and USB A outputs. The unit outputs 5v at 3 max as well as the higher voltages associated with QC3 charging. As far as inputs current is concerned, the unit can take in 5v or 9v at 2A or 12 at 1.5A. Capacity is 10,000maH.

Blitzwolf BW-P9

The BW-P9 has 4 small white LEDs on one side and an on-off button on the right, rounded corners and overall looks pleasant. Model number and capacity are on the back, the front merely says “Blitzwolf”. The P9 looks substancial. And here’s the link – BlitzWolf® BW-P9 10000mAh 18W QC3.0 PD3.0 Type-c + USB Ports Power Bank

Out of interest, the company is based in the Netherlands as against the more usual China.

Possibly more of interest to IOT people, you’re pretty used to me talking about Sonoff devices – SONOFF® Basic 10A 2200W WIFI Wireless Smart Switch but the smaller Sonoffs have 10A relays(which means less than 10A in practice. It could be that the BlitzWolf® BW-SS1 3300W 15A Basic DIY WIFI Wireless unit at 15A could have a niche use.

BLitzwolf power controller PW-SS1

To start things off (any by the look of it to keep going – I checked Tasmota and Espura lists of controllers) – you need their APP (the manual comes in clear English. The Android Blitzwolf App looks ok. I had to pair with the device’s local network as usual then seconds later it was on MY WiFi network… BW-SS1. And using the Blitzwolf cloud. Adding to Amazon looks easy and OTA updates are straightforward – but that’s when I ran out of English instructions – nothing about non-Cloud use. That’s a shame but it might appeal to those with more limited technical aspiration.

Facebooktwitterpinterestlinkedin

The post A Blitzwolf Weekend appeared first on Scargill's Tech Blog.

Besiter 20,000maH Power Pack

$
0
0

This on’e a little more beefy than previous power packs I’ve recently looked at (I did sayI had a backlog). The Besiter 20000mAh QC3.0 Quick Charge Dual USB LED Display Power Bank is a solid-looking and only JUST pocket-sized battery pack able to handle type-C, micro-usb and full USB-S connections as well as being a Quick-Charge compatible battery pack.

The highest current output seems a little low for a large unit with a high capacity battery 2.4A at 5v down to 1.A at 12v (when doing QC3.0 charging),

The BST K6X comes with an on-off switch on the side (so no Raspberry Pi UPS function – but that is pretty much the norm) and a nice big LCD display on the front. The unit LOOKS big enough to support the 20,000maH claim and it is quite weighty – time will tell. It already charged my Pocophone F1 without breaking a sweat. The patterned finish you see in the photo is real, not a camera artifact. Quite nice.

Facebooktwitterpinterestlinkedin

The post Besiter 20,000maH Power Pack appeared first on Scargill's Tech Blog.

ijoou Smart Moxibustion Device

$
0
0

The ijoou-B02 is a USB-powered (5v-1amp) pearly white “Smart Moxibustion Device” made in China by Shenzen Baichuanai Technology – here’s their website

In short, two round heating units on which you fix replaceable adhesive pads (moxa patches) so you can stick the two units on your arms, back etc at the “correct acupoints” . You can press the button on each unit once, twice for gentle heat or three times for “hot heat”. Once I got of the floor laughing I decided to give the units a go (after USB charging of course).

ijoou Smart Moxibustion Device

At this point I could just shut up as it’s all on their website, but let’s go with it for a moment. The unit is described as a “herbal remedy for natural pain relief, hands-free, portable and easy to use”. I didn’t find the sticky pads that easy to use but that’s a minor detail.

There is a full user guide online as well as the leaflet you get with the unit and they have apps (the “ijoou” app) for Android and IOS. By this point I was itching to give the gadget a go but had to wait for the units to charge in their case – it didn’t take long for the colour bands to turn green, indicating a full charge..

I put them on my neck, pressing each of the two buttons until they turned cyan. After a while they warmed up a bit – good start, but when I realised I needed more than just something to warm my neck – I went off looking for the App – and that’s where it started to go wrong. For Apple users you go to the Apple Playstore, for Android users you go to their website which does not have a valid security certificate, but worse, there’s a download link that doesn’t actually work. At this point I gave up, partly because I could not get the app and partly as the stickers were beginning to fail. They should work on that,I’ve a fairly normal neck.

Well, there you go – another great idea that needs more work. Bu you have the link if you want to progress it so I’ve done by bit.

Facebooktwitterpinterestlinkedin

The post ijoou Smart Moxibustion Device appeared first on Scargill's Tech Blog.

A9 Mini WIFI HD 1080P Wireless IP Camera

$
0
0

Note: I’m having a re-think about this camera. I don’t think it is ONVIF compatible, the picture quality is variable and it seems to keep logging off then back in. It has just lot the job to my spare (and wonderful) Q8 camera. ACTUALLY, too late now but it was I believe down to power. I used a 200ma USB supply which the other (Q8) camera is happy with. Bringing the Q9 into my office it is reliable (even overnight) on a different supply able to manage (arbitrarily) 1 amp.

As some of you know I have various IP cameras dotted around both in the UK and Spain – just to keep an eye on things. I recently received this odd one from Banggood back in January 2019  – a miniature fish-eye type camera which connects as most do via an app – in this case the free Android App HDMiniCam and claiming H264 1080p.

Update October 2019: I thought I’d finally found a use for this little thing… I recently returned from Spain to the UK and in the not so distant future I’ll be going back. Brian Gentles apparently has this camera running on iSpy – I’m waiting to hear back from him.

Just because I can, I have security cameras everywhere but when I last headed off to Spain it never occurred to me to keep an eye on the heating system water pressure in the UK. Aidan and I were talking about this last night over dinner as I was pondering how to put a water pressure sensor into/onto the incoming mains water and to cut a long story short, this little camera can be magnetically mounted anywhere – in this case to monitor the manual water pressure gauge and control panel without invalidating any warranties – HOWEVER on experimentation, despite it’s undoubted small size I’m not 100% happy about the quality, at least in low light conditions. It was just fine on my desk but in a cupboard not so good. Take a look at the Q8 camera page.

The HD MiniCam app for the Q9 can handle multiple cameras as the thumbnails are quite small. My camera is white, not black.

tmp16

Well, the good news is, it works – it took seconds to connect to my phone via the free app though I’ve not tried a PC connection yet.  What I find interesting about this model is the size and the fact that it has it’s own rechargeable battery. Oh, and a magnetic stand. Here you see the fish-eye effect.

A9 Camera

Since starting it up it has worked 100%, plugged into the USB on my PC. The fish-eye view and inconsistent frame rate would prevent using this as a Skype webcam but then that’s not what it is intended for. Sound in and out is fine.

A9 cameraHere is the actual white camera. There are two clearly marked buttons – one for on-off, the other for setting up etc. Yes, the green and blue indicators are bright. One of these cameras would be easily hidden but for the bright lights. Underneath you see the magnetically attached stand who’s base is adhesive, not magnetic. I’ve not tested battery life yet.

The 150 degree wide angle fish-eye lens is as you can see here on the top. For actual use, I could see this going in the car, a lot less obnoxious than the camera I have now in the car and it could be used for recording minor accidents or near misses. Along with others of it’s kind, I’m not sure the magnetic connection would stand up to a severe accident.

The camera takes a microSD, not supplied. I happened to have a couple floating about.

https://goo.gl/sxYYyB
More Security Cameras — https://goo.gl/rxHohN

For general use in terms of value for money, my much larger Alfawise camera previously blogged about is better if ultra wide angle isn’t important to you.Facebooktwitterpinterestlinkedin

The post A9 Mini WIFI HD 1080P Wireless IP Camera appeared first on Scargill's Tech Blog.

Viewing all 1400 articles
Browse latest View live