Quantcast
Channel: Scargill's Tech Blog
Viewing all 1399 articles
Browse latest View live

Pocophone F1 with Pixel Camera

$
0
0

I’ve had (and used constantly) my Xiaomi Pocophone F1 for many months now and hence I can speak with some authority on the subject. For those unaware of this smartphone, it comes from Xiaomi who produce a range of phones as other tech gadgets of note. Though not their TOP phone, the Pocophone is something of a flagship product for them and it certainly stands out in several ways from the (rather large) crowd and has had many positive reviews. I last updated th firmware at the end of July 2019 to the July update.

Pocophone F1 by XiaomiThere are two main variations, one with 64GB of storage, the other with 128GB. As far as I can tell, the Pocophone is available in black, red and blue.

My F1 is 64GB and black. It would be nice if it was 128GB and red, but I was in a hurry when I bought it and I’m not REALLY complaining as I have a range of decent (and variously coloured) backs for the phone and in the unlikely event that I ever run out of storage I can always add microSD storage.

Those readers who store videos on their phones may feel differently. I tend to stream whatever I need.

Let’s get the important specs out of the way before I give you my opinions of this superb phone: 64/128GB storage, 6GB RAM, 4000maH battery with Quick Charge 3.0, Qualcomm Octa-core Snapdragon 845 processor at 2.8Ghz, Android 9, AI dual cameras on the back (1.4uM large pixel 12Mpx+ 5Mpx, 20Mpx front camera - so best of both worlds), HDR, panorama (I’ll stick with the important stuff and leave you to look up most of the gimmicks elsewhere),  4K video at 30fps, fingerprint and face recognition, 6.18” 2246*1080 screen, dual SIM, Bluetooth 5.0, USB C charging/data and 3.5mm audio jack, GPS+AGPS+GLONASS+BEIDOU, sensors include proximity, vibration, gyroscope, accelerometer, compass, hall, ambient light.

No NFC.

Links:
Xiaomi Pocophone F1 Global Version 6+64GB -- http://bit.ly/2IIKG9X
Xiaomi Pocophone F1 Global Version 6+128GB -- http://bit.ly/2V24DPH

Connectivity: You may see elsewhere, comments about connectivity. I can tell you my Pocophone F1 has had its time split between the UK and Spain, at first on GIFFGAFF in the UK and then in Spain for several months with EU roaming. After GiffGaff changed their roaming down to 2 months without a much as a warning and the cut me off part way through the month, I moved onto the Spanish SIMYO with UK roaming. NO dropouts or issues with mobile data or WIFI AT ALL – end of story. The ONLY problem with SIMYO was that they simply would not respond in English and I don’t speak Spanish – so ultimately I moved to HITS MOBILE. They respond in Spanish, German (apparently) or English and the service (at the time of writing I’m on my third month with them) and pricing are unbeatable IMHO.

The notch:   I look forward to notch-free phones once they are widespread. I’m not happy about the approach used in the Nubia X for example. Examples of phones which appear to eliminate the notch well include the Xiaomi Mi Mix 3 – a more expensive flagship from the same company (nice phone, Amoled screen, lower capacity battery, no 3.5mm headphone jack). In the case of the F1, you can now if you wish (in settings, full screen) darken the notch area and hence have rounded corners on all 4 sides of the screen while losing only a small part of the top of the screen..

Decent contrast is no problem on th Pocophone F1 LCDThe F1 uses an LCD rather than Amoled screen. In practice this only affects blacks which, as with all LCD screens are not QUITE as black as Amoled black. In this case the difference is marginal. I have devices with Amoled displays but For me, the jury is still out on Amoled as I’ve had various small displays who’s output has diminished over the months – this simply does not happen with LCDs. Of all the smartphones I’ve had over recent years, LCD display lifespan has yet to appear as an issue. The photo above was taken very late at night so don’t expect miracles.

So, importantly, the phone has all the hardware you need for (and this is the bit I enjoy) easy customising: the Pocophone has a very good camera, poor to average night photography, average panorama facilities but this is where customising comes into play.. thanks to the guys at XDA developers, the Pocophone ALSO now has a port of the Google Pixel 3 camera software which has decent night sight and a variety of panorama options thanks to the flexible Photosphere tools.

This panorama below was taken BEFORE the latest MIUI updates using an early version of the port of the Pixel 3 phone app for Pocophone F1 (6.1, I’m now using 6.2). I quite like this.Pocophone F1 with Pixel 3 camera appThe Pixel 3 as you may know STARTS at £589 at Currys and goes up to a stunning £819 at the same store, even though it seems to have a poorer front camera and smaller battery,

The Pixel 3 phone DOES have wireless charging but that’s a technology I can live without until it gets much faster and more powerful. All in, you can get the Pocophone F1 for around 1/3 the price of the Pixel 3 and still get a LOT of the benefits of the latter.

Just as well I held back on doing a write-up on this phone, however, as the Pixel 3 camera software transforms the image capabilities of the Pocophone camera hardware. In the above panorama in one of our local cafe-bars here in Andalusia. Using the Pixel 3 camera software I got the entire bar area in frame in a photo exceeding 5,000 pixels width.  In addition, the latest MIUI updates address comments you will notice elsewhere about the F1.

https://forum.xda-developers.com/poco-f1/themes/port-modded-google-camera-hdr-night-t3910336

You also can install custom Kernels onto the Pocophone F1 (which I would do if I had a spare Pocophone)

Videos - https://www.youtube.com/watch?v=57HMx7NCwrE and this https://www.youtube.com/watch?v=mHEAaZF0w6w – unlocking is, apparently simply a matter of applying to Xiaomi and waiting for 72 hours. None of that was needed for either the new 10.3.4 MIUI update or the Pixel 3 camera software.

The 10.3.4 OTA update (currently on 10.3.6) added 4K video recording at up to 60fps and added several other features such as “Widevine L1” certification which allows users to play high definition videos from the likes of Amazon Prime and Netflix.

Pocophone F1 displaying Attenborough on Netflix in HDI’ve seen reviews stating that Netflix is still missing HD (probably older reviews) which I found strange as I watched Attenborough on Netflix recently on the phone, in 16:9 format (and that was BEFORE the 10.3.4 update) and the quality was great if restricted to a 16:9 segment of the phone display until I twigged that I could expand it to use almost the entire image surface.

I should clarify that my Pocophone is regularly used both in the UK and (only a few weeks experience using it in the USA sharing mobile data from another phone and on WIFI at several locations – NO issues). Reader Joe Lippa contributed the following info:

For anyone wondering if this phone will work on their preferred network in their home country:

https://www.gsmarena.com/xiaomi_pocophone_f1-9293.php

NETWORK Technology
GSM / HSPA / LTE
2G bands GSM 850 / 900 / 1800 / 1900 - SIM 1 & SIM 2
3G bands HSDPA 850 / 900 / 1900 / 2100
4G bands LTE band 1(2100), 3(1800), 5(850), 7(2600), 8(900), 20(800), 38(2600), 40(2300), 41(2500)
Speed HSPA 42.2/5.76 Mbps, LTE-A (4CA) Cat16 1024/150 Mbps
GPRS Yes
EDGE Yes

Back to the display: Some may like the expanded view with rounded corners, others may stick with 16:9 – I would LOVE to show you a screenshot of the Attenborough episode above but it seems that Netflix have found a way to stop screenshots of streaming video hence the rather inadequate shot from my Panasonic camera above (video quality is superb). If anyone knows a way around this restriction – please do let me know.

Before leaving the subject of the camera apps, here is a summary of the modes available between the native camera and the Pixel 3 app: Lens blur, panorama, portrait, photo, video (inc. 4K video at 30fps and 60fps), night, square, Pro (manual white balance, F-stop, shutter, ISO), photo sphere, night sight, slow motion at up to 960fps, time lapse up to 60 seconds interval and options for H264 and H265. Finally tilt-shift and Google LENS. If I’ve missed anything, do let me know.

Pocophone update 10.3.4The manual upgrade to MIUI 10.3.4 caught me out due to omitted information in the simple instructions I read online, having grabbed the relevant zip file. In addition, in THIS screen (see right) you need to tap the graphic 10 times to enable additional features such as using local update files. This is NOT the same as enabling “developer” mode which is done in the usual way. It is also REALLY easy.

Once done, I grabbed the 10.3.4 file I’d downloaded from XDA Developers, put it in the “downloaded_rom” folder on the phone (I use ES File Explorer Pro) and the rest was automatic. Voila, 4K video at 60 fps with stabilisation and more. The list of features using the standard camera is now amazing.

As full screen minus the notch is now a standard option you don’t need “The Pixel Experience” rom for that any more.  I’ve had no WIFI or data issues either. Bluetooth also has been rock solid. Battery life is good, too.

The upgrade to (Android 9) Miui 10.3.4 includes Game Turbo, the March 2019 security updates, Face unlock support, new AI camera modes and a shedload of fixes as well as the improvements mentioned above. I’ve not had to root the phone or do anything complicated at all. I just tried out the face unlocking, I could not tell you how secure it is but I can say it works reliably in a a variety of light levels.

Shall we compare to Apple ?Why not, everyone else out there is.  Honestly, as an early Apple adopter, I just don’t see the continued fascination with the company who’ve done little real innovation since the iPhone and iPad other than to become incredibly rich, but millions apparently disagree, sufficiently to spend more than the cost of a PC on their phones.

One fellow put out a video comparing the plastic case of the Pocophone to the metal and glass structure of the iPhone. Well, back to reality, these beautiful structures more often than not end up fully immersed in a case to protect them from scratching, so what’s the point? There are some great cases for the Pocophone as well as glass fronts. Like mine, these can be so thin a to be un-noticeable while fully protecting the phone. For heaven’s sake guys you’re going to expect these things to last a few short years at most.

More features: with facial recognition and double-tap to turn on it has never been easier to start up a phone. I mentioned 3.5mm headphone jack. I didn’t know until now that the F1 ALSO supports type-C USB headphones (and obviously Bluetooth). What more could you want?

If you are reading from the USA you might want to check LTE support but PLEASE only do that by reading Pocophone reviews from March 2019 onwards (Andrew 9 Pie and at least Miui 10.2.3 – I’m on 10.3.4). In Europe, no such consideration is needed.

Performance? Technically, Pocophone benchmarks are usually not quite as good as iPhone even though the phone is a very fast performer. I’m not intensely into the very latest games and have never noticed any kind of lag.  I’ll leave such discussion to others.

I read one review suggesting the iPhone camera did a better job of “brightening up” camera images than Pocophone. What? Hasn’t anyone heard of Snapseed? What self-respecting photographer would be without that (free of course). Between the Google camera app and Snapseed, I can turn out stunning photos even in rubbish lighting – not that either are essential, I like to do the best job I can without lugging my big camera around.

Moors v Christians Celebrations in Cullar, Spain, courtesy of my Pocophone

As for iPhone and video at 60fps, see earlier comments about the latest F1 updates – sorted!

On the subject of RAM, I agree with Gary Simms (https://www.youtube.com/watch?v=9mkrtWg4c3E)– for typical users, 6GB should suffice for all but extreme cases. I have hundreds of Apps on my phone and maybe use a dozen or two regularly (4 or 5 of them several times a day)… no problem. I would recommend spending the extra on the 128GB storage if you store videos on the phone.

Facebooktwitterpinterestlinkedin

The post Pocophone F1 with Pixel Camera appeared first on Scargill's Tech Blog.


Solar HD1080P IP67 Camera

$
0
0

tmp83C3To give it the full title – Solar powered HD 1080p Wireless PIR waterproof security outdoor IP67 camera. This is the camera that Banggood just sent me to replace an ESCAM camera which would not operate reliably despite its other great features.

So, straight off the bat, I LIKE this camera, I also have a couple of MINOR gripes - no volume control on the sound… I like the idea of talking to the postman from thousands of miles away… .but to offset that – and there are ways around that (as I have a fully remotely controllable Raspberry Pi here in Spain) the camera, as well as being fully solar operated (it came minus batteries and I just fitted 2 cheap Lithium batteries  - it only actually needs one but I thought better safe than sorry)  is fixed lens and has a wide field of view complete with 2-way sound.

The first pleasant surprise was the App on my Android phone – dead easy to use – is called “I-Cam” – setup of the camera was trivial and I was surprised to see that the camera stores short video sequences triggered by the PIR into free cloud space (you can turn that off) even if you choose as I did, NOT to fit an SD.

Moreover, once I messed with some simple settings, on moving past the wall-mounted camera back into the house, the camera rang me up on my Android mobile phone and when I answered the call I was immediately greeted with video footage.

New camera from Banggood

Nice trick – I can have it ring me when I’m away from home or hiding in my office, on answering I can talk to whoever is visiting (like the postman) – or in the case of burglars, threaten to beat them to death.

Wall-mounting the camera is simple and they even provide a small screwdriver for the open-able battery compartment (the camera is solar but of course needs not-provided Lithium batteries for the dark).

New camera

HD quality looks good – and the price is ok too. Time will tell how well it works so I’ll come back to this – so far so good. The camera has it’s own access point mode in case it loses the WIFI.

Packaging was adequate, too.

Banggood packaging

Apparently July 31 is end of sale season. Be warned as is often the case, there are some really DUMB specs online. What the hell is "200w pixels" for example. Also "low-battery warning sent to your phone"... REALLY? Not much use if you are away from home, like, thousands of miles away. I hope that's just a translation issue. Such a camera MUST recover automatically from a flat battery. Don't expect to see much about this in other reviews.

Here’s the Banggood link: https://bit.ly/2Ouo5lc

Facebooktwitterpinterestlinkedin

The post Solar HD1080P IP67 Camera appeared first on Scargill's Tech Blog.

Diamond USB Wine Cork Light

$
0
0

As far as simple gimmicks go, this new one is a “corker”. As many of you know, I’m a sucker for LED gadgets and have them all over the place. The full title for this winner is (corrected English spelling) “Colourful Diamond Shape USB Rechargeable Wine Cork LED Bottle Light”. Good gimmick or WHAT??

 Cork lights

For my first experience, my neighbour Karin introduced me to the little white LED cork lights  - thin “rice wire” LEDs powered by 3 little batteries, in the form of a cork, complete with 1M or LEDs and suitable for empty clear wine bottles. Next, we discovered the same thing with 2 metres of wire and full colour, firstly red, green, yellow and blue. The novelty of changing batteries every day or two soon wore off as you can imagine. Learning curve three took us to solar powered versions with magenta, blue, yellow and green lights.

Cork lightsAside from having a stupid not-really waterproof switch on the side and a cork not the same shape as most wine bottles, this proved to be a winner. I have 6 wine bottles kitted out all over the place and now the entire neighbourhood is following suite – we ALL have them. What better way, given the powerful Spanish summer sunshine (or even the more lacklustre UK summer sunshine), to utilise empty wine bottles?

Cork lightsWell, as it happens, there IS another way – and THIS IS IT. You don’t even need the SUN. The subject of this blog entry is a USB-rechargeable cork with a diamond-shape light on the top and a white light to go inside any colour of bottle – now I don’t even have to recycle the GREEN wine bottles!!! AND instead of plastic, the variety of cork light featured here uses real cork – so a great fit to a typical wine bottle.

In case your next question is “price?” – these are DIRT cheap and good fun. I need MORE. New spelling for “manual” – “manule”.

Colourful Diamond Shape USB Rechargeable Wine Cork LED Bottle Light - http://bit.ly/30KC7jR

More LED Night Lights - http://bit.ly/2Ob3Zfp

Facebooktwitterpinterestlinkedin

The post Diamond USB Wine Cork Light appeared first on Scargill's Tech Blog.

RabbitMQ MQTT Broker

$
0
0

RabbitMQHere’s a guest post by my friend and collaborator Aidan Ruff. You’ll usually find him talking about his solar home in Spain or the kind of IOT stuff I do, in this instance, where I swear by Mosquitto MQTT, Aidan has always had a preference for RabbitMQ. Here goes:

When using “The Script” to setup a Raspberry Pi as an IOT controller, you have the choice to install Mosquito as an MQTT broker. Regular readers of the blog will know that an MQTT broker is the essential heart of the kind of IOT setups we usually discuss in here. Without MQTT, there iss no channel for ESP-GO! devices to communicate with each other.

Mosquitto is a great and robust broker, however, if you have software or hardware issues to diagnose then it would be great to have a graphical tool to help out. After all, we use a graphical tool in Node-Red to create control flows, but it is often difficult to see what’s happening as the various devices and nodes interact. Yes, you can cover your flows with debug nodes, but what if a device simply isn’t communicating? Where do you start?

There’s another message server that actually comes bundled with Raspbian called RabbitMQ-server. This is a message server that handles many different messaging protocols including the MQTT system that we all love. The great thing is that you can enable a web based management plugin to monitor messaging activity and change parameters very easily.

In MQTT, so long as each device has a unique message queue ID, you can use one MQTT login for everything. ESP-GO! devices base their message queue ID on the unique device name that ESP8266 devices have. However, I’ve gotten into the habit of creating an individual login for each and every device. RabbitMQ lets you look at all of the current logins and their messaging activities so you can see straight away if any particular device has (a) connected to the server and (b) what it’s doing. As a diagnostic tool it is way up there.

Getting started:

OK, first it is probably a good idea to install the latest version of RabbitMQ-server. If you’re not using a Pi, then you’ll need this anyway, so it’s probably worth going through the install route in any case. Below are a few lines to install the Debian package list, signing key and RabbitMQ-server itself:-

echo 'deb http://www.rabbitmq.com/debian/ testing main' | sudo tee etc/apt/sources.list.d/rabbitmq.list
wget -O- https://www.rabbitmq.com/rabbitmq-release-signing-key.asc | sudo apt-key add -

It’s probably a good idea to do a sudo apt-get update and a sudo apt-get upgrade at this point

sudo apt-get install rabbitmq-server
sudo rabbitmq-plugins enable rabbitmq_management
sudo rabbitmq-plugins enable rabbitmq_mqtt

So, now we have installed RabbitMQ-server and enable both the management and the MQTT server plugins. A next step is to add a user, although there is a default user called ‘guest’, password ‘guest’, I like to add one called ‘admin’ and then when everything is up and running, I normally delete the ‘guest’ user for security reasons. Here’s how we do that…

sudo rabbitmqctl add_user admin mypassword
sudo rabbitmqctl set_user_tags admin administrator
sudo rabbitmqctl set_permissions -p / admin ".*" ".*" ".*"

We’ve now added user ‘admin’ with a password of ‘mypassword’ (obviously, don’t use this one). We’ve then set its’ tags to indicate that it’s an administrator and set full permissions to the virtual server in RabbitMQ. In fact, I tend to make all users administrators, just so that I don’t get any access issues.

Setting up users:

Now we can go to the web admin page and set up some stuff. So, it’s at http://<my Pi Ip Address>:15672. So, if you’re Pi is at 192.168.0.10, you’d open a web browser to http://192.168.0.10:15672. Log in as ‘admin’ with your password and off you go.

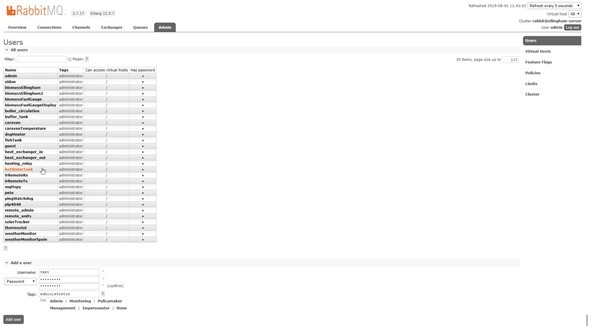
The first thing is to set some more users, so click on the Admin tab and you’ll see the ‘admin’ and ‘guest’ users – as I said, I tend to delete the guest user. Click on ‘Add A User’ and then enter a username, a password (twice) and then underneath the box marked ‘Tags’, click on ‘Admin’ and you’ll see ‘administrator’ appear in the Tags box.

Then click on ‘Add User’ and it’ll be saved – see image below:

Rabbitmq

However, we’re not quite finished as we need to give the user access to the virtual host – we did this on the command line for the ‘admin’ user.

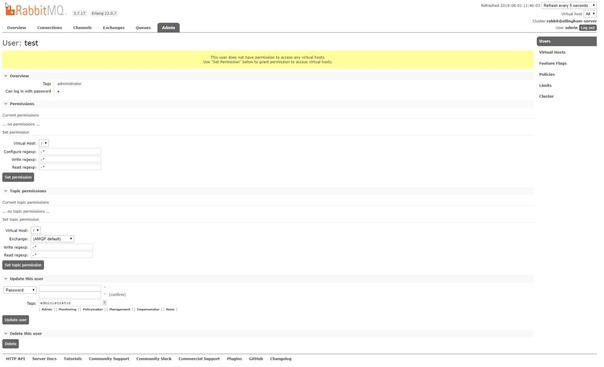
So, now click on the new user name which was ‘test’ in my case and you’ll see a screen with a yellow box indicating that the user doesn’t have any permissions yet. So, click on ‘Set permission’ and you’re done.

Rabbitmq

Click on ‘Admin’ on the tool bar to see the list of users. You can see in the screen shot above that I have dozens of devices set up. I use a fairly meaty server rather than a Pi for a lot of different things and my devices are spread across three sites and two countries. I do have a couple of Pis with an identical setup so that I can swing them into action if there’s a problem with my main server. I’ve done this by always using a domain name for my MQTT server in my IOT devices rather than an IP address so that I can simply change the NAT setting in my router to swing all of the MQTT traffic across to the Pi if a problem occurs. So, instead of using an MQTT server address of, e.g., 192.168.0.10, I have mqtt.myrouter.com (or whatever). I then set the NAT on the router for ports 1883 for MQTT and 1880 for Node-red to whichever server I want to be used.

RabbitMQ-Server has another useful facility in that you can create federations of servers whereby the servers can pass messages between themselves and other message brokers. This means that, for example, you could send messages to one server regarding data like temperature readings and they would propagate to other downstream backup servers, thereby preserving your precious readings in case your main server crashed or failed catastrophically or un-recoverably.

Message persistence

There’s another setting that also needs to be considered. By default, RabbitMQ-server keeps all messages transmitted. This is called persistence and after a while, it will become a problem as the message queues fill up.

This problem can easily be resolved by adding a couple of message queue policies to delete older messages. I set the persistence time to 60 seconds as if any device hasn’t picked up a message within a minute, there’s probably another problem which needs fixing.

So, click on the ‘Admin’ tab and then ‘Policies’ on the far right of the page.

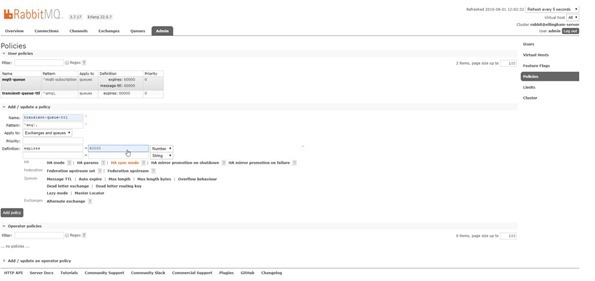
1. Underneath ‘Add/update a policy’, type a name for your first policy. Call it something like ‘Transient Queue TTL

2. Enter the pattern ^amq\.

3. Then select ‘Apply to’ and chose ‘queues’

4. Ignore ‘priority’

5. Underneath ‘Definition’, you’ll see a number of options. In ‘queues’ click on ‘Auto Expire’ and you’ll see the word ‘expires’ in the definition box. The next box to the right is empty. Enter 60000 (60 seconds in milliseconds) and then make sure that the drop box to the right has ‘Number’ selected.

6. Click on the ‘Add Policy’ button

You’ll see something like this:-

Rabbitmq

Repeat the above process with another policy called ‘mqtt-queue’ with a pattern of ^mqtt-subscription and an expiry of 60000, but also add another definition using ‘message-ttl’ – also set this to 60000 with ‘numbers’ selected. You can see both of those policies in the screen shot.

If you click on the ‘Queues’ tab, you can see that all of the message queues for the MQTT devices start with ‘mqtt-subscription. The pattern in each policy is just a Unix regular expression which matches up with the relevant message queues, in this case any MQTT queue. If you don’t add these two policies, the message queues will eventually fill up and your Pi will run out of disk space.

At this point, RabbitMQ-server won’t even start up and I imagine that a number of other processes that need virtual memory will also object…I tested this by doing a set of race-around nodes in Node-Red to fill up the message queues. It ended up sending about 6000 messages per second, which is actually astonishing when you think of it.

After a few hours the disk filled and it all fell over. I had to delete RabbitMQ-server and re-install it as I couldn’t figure out how to remove the message queues. No great deal, but to be avoided!

In conclusion, Mosquito is fine but in my personal opinion, RabbitMQ is way better.

Rabbitmq

Backing it all up

Finally, what happens if you want to replicate or simply backup all of the settings in your RabitMQ-server? Maybe you want to make a duplicate setup of just want a backup in case of a crash.

It’s easy to do a manual backup of all of your RabbitMQ users and settings by going to the RabbitMQ ‘Overview’ page. At the bottom of the page, there are two options marked ‘Import definitions’ and ‘Export definitions’ and just make sure that you back stuff up whenever you make a change. Or, you can do it the easy way and automate the process.

I have a Node-Red flow that does exactly that once every day. It also sends me an email to confirm that the backup has been done.

Node-Red flow

The ‘RabbitmqBackup’ node makes use of the command line tool rabbitmqadmin. If you ever need to setup a new server, you once everything has been installed once again you can then simply type ‘rabbitmqadmin import mybackup.json’ and then you are back up and running. The flows above generate a new file every day with the date embedded in the name. This means that if you completely cock-up an installation and it gets backup, you can always go back to a previous one.

Here’s the actual content of the flows:-

[
    {
        "id": "77bc89ae.3fa2f8",
        "type": "function",
        "z": "d70b0ab1.ce01b8",
        "name": "Rabbitmq backup filename",
        "func": "msg.filename = \"/my_backup_path/my_backup_\"+(new Date().toISOString().replace(':', '_').replace(':', '_').replace(/\\..+/, ''))+\"_rabbitmq.definitions.json\";\nmsg.localFilename = msg.payload;\n\n\nreturn msg;\n",
        "outputs": 1,
        "noerr": 0,
        "x": 600,
        "y": 260,
        "wires": [
            [
                "ae44c11d.e87cb"
            ]
        ]
    },
    {
        "id": "2c2bdf54.f02b7",
        "type": "exec",
        "z": "d70b0ab1.ce01b8",
        "command": "rabbitmqadmin export ",
        "addpay": true,
        "append": "",
        "useSpawn": "false",
        "timer": "",
        "oldrc": false,
        "name": "Rabbitmq Backup",
        "x": 350,
        "y": 360,
        "wires": [
            [],
            [],
            []
        ]
    },
    {
        "id": "586364c1.27d9bc",
        "type": "inject",
        "z": "d70b0ab1.ce01b8",
        "name": "Send at 6AM",
        "topic": "",
        "payload": "/home/pi/.node-red/rabbit.definitions.json",
        "payloadType": "str",
        "repeat": "",
        "crontab": "00 06 * * *",
        "once": false,
        "onceDelay": 0.1,
        "x": 140,
        "y": 340,
        "wires": [
            [
                "2c2bdf54.f02b7",
                "8b1a42da.0e7cf",
                "661da7e4.2d8258",
                "ebefaa2f.49e858"
            ]
        ]
    },
    {
        "id": "8b1a42da.0e7cf",
        "type": "delay",
        "z": "d70b0ab1.ce01b8",
        "name": "",
        "pauseType": "delay",
        "timeout": "5",
        "timeoutUnits": "seconds",
        "rate": "1",
        "nbRateUnits": "1",
        "rateUnits": "second",
        "randomFirst": "1",
        "randomLast": "5",
        "randomUnits": "seconds",
        "drop": false,
        "x": 340,
        "y": 280,
        "wires": [
            [
                "77bc89ae.3fa2f8"
            ]
        ]
    },
    {
        "id": "ae44c11d.e87cb",
        "type": "ftp in",
        "z": "d70b0ab1.ce01b8",
        "ftp": "ea2ed29a.98bf7",
        "operation": "put",
        "filename": "",
        "localFilename": "",
        "name": "FTP Backup",
        "x": 880,
        "y": 260,
        "wires": [
            []
        ]
    },
    {
        "id": "899a4ffa.af001",
        "type": "ftp in",
        "z": "d70b0ab1.ce01b8",
        "ftp": "ea2ed29a.98bf7",
        "operation": "put",
        "filename": "",
        "localFilename": "",
        "name": "FTP Node-Red Flows and Creds",
        "x": 630,
        "y": 420,
        "wires": [
            []
        ]
    },
    {
        "id": "661da7e4.2d8258",
        "type": "function",
        "z": "d70b0ab1.ce01b8",
        "name": "Node-Red Backup",
        "func": "\n// Backup the flows\nmsg.filename = \"/my_backup_path/my_backup_\"+(new Date().toISOString().replace(':', '_').replace(':', '_').replace(/\\..+/, ''))+\"_flows.json\";\nmsg.localFilename = \"/home/pi/.node-red/flows.json\";\nnode.send(msg); \n\n// Backup the creds\nmsg.filename = \"/my_backup_path/my_backup_\"+(new Date().toISOString().replace(':', '_').replace(':', '_').replace(/\\..+/, ''))+\"_flows_cred.json\";\nmsg.localFilename = \"/home/pi/.node-red/flows_cred.json\";\nreturn msg;",
        "outputs": 1,
        "noerr": 0,
        "x": 350,
        "y": 420,
        "wires": [
            [
                "899a4ffa.af001"
            ]
        ]
    },
    {
        "id": "ebefaa2f.49e858",
        "type": "function",
        "z": "d70b0ab1.ce01b8",
        "name": "Email Confirmation",
        "func": "var date = new Date().getDate();\nvar month = new Date().getMonth();\nvar year = new Date().getFullYear();\nmsg.topic = \" Server Backups\";\nmsg.payload = \"My Server backups done to ftp.myserver.com/my_backup_path/my_backup_ \" + date + \"/\" + month+1 + \"/\" + year +  \"<br>\";\nreturn msg;",
        "outputs": 1,
        "noerr": 0,
        "x": 380,
        "y": 520,
        "wires": [
            [
                "d36d27d1.9cbfb8"
            ]
        ]
    },
    {
        "id": "d36d27d1.9cbfb8",
        "type": "e-mail",
        "z": "d70b0ab1.ce01b8",
        "server": "smtp.gmail.com",
        "port": "465",
        "secure": true,
        "name": "myemail@mydomain.com",
        "dname": "Backup Confirmation",
        "x": 630,
        "y": 520,
        "wires": []
    },
    {
        "id": "ea2ed29a.98bf7",
        "type": "ftp",
        "z": "",
        "host": "ftp.myserver.com",
        "port": "",
        "secureOptions": "",
        "user": "my_ftp_login",
        "connTimeout": "",
        "pasvTimeout": "",
        "keepalive": ""
    }
]

You’ll need to have access to an FTP server on another machine, maybe your Windows PC or a back up Pi so that each can do cross backups. I use Proftpd for my FTP server as there’s a nice GUI based interface to control it known as GAdmin-PROFTPD

You’ll then have to enter your own credentials into the FTP node in Node-Red. This isn’t installed by default, but just add it using Node-Reds palette manager and then enter ‘ftp’ in the search box under ‘install’.

In conclusion, Mosquito is a great, simple messaging broker, but if you want something a bit more transparent and configurable, then you’d be hard pressed to beat RabbitMQ-server. It well be that we’ll add this an option to “The Script”.

Facebooktwitterpinterestlinkedin

The post RabbitMQ MQTT Broker appeared first on Scargill's Tech Blog.

Bakeey H8 Blood Pressure Diamond Bracelet

$
0
0

Bakeey H8Ok, so it isn’t real diamond, but the Bakeey H8 Blood Pressure Stainless Bracelet does a good job of looking the part for an inexpensive band.

My wife has a nice Mi3 watch – good battery life but a tad boring and like most of these cheap bands, it is plastic, no two ways about it.

Time for something different then.  Shipped from various countries, in my case as the cost was lower I had it shipped from China but delivery was still pretty good.

There are several models, they do black, bright silver or gold(ish). I went for the rose gold look in this case. It REALLY does look different to the other bands. I’m putting this up now as I think Banggood’s promotional sale ends August 4th.

We’re looking at heart rate, blood pressure, sport mode, turn light, alarm, sedentary reminder, sports, sleep, pedometer, anti-lost (whatever that means), find band and camera trigger.

Bakeey H8Like most of this kind of watch/bracelet, the reminders are not the most popular in the west: QQ and WeChat, I’d rather have Facebook and other popular system alerts and reminders along with Skype but then I have them on my phone so no big deal. The key thing about this bracelet is that it will appeal to the ladies who are not into plastic. If you want more info (and there is lots of it) check out the website in the link at the end.

The WearHealth App that you use with it (IOS or Android – QR code link in the manual) is fine and was DEAD easy to set up. I’ve set my daily steps expectation to 6,000 (because I’m not masochistic) and sleep target to 8 hours. More on this once I’ve handed it over to my good lady to hammer.

Charging cradleThe band can do continuous HR, there is an option for “lift to brighten screen”, call reminder and more. Measurements can be in metric or imperial. I have rather large wrists and I’m male so I’ll come back with more once I’ve handed it over to the boss. It is after all meant for women but I had to have a play first.

USB charging is easy – the band comes complete with cradle…


Bakeey H8 HR Blood Pressure Diamond Smart Watch Bracelet -- http://bit.ly/2LzdfYM 
More Smart Bracelets -- http://bit.ly/2XUwZg1

Facebooktwitterpinterestlinkedin

The post Bakeey H8 Blood Pressure Diamond Bracelet appeared first on Scargill's Tech Blog.

Dock Dock!

$
0
0

DockDock!I’m not really sure what to make of this one. A Paris-based start-up company with website www.dockdock.io just sent me a sample of their new product. The slogan on their website is “Make Your Tablet Great Again!”.

What you get for €28 is essentially 4 magnets that hold your tablet to your fridge door, along with a magnetic adaptor and 3 metre charging lead for your tablet with a LED light at the end.

The tablet end of the lead is micro-USB – I’d have thought offering USB-C as an option might’ve made sense.

Dock Dock!With the package you also get various clips and a companion Android App (that’s a link) which they say turns your fridge into a Smart Fridge using your tablet. Well, there it is, you have all the links above to progress this if you wish.

You do of course need your own laptop with power supply as neither these nor the fridge are included in the deal.

I’m guessing if you were thinking of mounting your old tablet on the fridge, this is an easy option and the website has lots of detail.

Facebooktwitterpinterestlinkedin

The post Dock Dock! appeared first on Scargill's Tech Blog.

Bakeey Watchstraps for Xiaomi Mi 3/4

Watchman Solar Powered WIFI IP Camera

$
0
0

My ESCAM solar camera arrived In July from Banggood (links below) – marked as ESCAM Model YN88-WIFI-130W and with the simple name “Solar Camera”. Much more on that lower down but first – here is it’s replacement – the “Watchmen” Solar WIFI Camera and what a beauty:

Boxed "Watchmen" Solar Camera

"Watchmen" Solar Camera from Banggood

The above “Watchmen” camera is the replacement for my original ESCAM solar camera which works just fine but appears less than 100% reliable in hot mid-summer Spanish sun.

Camera with controlsThe new camera turned up this morning and up to now I am OVER THE MOON. It comes complete with English instructions, WIFI antenna, much improved wall bracket, extension lead, USB lead (not that I expect to ever have to use either) and more. Setup with it’s “uBELL” APP (in the case of Android) could not be easier. ONE way to set it up is to use your phone to read a QCODE (one for Android without Playstore, one WITH Playstore) and iPhone.

I ran the scanner on my Android phone and hey presto, the APP installed. I turned the camera on with only it’s aerial attached, I made no attempt to charge it or plug it into anything and within minutes I had a working camera. A voice on my phone said to introduce a camera, a voice on the camera said it was ready for pairing. The APP wanted to know if I was inside or outside of China and invited me to select one of my access points and provide the password, along with a password to give the new camera.

Here’s a picture without the controls…

Camera output

And that’s about it. Compared to the original (easy) setup for the ESCAM camera detailed below, this was even easier. What can I say – HD video (1920*1080 max, lovely colours etc. Note the clear blue sky, not at all washed as with some cameras, yet there is detail in the shade from the hot sun) this just works - 2-way audio, adjustable PIR settings, white light and IR lighting via 4 powerful LEDs, recording (with visible timeline), snapshots, digital zoo and a VASTLY, VASTLY improved wall bracket over the original. Check out the Banggood link for more and read below the break for the full story. What you see above is a screenshot from the live video on the APP. This short video might be useful when it finishes uploading (Spanish rural broadband, who would have it?)…

See also after the break…

Original ESCAM camera which arrived here in Spain in July 2019

Original (July 2019) ESCAM Solar IP CameraWe’ve had great weather here in Southern Spain (unless you are working of course, in which case it is probably horrible) and the first  few days of testing out the camera were unbelievably hot even in the shade just as they are today on August 8, 2019. At first the ESCAM camera worked perfectly on its own (rather flimsy) bracket on our pergola for testing. It then then stopped twice in a matter of days,  I then took it out of the worst of the direct sun, it was fine with 90% battery after 24 hours of indoors and very little light. I then put it on a wall bracket outside but part shaded by our roof. But there is MUCH MORE to this story – so please read on – the camera has been replaced by Banggood and with reservations as I’ve only had it a day, I could not be more pleased.

I have two other (cheap) cameras which have not failed once in 2 years, but then they are not getting blasted with intense sunlight – I thought shielding the ESCAM camera from the worst of the sunlight might do it but no...

Resetting is easy, access panel open, switch to off, then on, seconds later all is well, however if this were to be used unattended then it would be no use at all. I’ve continued to test the camera in partial shade, it lasted more than 24 hours, the charge level looking great throughout. At the end of it around teatime it failed – again for no good reason. Banggood immediately offered to send a replacement.  In the meantime I put the camera in our pergola away from bright sunlight and the worst of the heat where it has performed flawlessly ever since (of course, being under the pergola limits what I can do with it and that bracket will have to go at some point.

When I finally gave up using this camera in bright sinlight as it would simply not stay on reliably, I emailed Banggood and suggested that this was a non-starter from a reliability perspective and made two suggestions: send me a replacement of a similar model from another manufacturer. They first chose the latter, which is up and running and I have to say, firstly excellent speed of response getting a new model here to Spain and secondly, up to now , weeks later, not a single issue impressed. See separate review.

Sizes, info and more pictures: suffice it to say for now that the ESCAM is a monster, running entirely off the sun and talking over WIFI. I’ve not plugged it in or physically connected it to anything. After being in transit for several weeks (thanks to a pretty useless courier mentioned elsewhere) and after getting only half an hour of sun, the camera came up straight away, IR lights running at full steam, it then lasted the night and was working perfectly the next morning morning.

image

Construction is mainly white coated metal.

The image was captured early morning – a screen grab – the actual image in the free App “toSee” (in my case on my Android phone) is WAY better than this screenshot. Not a lot to say as the setup took me seconds – “trivial” doesn’t do it justice.  The camera IS for outside use, DOES optionally record video (if you add a microSD card (up to 64GB card supported) – socket is under a plastic seal) – and by default it sends out alarm movement-triggered messages to my phone (after I installed the app which again took no time).

Apparently up to 200 short recordings a day means 70 days worth of recordings on SD before it starts recycling. As we’re likely to be out of the country for up to 6 months, I will be having a lot less daily recordings than that. It is not necessary to fit an SD card to use the camera. I’ve not fitted one yet.

Phone screenshot of WIFI cameraThere are of course many Chinese and other IP cameras out there (I own and use several of them) in the £30 arena – this unit is more expensive at around £85 (89 Euros inc. free post depending where you are) but if you don’t like or can’t have a power lead to the camera (you still need it to be in WIFI range) and you want something a little further upmarket without going overboard, then this camera might be ideal for you.

It produces a good quality image in colour or mono depending on the time of day and has it’s own build in IR lighting – all solar powered!! There is of course a wall mount metal bracket supplied (see comment) and if needed there is a longer lead to separate the camera and solar panel by several feet. I didn’t need that as this is now under my Pergola, watched by two regular WIFI cameras. So if anyone gets any ideas about stealing it – beware, you are on candid cameraSmile

Camera and lights on test

Solar camera and two garden lights (left solar light is full colour (more on that elsewhere – yes, colour choice is retained from day to day), middle solar lamp is a simple but powerful white solar twin flood, all on test… no wires anywhere. On the right above, the solar camera is on display with its internal 4,000maH battery capacity and default solar panel which is 2.2w.

Links below: No I don’t work for Banggood and I’m not on their affiliate program before anyone asks Smile

IP67 1080P HD Solar Powered Wireless WIFI IP Surveillance Camera
http://bit.ly/2Frnd8T
More WiFi IP Cameras -- http://bit.ly/2unR3pR

Facebooktwitterpinterestlinkedin

The post Watchman Solar Powered WIFI IP Camera appeared first on Scargill's Tech Blog.


Xiaow Q8 1080P IP Camera

$
0
0

V380This entry is about the Xiaow Q8 HD 1080p 360 degree panoramic IP camera with ONVIF support, InfraRed night vision and AI motion detection from Xiaomi Youpin. No, I’d not heard the last part of that name either. Here’s a stock photo to start the ball rolling…

These cameras turned up a while ago and have been running ever since but I forgot to write about them. Now is as good a time as any.

In short an inexpensive, mainly indoor IP camera with APP, V380 Pro, the QR code comes in the little manual that is supplied with the camera.

After a spot of fun setting the Android V380 Pro APP up, all was well, the cameras operate perfectly. However, the ad claims ONVIF compatible and that is where I had problems. I use ONVIFER and other ONVIF programs with several other cameras all of which work, this camera does not appear compatible.

Also the V380 Pro app that comes with these cameras returns the camera monitoring to SD mode when running in HD mode, i.e. very time I restart the APP the cameras revert to SD mode. I will write in about that.

Fridge CamLest I sound negative, I’ve been running both cameras 24/7 for some days now on my workbench and they’ve performed perfectly (staring at the walls) despite two power brown-outs and an unexplained house WIFI outage one day which lasted more than an hour. On later checking the V380 App, the cameras were operating perfectly.

R2D2 watching Fridge CamFor the purposes of making a nicer demo, this morning I down-powered one camera which I’ll now call “Fridgecam”, put it in front of the fridge in the living room and plugged it in. Voice: “System is starting”, “start-up is completed”, “WIFI connecting”,  “WIFI connected” as the little round head revolved almost 360 degrees and bobbed up and down for a few seconds,  Is that cute!! English is good with a very slight Chinese/American accent.

SettingsBack in my office, via the app, I adjusted the height and direction of the camera so as to get a half-decent shot, then it occurred to me that watching this camera with the other one might make for an interesting demo. I moved camera #2 which I’ll refer to as “R2D2” into the kitchen and plugged it in. After the start-up messages, R2D2 commenced it’s monitoring duties perfectly and is still doing so as I write this.

Settings in the App for each camera (I just happen to have two) include paid cloud storage options, network selection, video recording options including quality, SD formatting. video record quality (I chose HD and it stayed put, unlike the preview), audio record and event recording options, also optional continuous recording (that would need a big microSD or cloud package). SD formatting is also possible. The cameras operate from WIFI or a standard network connection

Device voice prompts can be turned on and off, language can be English or Chinese, IP can be DHCP or static and alarms can be turned on or off. There are arm/disarm options for intruder sensing but I could not see any sensitivity settings. Maybe I missed something or maybe that’ll come later with permanent HD preview?

For now, good gadgets!

Xiaovv Q8 HD 1080P 360° Panoramic IP Camera -- http://bit.ly/2Ob4A0D 
More IP Cameras-- http://bit.ly/2SsFdWI

Facebooktwitterpinterestlinkedin

The post Xiaow Q8 1080P IP Camera appeared first on Scargill's Tech Blog.

RPI4 Network Lesson for Today

$
0
0

I learned something new today (Aug 9, 2019)….

I’ve set up countless Raspberry Pi 2 and 3 SBCs over time, usually headless and using the file /etc/dhcpcd.conf to set up a static IP address, It works every time. Or WORKED every time. Read on for some hopefully useful info…

When I got my new RPI4, I upgraded my older systems to BUSTER, not one of the easiest things to do and indeed not recommended on the RPI-forums. (Use a clean installation, they say. GREAT unless you happen to have years’ worth of complex, only partly documented code on your RPI2 or 3. Well, I did it, the change is all documented on the blog – and of course when it came to setting a static IP address I  never thought twice about it. I used my Buster-upgraded installation several times on the RPI4 without issue.

That is until yesterday when, frustrated with a few packages of little relevance being “held back” by “sudo apt-get upgrade” or as I now call it “sudo apt upgrade”.

I discovered that if you use “sudo apt dist-upgrade” you get all the packages available. Following that by “sudo apt autoclean” gets rid of any old versions lying around and you’re all set.

I checked out two of my RPI-3 boards with this thoroughly up to date setup and all was well until this morning when I tried this on the RPI-4 – no IP address. I don;t use the graphical desktop and hence could not even see if the board was working.

Reluctantly I fitted a screen, keyboard and mouse to the Pi4 – and as user PI at a command prompt I then could play with the board (like I have nothing better to do). But nothing I did would bring up the Ethernet connection. I even checked /etc/network/interfaces as recommended by one chap on the web… No.

Then my friend Antonio reminded me that “the script” has a  couple of commented out lines that allow for permanent setting of graphical mode and vice-versa. I put the Pi into graphical mode and reset. That helped but still no Ethernet. In the setup on the Pi graphical desktop you can get a fixed IP address. I tried that – it WORKED.

The dist-upgrade seems to have enabled WICD – despite (according to Steve Lenehan in here) it being no longer supported. That being the case I’m happy to stick with dhcpcd.conf once I’ve disabled WICD which always worked in the past.

A file called “/etc/wicd/wired-settings.conf” – that exists in my older images but with  IP etc set to “none” – Antonio thinks that it might override “/etc/dhcpcd.conf” – has taken over from dhcpcd.conf  - I’m onto it…

Those two lines incidentally, commented out… below..

# you may want to use these on a Pi or elsewhere to force either a graphical or command line environment
#sudo systemctl set-default multi-user.target
#sudo systemctl set-default graphical.target
Facebooktwitterpinterestlinkedin

The post RPI4 Network Lesson for Today appeared first on Scargill's Tech Blog.

PIVPN and PI-HOLE

$
0
0

PIVPN

Before we start, here is a link to the PIVPN site http://www.pivpn.io/ also to Pi-hole: https://pi-hole.net/ and thanks to Loic74 - https://marcstan.net/blog/2017/06/25/PiVPN-and-Pi-hole/

Like most normal people I find the subject of backups and secure VPNs to be torturous and boring. I’ve covered backups elsewhere since discovering the absolute importance of being able to do them easily but only recently have I discovered the fun and relevance of having my own domain blocker to stop some of the ads coming in (PI-hole).

Recently, after months of on and off investigation into VPNs (mostly off) I stumbled across PIVPN. For the majority out there who are turned off by the subject… this is REALLY, REALLY easy and the PI does a great job of being a VPN server while doing other jobs. It also easily handles Pi-hole and hence can do blacklisting and whitelisting for your whole network.

While out in Spain for the summer last year I installed (doddle) PIVPN onto the Raspberry Pi 3 board (using Raspbian Stretch originally) I use to control stuff (and which is hence on 24-7) and more recently I’ve put these tools onto a Raspberry Pi 4 – after upgrading all my Raspberry Pi kit in Spain to Raspbian Buster. Go to the link above and you’ll see this is a no-effort-or-skill install. Oh, your router, you need to direct one port to the PI.

Pi-Hole on mobileI’m talking above about the “VPN SERVER” i.e. software that allows secure access to your stuff from anywhere (all your stuff).  I then put an “OPENVPN “client” on my mobile phone. This needed a “certificate” and in the past that has always filled me with fear.

“openVPN add”

on the Raspberry Pi. That’s it. Add a password and a certificate is generated. This is just a text file which you can copy to your mobile phone, computers etc. There really is nothing more to it than that.

Back in England, the novelty of talking to my kit in Spain on the mobile with lots of open ports soon wore off… so I put the OpenVPN “client” in my router so I could access Spain from any machine here with only one port redirection on the router. Sorted.

Last winter I did the reverse and installed PIVPN on a PI 3 while in the UK. One more certificate and I was done. I cannot overstress how easy this was. I’ve looked at all sorts of solutions and this can’t be beaten for ease. The Pi is not wasted as it too is on 24-7 doing other stuff.

Clearly, testing this while inside the network is foolish – so I turned off the WIFI on my phone and used my mobile data package for the test. Worked a treat. I could access all my network stuff.

So now, instead of having a shedload of open ports for various control and monitoring systems remotely, I only need the one. All of this is free – PiVPN is a great project as is Pi-hole!

PiVPN and Pi-hole

Putting PiVPN together with Pi-hole makes the investment in a Raspberry Pi a no-brainer – especially if that same Pi is running the home control and (for example) thermostat display etc. No reason you could not do ALL of this on a Pi2 but I’m playing safe as I want it to do a LOT so I use Pi3 and 4.

As I update this blog on my Windows 10 PC – Pi-hole has reduced the incoming traffic on the web by a large margin without me noticing any missing stuff. MARVELOUS and thanks to an idea from Mr Shark I’ll soon have the stats for that on the little OLED display I ALSO have on the Pi (though I wrote this para ages ago and promptly forgot about it).

While on the road on day in the UK late winter, I had the VPN client running on my mobile and watched the stats as Pi-hole protected my phone, reliability 100%

I’ve updated this blog entry as I’ve just discovered how to update Pi-hole… as user pi, simply “pihole –up”

And here is the official video for Pi-hole… https://www.youtube.com/watch?v=vKWjx1AQYgs – just remember, this stuff is free. MAGIC.

Enjoy..

Facebooktwitterpinterestlinkedin

The post PIVPN and PI-HOLE appeared first on Scargill's Tech Blog.

Huawei Honor Band 4 Smartband

$
0
0

tmp7494In this morning’s post the Honor Band 4 Smartband – and lovely it is too. It has a little USB charge lead that connects to the band and hooks to any USB supply. Sitting in the garden I just happened to have my sadly-no-longer-sold-by-Currys Mixx Charge Power Bank – and without rising from my seat, plugged in the band. Shortly thereafter,  the band had 80% charge and came up in Chinese but with a QR Code (how did we ever manage before these were invented) and so I told my Pocophone to scan the code and the next thing the Health App was on it’s way.

Next, I registered with the App and hit the + sign to add a new device, I told the APP I have the Honor 4. The band registered by Bluetooth immediately and next, I looked at upgrade options and was presented with the option to upgrade it’s firmware. I agreed and moments later, a fully up to date band operating in English. That reduced the charge to 70%, not bad as it was a big upgrade, Lovely and there is a UK hotline for the APP. I’m sure that applies to other countries, too.

This 0.95” AmoLED Colour touchscreen pulse band offers sleep advice, monitors heart rate, apparently checks swimming posture (and therefore must be waterproof – they claim 50m), has a glass front (that’s unusual), heart rate alarms and more. The English in the AD is bad so I had to figure out some of the functions (though I COULD have read the manual).with TruSleep OFF they claim 14 days battery, with it ON, they claim 6 days. I’ve not had it long enough to prove that either way. How about remote control for the phone camera, only available if you have a Huawei phone (why?)

The default strap is soft plastic but comfy.

As you can see, my SMS-handling band is the black one, I can see a swift purchase coming on to give me some variety or I should say to give my wife some variety. There are lots of bands in this class, so what makes this special? For one thing it works in sunlight and of course it is Huawei.

No blood pressure or oxygen levels in this band but then, a decent-in-sunlight screen is worth losing other features for.

I checked my pulse rate, that worked a treat. My neighbour has one of these and that’s what triggered me off, as she absolutely loves hers.

Huawei Honor Band 4 Smart Watch Bracelet -- http://bit.ly/2Ms47os 
More Smart Bracelets -- http://bit.ly/2MrVESg

Facebooktwitterpinterestlinkedin

The post Huawei Honor Band 4 Smartband appeared first on Scargill's Tech Blog.

Xiaomi Mi 4 Smart band

$
0
0

Xiaomi Mi 4 bandDespite the manual coming entirely in Chinese, on opening the box, I noted a QR code inside the manual and scanning that with my Pocophone, which then loaded up the Mi Fit App. I let the band (or rather it’s detachable central module) charge for an hour before doing anything – just as well as all I got was Chinese output initially. Once Mi Fit was installed on my phone this was sorted automatically

I already have a MI account but signing up is easy. Once signed in, the band started to display in English – job done. No ECG or Oxygen levels in this one – indeed facilities are basic – but the quality is good. As soon as the watch had charge in it, both the app and the firmware updated to the latest versions.

You can get the bands in a range of colours. The watch handles sleep monitoring, alarms, reminders, pulse checking and sports.   You can play music from your phone, and the charge claim is 20 days. Bluetooth is v5.0 and the watch is waterproof to 5m.

At 44 Euros this is not cheap but then here in Spain I recently bought an un-branded similar band for 26 Euros, took it to our local pool and that was the end of it. I do have a nice lime green band for this as a change from black.

Xiaomi Mi band 4 AMOLED Colour Screen Wristband -- http://bit.ly/2Gkktvh 
More Smart Wristbands -- http://bit.ly/2y2XXCO

Facebooktwitterpinterestlinkedin

The post Xiaomi Mi 4 Smart band appeared first on Scargill's Tech Blog.

MobaXterm Pro

$
0
0

tmp42CASome time ago, William Taur of Mobatek sent me the latest Pro version of their MobaXterm product, and very nice it is. Mostly in the past I used the excellent WinSCP but then I started using the free version of MobaXterm with great success. Excellent as it is, if you have lots of connections, you soon get tired of the limits to the number of saved sessions and so I’m excited to now own the Pro version.

Update August 12, 2019 - I now have version 12.1 thanks to an email conversation with Alicia Boschat of Mobatek.

MobaXterm for those who don’t know, is a Windows program which handles lots and lots of communication protocols including SSH (like WinSCP), Telnet, RSH, XDMCP, RDP, VNC, FTP, SFTP, Serial and many more and also has a range of servers including TFTP, FTP, HTTP, SSH/SFTP, Telnet, NFS, VNC, Cron and Iperf.

There is also a built-in package manager but I’ve not figured that out yet. All in all a sheer work of art. Read all about it on their site. They have other products but I’ll leave it with you to progress (or not).

https://www.mobatek.net/

Facebooktwitterpinterestlinkedin

The post MobaXterm Pro appeared first on Scargill's Tech Blog.

Gosund Smart Sockets

$
0
0

Gosund socketsA pair of Gosund Smart sockets turned up for me today.

These German smart sockets plug into your mains power outlet and allow you to control the output either locally or remotely by a variety of means.

Now, first off the bat these are not as cheap as the Chinese versions, they are made in Germany and at least to Spain I got rapid delivery.

There is an on-off manual override button on the top…. with a red light – OFF when off, dim RED when ON. I plugged them into the mains one at time after grabbing the Android App “Smart Life” – there is handily a QR code for this on the side of the boxes they come in.

As it happened I already had an account with this APP as I must use it for other stuff but that’s easy.

Next, I tested pushing the on-off button on the sockets – works as expected. Next I tried adding in the sockets to the Smart Life app – doddle.

Next I asked Amazon to find the units by name. It didn’t – then I noted that the “Smart Life” skill is needed for Alexa – the Amazon app on my phone asked for a password to enable the skill – done – dusted. Now Alexa could control the two sockets no problem.

Of course my next course of action was to ponder how Node-Red on my Raspberry Pi could talk to the switches…… normally I would FLASH such switches with Tasmota or ESP-GO – but it hit me that, as my Node-Red installation has Amazon cached speech (via my Amazon AWS  account and MPG123 – I put together a flow in here ages ago) I could have NR talk to Alexa. IT WORKED. Now, you might say “why bother as the sockets have their own time switches” – well, they DO have simple timers, but using my BigTimer on Node-Red, I can do something those simple timers can’t… that is dusk and dawn as well as special include/exclude days and months – in fact, almost anything except make tea.

All  in a very successful day. The GOSUND sockets of course do simple on-off only – but this setup was EASY. I’ve seen somewhere (out of stock) for UK and US plug variations but personally a I travel a lot I’ve settled on the EU standard for sockets and just use adaptors elsewhere (and American plugs are usually a bit nasty anyway) and increasingly we see universal sockets appearing that will handle various standards.

Facebooktwitterpinterestlinkedin

The post Gosund Smart Sockets appeared first on Scargill's Tech Blog.

Cubot X19 Budget Phone

$
0
0

Updated August 17 2019: The Cubot X19 smartphone arrived back in May, well packaged, complete with USB charger and lead (the ad describes charging as Type-C fast charge and with its own charger it does charge quite quickly)  and the first thing that came to my wife's attention was the COLOUR – she LOVES it.

At just over £100 sterling (with free shipping to the UK) and other destinations from Gearbest, while taking the low cost into account, this is a good value phone, still working perfectly after being in constant use for approaching 3 months here in Spain. This is not the first Cubot we’ve had but is definitely the best looking so far. The last one was also a budget Cubot and was flawless.

The Cubot X19

If you’re used to unreasonably tarted up studio photos, these un-retouched photos should be refreshingly real. The photo above is the X19 sitting on my desk, shot taken with my Pocophone and NO adjustments made.

CUBOT X19 : https://www.gearbest.com/cell-phones/pp_009932244816.html?wid=1349303&lkid=20442601

Check the centre of the image above – pin-sharp and IMHO just the right distance from the edge of the phone. I also want to show you the unique colour of the Cubot X19 phone back, underneath that clear plastic protector. Not sure I can do the variable “Twilight colour” justice – SO very much better than plain black. It’s….. LOVELY.

Cubot X19 Smartphone

Gearbest refer to the phone as the Cubot X19 4G Phablet. specs include 4GB RAM, 64GB ROM, 5.93” FHD+ screen, 16MP + 2MP dual cameras. The phone also comes complete with a SIM tool.

The unit originally came with Android 8.1 Oreo, MT6763T (Helio P23) Octa-core 2.5Ghz 64-bit chip, fingerprint sensor, face recognition and 4000maH battery. The Gearbest ad claimed (as did Cubot) that the Android would be upgraded to 9.0 soon. On June 25, 2019 An OTA version was available and I immediately had it running on the X19 – all is well to date with this phone.

Cubot X19 SmartphoneThe screen is a very reasonable (given the physical size under 6 inches) 1080x2160 pixels and the front camera is 8MP. At 4:3 aspect ratio the rear camera is 16Mpx. At 16:9 the images are 4096x2304.

Sensors include e-compass, fingerprint sensor, gravity, light sensor, gyroscope and distance sensor.

The phone handles 2 nano-SIMs or 1 nano-sim and a micro-SD card. Bluetooth is version 4.2 and the unit also has GPS, A-GPS, Glonass and voice. No NFC.

A question often asked about new phones at this time of year is: how does it work in bright sunlight?

Ok, so check this out, photo taken with my Pocophone of the Cubot camera looking at my Pocophone – if that makes sense. In VERY bright Spanish sunshine, the X19 screen looks just fine.

Networks include: GDM 850/900/1800/1900Mhz, WCDMA 900/2100Mhz, FDD-LTE B1/3/7/8/20 ; i.e. 4g no problem.

Of course, the phone also supports the all-important Android Playstore, has type-C USB and a standard 3.5mm headphone jack.

Here are a couple of photos taken with the X19 – again – NO touching up on any of these photos – which is very unusual for me.

And before you say that "iPhones have a different visual tone", it would have taken me a second to adjust that Spanish blue sky to any tone you like – using as usual the free Snapseed app or even the phone’s own editing tools. While I'm here, I've recently become a fan of Corel Paintshop Pro 2019 Ultimate... just thought I'd mention that. When I use these images elsewhere (i.e. not in a phone review) expect very difference colour and tone.

X19 Photo

and another photo…

X19 photo

As for WIFI and mobile connectivity on the X19, absolutely no dropouts on either WIFI or mobile. We are now running  the X19 phone with HITS as we've been in Spain for some months.

Battery life on the X19 is fine – I’ve seen worse in budget and not so budget phones. So you're looking at around a day's operation, maybe more depending on screen brightness (we always use full brightness). The X19 charges more quickly with the phone turned off.

Taking into account both screen and camera resolution, the X19 seems to represent very good value.

As you can no doubt tell, at the budget end, I'm a fan of Cubot.Facebooktwitterpinterestlinkedin

The post Cubot X19 Budget Phone appeared first on Scargill's Tech Blog.
Sonoff BasicR3 10A Power Controller

$
0
0

Sonoff BASIC R3I’m soon going to blog about the 16A Shelly One power controller and already this  summer I’ve written about the Gosund units, but regular readers will be aware that I’m a long-term fan of Sonoff and their various low cost controllers. Gosund have JUST confirmed that their current units will NOT support MQTT – and that they’d have to do some redesigning (I don’t understand why an OTA upgrade could not do that, personally)… No matter what, the Sonoff entry-level WIFI power control units are just cheaper than every one elses – it’s that simple. If only they’d all take MQTT as seriously a people like Arendst (Tasmota) and myself who have made replacement firmware for such boards. There are other good examples out there.

One of their most recent offerings (I got mine back in May but I’ve had a VERY busy summer out here in Spain) is the Sonoff BASICR3.

I have a pair of the BASICR3 units, one is on duty controlling my Hot Tub pump, the other is on my bench after suffering a mishap (my fault). I ended up replacing the on-off PCB control button – here it is…

I love these devices, what I’m not 100% convinced about is the firmware. I’ll go into that in depth when I have the (more expensive) Shelly One to compare with. For now, the new Sonoff Basic R3 has DIY firmware for those who don’t wish to use the Sonoff Cloud.

I flashed TASMOTA software onto these devices the old-fashioned way with an FTDI then upgraded to the latest Tasmota release using the Tasmota OTA facility. What I’ve not yet managed is getting the indicator lights right (feel free to step in and advise if you are familiar with putting Tasmota on these particular devices (I have one BASICR3 and one BASICR3 RF – the unit shown in the photos is the RF version – not that I actually use the RF facility as I run these on WIFI).

There are two LEDs on these devices, on mine, the leftmost is RED and should show the state of the relay, the rightmost is blue and should show WIFI connectivity. In fact right now I get only the rightmost blue light which is showing relay status. AND initial WIFI status. I need to get to grips with the Tasmota configuration (most likely the template option)

Sonoff BASIC R3

Here’s the BasicR3 with my )not quite long enough) replacement PCB button (the white glue is theirs, not mine).

Sonoff BASIC R3

Sonoff BASIC R3

Anyone familiar with the Sonoff BASIC will know that the new cases are quite an improvement.

Meanwhile, Itead continue to claim 10 amps capability, I continue to state that this means 10 amps non-inductive load and that you should not try to control a 10 amp inductive heater. Consult an electrician if in doubt. Right now, one of these units is happily controlling everything BUT the heater on my Hot Tub.

I ended up flashing these with Tasmota using the excellent NODEMCU Firmware Programmer http://www.nodemcu.com and or course, for putting in the initial WIFI configuration I use YAT – all on my Windows 10 PC.

NodeMCU

The rest is done in a web browser using Tasmota’s own web interface and finally onto my own Node-Red setup which includes MQTT. I’ve suggested to Itead that they include MQTT as a standard alternative to their cloud. Time will tell. I believe Shelly already do this but I can’t vouch for that yet as I only have second hand info on the Shelly – that will soon all change.

Facebooktwitterpinterestlinkedin

The post Sonoff BasicR3 10A Power Controller appeared first on Scargill's Tech Blog.
The Script

$
0
0

Regular reader will know about the script that Aidan Ruff and I originally developed to put Node-Red and several other packages onto the Raspberry Pi for our own home control purposes. This has been developed with help from several people and in particular my friend Antonio “Mr Shark”.

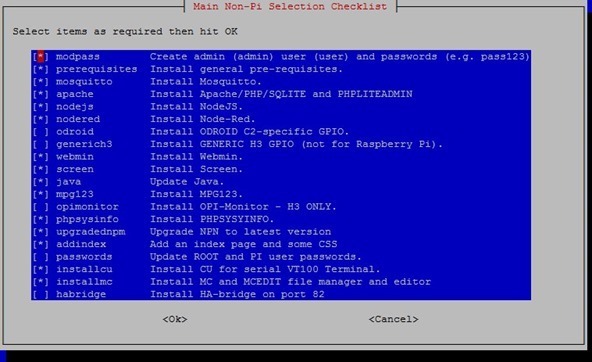
tmpFB70

WELL – here is the script which is intended to help set-up certain Raspbian, Debian or similarly-based SBCs which now includes logging and handling Raspbian Buster (tested on Raspberry Pi  2, 3, 3B+, 4 with Stretch, 3B+ and 4 with Buster). As well as it's original purpose of setting up a Raspberry Pi, the script also runs well with several other boards.  See right hand side of the above image for what the script does, given a basic operating system install.  We currently suggest NOT using this with DIET PI, original Pi or the Raspberry Pi Zero as we are no longer testing either and the latter pair are just TOO SLOW.

August 20 2019

Just made some minor changes as the world never stops…

July 21 2019

Many thanks to (in particular) Mr Shark (Antonio) and others for help in bringing the script (stored on Bitbucket – the July 20 2019 version) up to date to handle Raspbian Buster and the Raspberry Pi 4.

February 18 2019

Raspbian and Pi Zero Wireless – users have reported success with latest update but we’ve not tested.

The local Blynk server is not installed in the script – see this blog entry, note that I now use all lowercase for the blynk directory name.

Still using Apache but soon will change to NGINX – also whichever web server you use – if you plan to use node-red-contrib-amazon-echo – you might want to shift the working port for Apache (or NGINX) from 80 to 86. Do this in /etc/apache2/sites-enabled/000-default.conf (one reference to change) or if you ARE using nginx change /etc/nginx/sites-available/default – two references to 80 change to 86 (my choice). The Amazon echo hub in NR I then set to 8980 and rebooted. The next para is taken from “A Good Day for Alexa” blog entry:

I am using port 8980 to avoid being the hated Linux ROOT user and so now, on my Raspberry Pi 3,  I moved the web server to port 86 and using “iptables” have redirected port 8980 traffic to port 80 to keep Amazon happy while continuing to use port 8980 to keep Linux happy as PI user. All of this of course only matters if you want to use that particular node in Node-Red- with generation 3 DOT and similar Alexa devices.

sudo apt-get install iptables-persistent
sudo iptables -I INPUT 1 -p tcp --dport 80 -j ACCEPT
sudo iptables -A PREROUTING -t nat -i eth0 -p tcp --dport 80 -j REDIRECT --to-port 8980
sudo netfilter-persistent save
sudo netfilter-persistent reload

March 2 2019 - Just added a useful file/directory operations node to the installed Node-Red nodes along with the strangely missing node-red-contrib-influxdb node. Note that in order to use this you must have opted to install Grafana and Influxdb. Databases in Influxdb are added at the command line (I do this as user pi) simply by invoking the command “influx” and once in, using the commands “CREATE DATABASE mydatabase” followed by “exit”. All without quotes and using your choice of database name.

February 2019 – I’ve uploaded a new version with mods for Raspbian and in particular Node-Red and nodejs v10.x as currently used by the Node-Red guys on the Raspberry Pi.

Raspberry Pi users should log in a user PI and start with a clean Raspbian. Enable any hardware you want working before installing the script – like I2c.

Raspberry Pi users get the script in your /home/pi directory as below.  Non-Raspberry Pi users start in your ROOT directory as user ROOT, initially.

Here’s how to get the script – July 2019 version.

https://bitbucket.org/!api/2.0/snippets/scargill/kARod4/master/files/snippet.txt

Read on…

Originally designed to run under Debian – reader Antonio and I have also made the script compatible with Xenial in some cases. It now handles Raspbian and the Armbian versions of Debian and Xenial (Ubuntu). Today (July 2019) it is mainly being tested with Raspbian Buster (the current official Raspberry Pi operating system).

One issue I have occasionally with new boards is lack of remote root access to install the script. For example on a Banana Pi 3 I had this.. there was PI access for the likes of WinSCP but not root access. This was easily solved as user Pi - after using "sudo passwd root" to ensure I had a known root password.

sudo sed -i 's/prohibit-password/yes/' /etc/ssh/sshd_config
sudo systemctl restart sshd

That won’t work in all cases but I’m parking that here for reference.

The easiest way to get the pre-2019 script – as ROOT user, in your ROOT directory is:

wget --no-check-certificate  https://bitbucket.org/api/2.0/snippets/scargill/ekon6o/master/files/script.sh

This can now be run easily: bash script.sh – run as user root, it will start up, copy itself into PI user area, creating that if it does not exist then will give instructions.

Before I begin... no, we’re not a support shop – you may or may not end up having to tweak things for your system but please don’t write in to say “I tried this on a Mac and it doesn’t work”.

The level of interaction after the beginning is now almost zero thanks to a new menu-driven approach and many improvements. We continue to add/modify features as appropriate.

What is this about?

What we have here is an old explanation of how to get Xenial running in a VM – the purpose of this is merely as a base to test the script which includes installs and set-ups as below:

  • Node-Red at port 1880 and lots of useful NODES
  • Mosquitto (MQTT) with Websockets
  • NODEJS/NPM
  • Webmin at port 10000
  • Apache at port 80
  • HA-Bridge at port 82 (suitable for Amazon Alexa)
  • SQLite and PHPLiteAdmin
  • MC File manager and editor
  • Grafana with InfluxDB (only tested on a few setups – so OFF by default)
  • Lots more – see the menu screen

Typically this setup would be used as the basis of a nerve-centre to control and monitor home control gadgets such as the ESP8266 units we discuss in this blog, Sonoff controllers and much more. Armed with this software, controlling the home is easy – and more importantly can be done YOUR WAY.

The Virtual Machine

Let’s take a look at what we did to get this running on a VM – you can of course duplicate all of this as you go along. We used the excellent VMware of VirtualBox on Windows PCs. This explanation covers VMware.

So – first things first – as I’ve done a video of the VirtualBox installation complete with sample use of Node-Red, here we’ll discuss the VMWARE version.  Both of these were done as test mechanisms before using the script on real devices such as the Orange Pi Zero, Raspberry Pi, Odroid and other devices discussed at length in the blog.

We loaded up a copy of VMware (I used VirtualBox but the procedure is similar – VMware player is free of you can use the full commercial workstation) and made sure it works. That much is up to you. There is a wizard for creating new virtual machines -  we chose a CUSTOM machine. Steps from that point on were:

NEXT - NEXT – “I will install the operating system later” – NEXT
Linux / Ubuntu 64-bit – NEXT – d:\test  - NEXT
Number of processors – 1  - number of cores – 1 – NEXT
Memory for this machine – 1024MB – NEXT
Use Bridged Connection - NEXT
I/O Controller type LSI Logic - NEXT
Disk Type SCSI - NEXT
Create a new virtual Disk - NEXT
12GB (I used 16GB – 8GB would have done) – Store virtual disk as a single file - NEXT
At this point we gave the file a name – in our case d:\test\Ubuntu 640bit.vmdk -  NEXT – FINISH

Under settings – hardware – CD/DVD we ticked “Use ISO image file” and selected the file we loaded from the Ubuntu website – “Ubuntu-16.04.1-server-amd64.iso” – OK.

At this point you’ll note reference to AMD64 – that had me as well but it works a treat on INTEL hardware.

Start off the VM – you get asked which language to use (ENGLISH) and various options will come up – the first being “Install Ubuntu Server” – that’s the one.

Once again you’ll get a language question – English. Location – in my case “United Kingdom” – if you don’t fit into the rules use “Other”.

Time Zone in my case – EUROPE  and then country. Locale – in my case United Kingdom.

Hostname – we went with the default “Ubuntu” – but call it whatever you want.

At this point you get asked to create a user – it is important you make a user “pi”. Enter password also (though the new script will create user PI if it does not exist).

tmp6049Home encryption – we said no. When asked if the time zone was correct we said yes.

Partitioning – “use entire disk” (remember this is a virtual disk – not your real disk). You are then asked to confirm erasing disk – go with that. You then get asked to confirm AGAIN. YES.

HTTP Proxy just leave blank – CONTINUE.

Install security updates automatically.

Add OpenSSH server and CONTINUE (important for remote access)

Install GRUB bootloader – YES.

Installation is complete – CONTINUE. Let it run.

And voilà – one working copy of Ubuntu.

When run, the script will generate a Pi user if it does not exist - will make that user part of the correct groups and will ask you to restart the script as user Pi.

The BASH Script

This part is about running the script and the easiest way is to start in a terminal as user ROOT in the root directory.

do the WGET shown above and you will end up with a script file called “script.sh” in the root directory.

At this point BACK EVERYTHING UP to avoid disappointment – no, REALLY.

Execute as:

bash script.sh

The script will if necessary create the Pi user but either way will now ask you to log in as user pi and repeat the procedure in the /home/pi directory - i.e. bash script.sh.

The point of this is to avoid another way which would be to create a file, load in the script contents ensuring you’re using Linux LF only format – then run the script after setting up permissions – this way you don’t have to do any of that.

In the end you will see a menu which will vary slightly depending on which system you are using – you won’t be asked about GPIO on a Raspberry Pi for example.

tmpE673

For the VM we left everything as you see here and tabbed to OK.

At this point you will be asked for a USER and ADMIN names (which can be user and admin if you like) and corresponding passwords. From there on – everything should happen with no user interaction.

After maybe 15 minutes to an hour - or a LOT longer on a Raspberry Pi Zero WIFI   – you’ll see an invite to REBOOT – so REBOOT. When the board/VM boots up you will find hopefully a working system.

Assuming you've installed everything:

  • Node-Red runs at port 1880
  • Webmin at port 10000 (Webmin needs Pi or ROOT username and pass until we figure out how to add in the ADMIN user).
  • Apache runs at port 80
  • HA-BRIDGE will run at port 82 – It seems that Amazon Echo is quite happy with this but the Google product wants port 80!

Node-Red should include MQTT which will need admin username and password as will Node-Red itself. USER name and password is used by Node-Red Dashboard.

There is also the excellent MC – a file manager and editor.

MC and MC EDIT

I hope this brief introduction sets you off in the right direction and of course no doubt there will be discussing in the notes below.

Update 05 Jan 2017: At the time of writing I'm having issues with PIXEL in VirtualBox and DEBIAN on VirtualBox in terms of Apache not loading.. I'm sure we'll sort that - meantime some useful links.   Debian may not come with SUDO depending on which installation - here's a fix link that worked for me in my VirtualBox image.. If SSH setup won't allow remote access using passwords, here's a link that helped me.  Pixel of course will run in VirtualBox but by default it runs of a virtual DVD which is about as much use as an ashtray on a motorbike as nothing gets saved. Once running however it is a breeze to move over to the Virtual hard disk - you'll find that part way down the comments in this link.  So right now I have VirtualBox running Xenial, Pixel and Debian and the only issues I have are with Pixel and Debian - Apache - watch this space.  I’ve also improved the input for user and admin.

Important: Whatever you are using should have the SUDO command built in – it may not be obvious but Debian often does NOT have this installed by default – sort this FIRST. You should also make sure you have Pi user with SUDO group privilege – PI already has this of course and you may have added a user Pi – if not..

wget https://bitbucket.org/api/2.0/snippets/scargill/E5rG7/master/files/makepi
su -c "bash makepi"

Or, Here’s a useful link – takes seconds and is easy…  basically – as root you can do - apt-get install –y sudo….. and you should make sure that your PI user is part of the sudo group.

The script works with both NanoPi NEO2 and the NanoPi M1+ and features temperature monitoring and other improvements.

If doing this as a non-Pi user – i.e. ROOT on a machine with no Pi user – follow instructions above OR a slightly easier way…

Having uploaded the script and given permissions… as ROOT

./script.sh

as before – but when it has completed and wants you to log in as PI – stay where you are and:

su - pi -c /home/pi/script.sh

That might save you a little hassle.

Update 19 Aug 2017: Script updated to handle Raspbian Stretch on Raspberry Pi – tested on RPi 3. Also added code to help with non-root access to GPIO using ONOFF library. See blog entry on GPIO.

Facebooktwitterpinterestlinkedin

The post The Script appeared first on Scargill's Tech Blog.

Shelly One WIFI Switch

$
0
0

“Shelly One” is just one example of several open source products produced by a company called Shelly who are based, not as you might expect in China’s mega technology city of Shenzhen but in Sofia, Bulgaria. Shelly are not new and there are plenty of videos out there about their products – so I won’t bore you with the usual stuff.  I call them “Shelley” but I note that the box and their web interface footer state “Allterco Robotics Ltd”.

Suffice it to say that they make (or perhaps re-badge in some cases? Just a guess) quite a variety of products from relay switches, through energy switches to smart RGBW lights, flood sensors, temperature sensors and more.

Shelly One on Pete Scargill's bench

Today let’s just take a look at the “Shelly One”, a product that competes with my favourite smart switch (it is my favourite because it is CHEAP and because I prefer where possible not to help finance the likes of B&Q who are owned by Kingfisher PLC so really we are also talking about for Brico Depot, GoodHome, ScrewFix  and others) when it comes to automating my houses here in Spain or back in the UK.

Shelly One packaging

According to the box, the Shelly One features a 16 amp Relay unit , open source, AC 110-220v, DC 12v/DC 24-60v, WiFi 2.4Ghz, intelligent on/off, embedded web server and SSL connectivity. It also has (optional thankfully) a cloud service for remote access, services and backup.

My favourite  low-cost power controller then is the Sonoff Basic and it runs lots of gadgets around my house. powered by 3rd party firmware all of which talks to my Raspberry Pi based home controller which communicates with external devices over WIFI using a protocol called MQTT.

Many regular readers will be familiar with this. I also use Node-Red on the Pi but thanks to MQTT, that isn’t important as all the power devices need to understand is MQTT over WIFI. See my home control  and various other blog entries for more information.

So is Shelly going to displace Itead (makers of the Sonoff series of mains controllers who have been around for some time) on grounds of price? No, not a hope in hell.. but could they have some other advantage?

ComplianceWell, yes is the short answer. Whether that is enough for you is another matter. Here are a couple of points to consider. The Shelly One, like the Sonoff Basic has a relay output – you can turn things (lights, heaters, alarms for example) on and off via a variety of means in both cases. Sonoffs are cheap, have been around for some time and they have nice new boxes. Shelly One is smaller but the box is not so nice – there are a ton of differences but here are ones that matter to me.

Both Sonoff Basic and Shelly One can do more than merely turn things on and off but then in both cases it gets more complicated. We’ll skip that for now except to say the Shelly One has a non-isolated SW connection for, say an on/off button. Use by all means but don’t actually touch that screw terminal when the unit i connected to power.

Both companies – like everyone else out there have their own mobile APP and cloud service. Well, you must want to use ONLY THEIR APP as that makes like simple. Really? I’ve not come across ANY tech-type who would agree with this. WE all want to use a variety of products, ideally with a common control system, often of our own making. Who wants to use a dozen, incompatibly different remotes to control gadgets around the house? In my case do I really want to RELY on c cloud-based service “somewhere” in the world = or several depending on which device we are talking about?

Erm, no. I already pretty much have to use Amazon’s cloud or non-essential control such as speech input – and that is bad enough.

Shelly One and low-voltage LEDS as load using their own 12v supply

Is this an unbiased review? Hell no, I don’t review every product on the planet, only those which are cheap or for which I can easily get samples to actually test– on the OTHER hand, no I do NOT do affiliate schemes – I need my blog to remain independent and have done for several years. – and no I don’t have “guest” writers.  So, Shelly One – why this, why now?

Both Shelly and Itead now let you use third party “firmware” in place of their own cloud offering so you can use your own favourite control system. So no big difference there, except that installing such third party software may or may not be a problem depending on your software skills (or lack of said skills). There are several such alternative firmwares, the free Tasmota being as good an example as any.

One result of this flexibility is that you can then control their products by the extremely useful MQTT protocols.  With Sonoff and others, you need to install Tasmota or similar to enable MQTT access. With Shelly, you can merely issue a simple MQTT command to disable their own cloud service and use MQTT directly, no third party software required, all over in moments. Indeed after a quick word with my friend Antonio, I don’t even need MQTT, the REST API is a doddle to use in Node-Red but that is a whole other conversation.

I did not have to use an FTDI or any other hardware during setup (see FTDI picture below). Just a screwdriver.

No FTDI required

Also I just realised that unlike the Sonoff Basic (and others), the relay contact pair (N.O.) on the Shelly One is actually totally uncommitted and isolated from the rest of the board.  Most other smart switches common up the neutral line on the assumption it will make life easier for you.

For Sonoff Basic, should you need a completely isolated set of relay contacts, then a potentially messy soldering job is ahead of you. Some might say that this is not important to them – fair enough, often I don’t need isolation either (and with Sonoff “the price is right) but right now, I do need complete output isolation. In the more expensive Shelly One, no issue with relay contact isolation, no soldering, job done.

Why mention it at all? Well, I need to thermostatically control a heating system that needs an uncommitted contact pair to control it and as it is an expensive system, the les bodging, the better. With Shelly, job done.

See the photo of Shelly One at the top of this blog entry – live and neutral in…. also a switch connection (to LIVE – be AWARE of the live nature of THAT connection) to turn the output on and off manually and a normally open, isolated contact pair rated at 16 amps (make that 10 amps – Shelly do as everyone else and quote a DC maximum, a typical heater has a peak current that forces you to work well below their 16 amp spec – hard to be precise, shall we say 11 amps?

Others who quote 10 amp contacts should also phrase their adverts more carefully for the same reason. A 10 amp-rated output (Sonoff Mini and BASIC) should NOT be used to control a 10 amp heater – be similarly conservative and if you are not an expert, listen to someone who is.

Did I say that Shelly One is also very small indeed? 40mm diameter, 18mm high.

If you are happy to use a “cloud” in another country or install your own software (as I usually am) then there are lots of other blog entries including my own which cover this.

If you want to use the MQTT communications format WITHOUT replacing the firmware in such devices, you’ve come to the right place.

Here is my test setup demonstrating some of the points made above. I’m deliberately keeping this as simple a possible.

Once I received the “Shelly One”, I wired it into 220v main power here in Spain and immediately it provided an “access point” that my mobile phone could talk to (I told the phone to use the Shelly as an access point instead of my normal WIFI). I went into the Shelly’s setup page (on my phone browser) and told the Shelly about my WIFI and the WIFI password. From that point, I set my phone back to normal.

A quick check of IP addresses active on my home network showed that the Shelly was now available on the network. One more set of commands sent to the Shelly setup page disabled their company CLOUD access and enabled local MQTT access for which it needed the IP address, username and password of my local (Raspberry Pi-based MQTT “broker” i.e. the free and widely available Mosquitto.

From that point on I simply added 2 commands to my Raspberry Pi Node-Red screen – an “inject” node to turn the output of the Shelly ON” and another to turn it off. In the screen you will also see status monitoring – but that is just there for completeness.

On and Off - simple

Now I could easily turn the Shelly One on and off (of course in practice I’ll be using my BigTimer node to do that under schedule along with temperature monitoring (handled elsewhere) all without any third party firmware, – but was it safe to connect some system to the output that needs an isolated contact set? YES.

Simple MQTT commands - topic identifies the Shelly

See lit-up LEDS in the photo higher up – they are still here, I am still here, sure enough, neither of the two “Shelly One” output terminals are connected to the mains (as we say in the UK, others might call it the wall outlet) – and hence can be used either to control low voltage gadgets (who’s power supply may well have minus connected to ground) or something like a heating system which requires an isolated contact pair. Just beware that the manual override control on the Shelly One IS however potentially LIVE – no fingers, hence the simple red test lead you see at the right of the photo higher up. I can electrocute myself easily enough without ASKING for it.

Looking at the (Raspberry Pi + Node-Red-originated) MQTT command above you could well ask, is all that necessary? The long name in the “topic” identifies that particular Shelly device and the “0” is there (again in the topic as some Shelly devices have more than one output. In this case the (text) topic identifies the Shelly device and what type of command, the (text) payload covers the two options you have – on or off. Unlike some setups, this IS case sensitive. “on” works, “ON” or “1” does not – remember that to save some heartache.

While I’m here

I started this blog entry determined to talk only about the isolated relay and MQTT features of the Shelly One… but since I realised that the “SW” switch connector (which you fasten to LIVE) was operating in a momentary press mode, so instead of 2 presses turning the output on and then off, with the output initially ON, shorting the SW input to live would turn the output OFF and then releasing it would turn the output back ON. That’s NOT what I wanted and I was/am determined NOT to hook up their APP or Cloud.

I am therefore delighted to report some of the functions of the WEB interface. Simply pointing my PC browser to the internal IP address of the device opened up a nice web interface  with an ON/OFF switch, options to change the way the SW hardware input works and so VERY much more including (for those without Node-Red and my wonderful BigTimer) timer schedule options including dusk/dawn and more.

The Shelly automatically detected my time-zone which is necessary for dusk/dawn controls to work. When I took a look I remembered I’d already used this to set up my MQTT address and user name and password but at the time not fully grasped the potential of this interface. Expect more on this subject…

I did notice one setting to protect the web admin interface of the  Shelly with a user name and password. Did that, ensured the option was ticked and saved… nothing changed so I rebooted the device… I could still control it via the web without putting in the user name and password… including changing the default power up mode… have others noticed this???

“The Web Interface is now protected by a user name and password” it says -and I have FULLY up to date Shelly firmware.  At first I was unsure about this then realised I had two copies of the browser open and I’d left one attached to the Shelly web interface. Once I closed that, things improved. I DID end up having to close ALL browser tabs, related or not, in order to close off access to Shelly.Shelly One Security

Maybe I’m missing something but a “Logout” menu option might be useful for the terminally security-conscious.

I’m not going to get into the APP here but there are QR codes on the box for both the Apple and Android Play Stores.

Facebooktwitterpinterestlinkedin

The post Shelly One WIFI Switch appeared first on Scargill's Tech Blog.

Photo Apps

$
0
0

Deep Art Effects for Android and IOSIt just occurred to me that the sub-title of my tech blog infers anything to do with gadgets – and most sunny summer days  I find time to take photos, usually of gadgets but also of friends, scenery and local events. I do have a blog for photography – a relatively new blog and until today COMPLETELY forgot to add subscribe, log-in and log-out buttons.

Thanks to forgetting to give it a “subscribe” button” – I probably end up writing to myself most of the time. Anyway, the phone is a “gadget” – and regular readers know that I cherish my Xiaomi Pocophone. The same readers also likely know I’m a great fan of the Android “Snapseed” app which handles most photo processing “essentials”, despite being free. Well, my NEW photo toy is very cheap and called “Deep Art Effects”. More of that over on the photo blog.

Facebooktwitterpinterestlinkedin

The post Photo Apps appeared first on Scargill's Tech Blog.

Viewing all 1399 articles
Browse latest View live